Just us on Zion National Park Travel Guide as we explored the majestic rock formation carved by the Virgin River, took in the breathtaking view from the Canyon Overlook, and hiked the Emerald Pools.

Our family took a trip to Utah and Arizona during children’s spring break to visit the National Parks and other nearby wonders. It’s been a dream of Nami’s to visit Zion and Bryce Canyon National Park for a long time. In case you’re not aware, Nami’s dream job when she first came to the US was to be US National Park ranger. You can read about it in our Yosemite National Park Travel Guide post.
For this travel series, we’ll share the following posts.
- Zion National Park Travel Guide
- Bryce Canyon National Park Travel Guide
- Lower Antelope Canyon Travel Guide
- The Wave Lottery, Glen Canyon Dam, Eating, and other Activities
Ready to go explore awe-inspiring landscapes with us? Let’s go!
Watch Zion National Park Highlights
Just us on Zion National Park Travel Guide as we explored the majestic rock formation carved by the Virgin River, took in the breathtaking view from the Canyon Overlook, and hiked the Emerald Pools.
Getting to Zion National Park
Zion National Park is about a 3-hour drive from McCarran Airport in Las Vegas. The scenery along the way is beautiful and unlike anything we’ve seen before. It makes the drive go by pretty fast. To maximize our travel day, we took a very early flight from San Francisco (6 AM) so we can do some activities on the first day.

It was still pitch dark out when we boarded our flight to Las Vegas.

Viva Las Vegas!

The scenery once we got out of Las Vegas.

Almost there! Interesting rock formations are everywhere you look.

Welcome to Zion National Park.
Zion National Park Highlights – Zion National Park Travel Guide
- 3rd most visited National Park (4.5 million visitors in 2017)
- Unique Geographic features – the Grand Staircase
- Easy to get to
- Slot canyons
- Spectacular sceneries throughout the park
Zion National Park – Travel Tips
Before we sharing the details of the Zion National Park Travel Guide, here are our tips in case you plan on visiting.
- Visit the park during off-peak and avoid the holidays. When we visited there was no wait for the shuttle; however, we overheard during spring break the line to board the shuttle is over 1.5 hours long. The shuttles run at very high frequencies, 5-7 min.
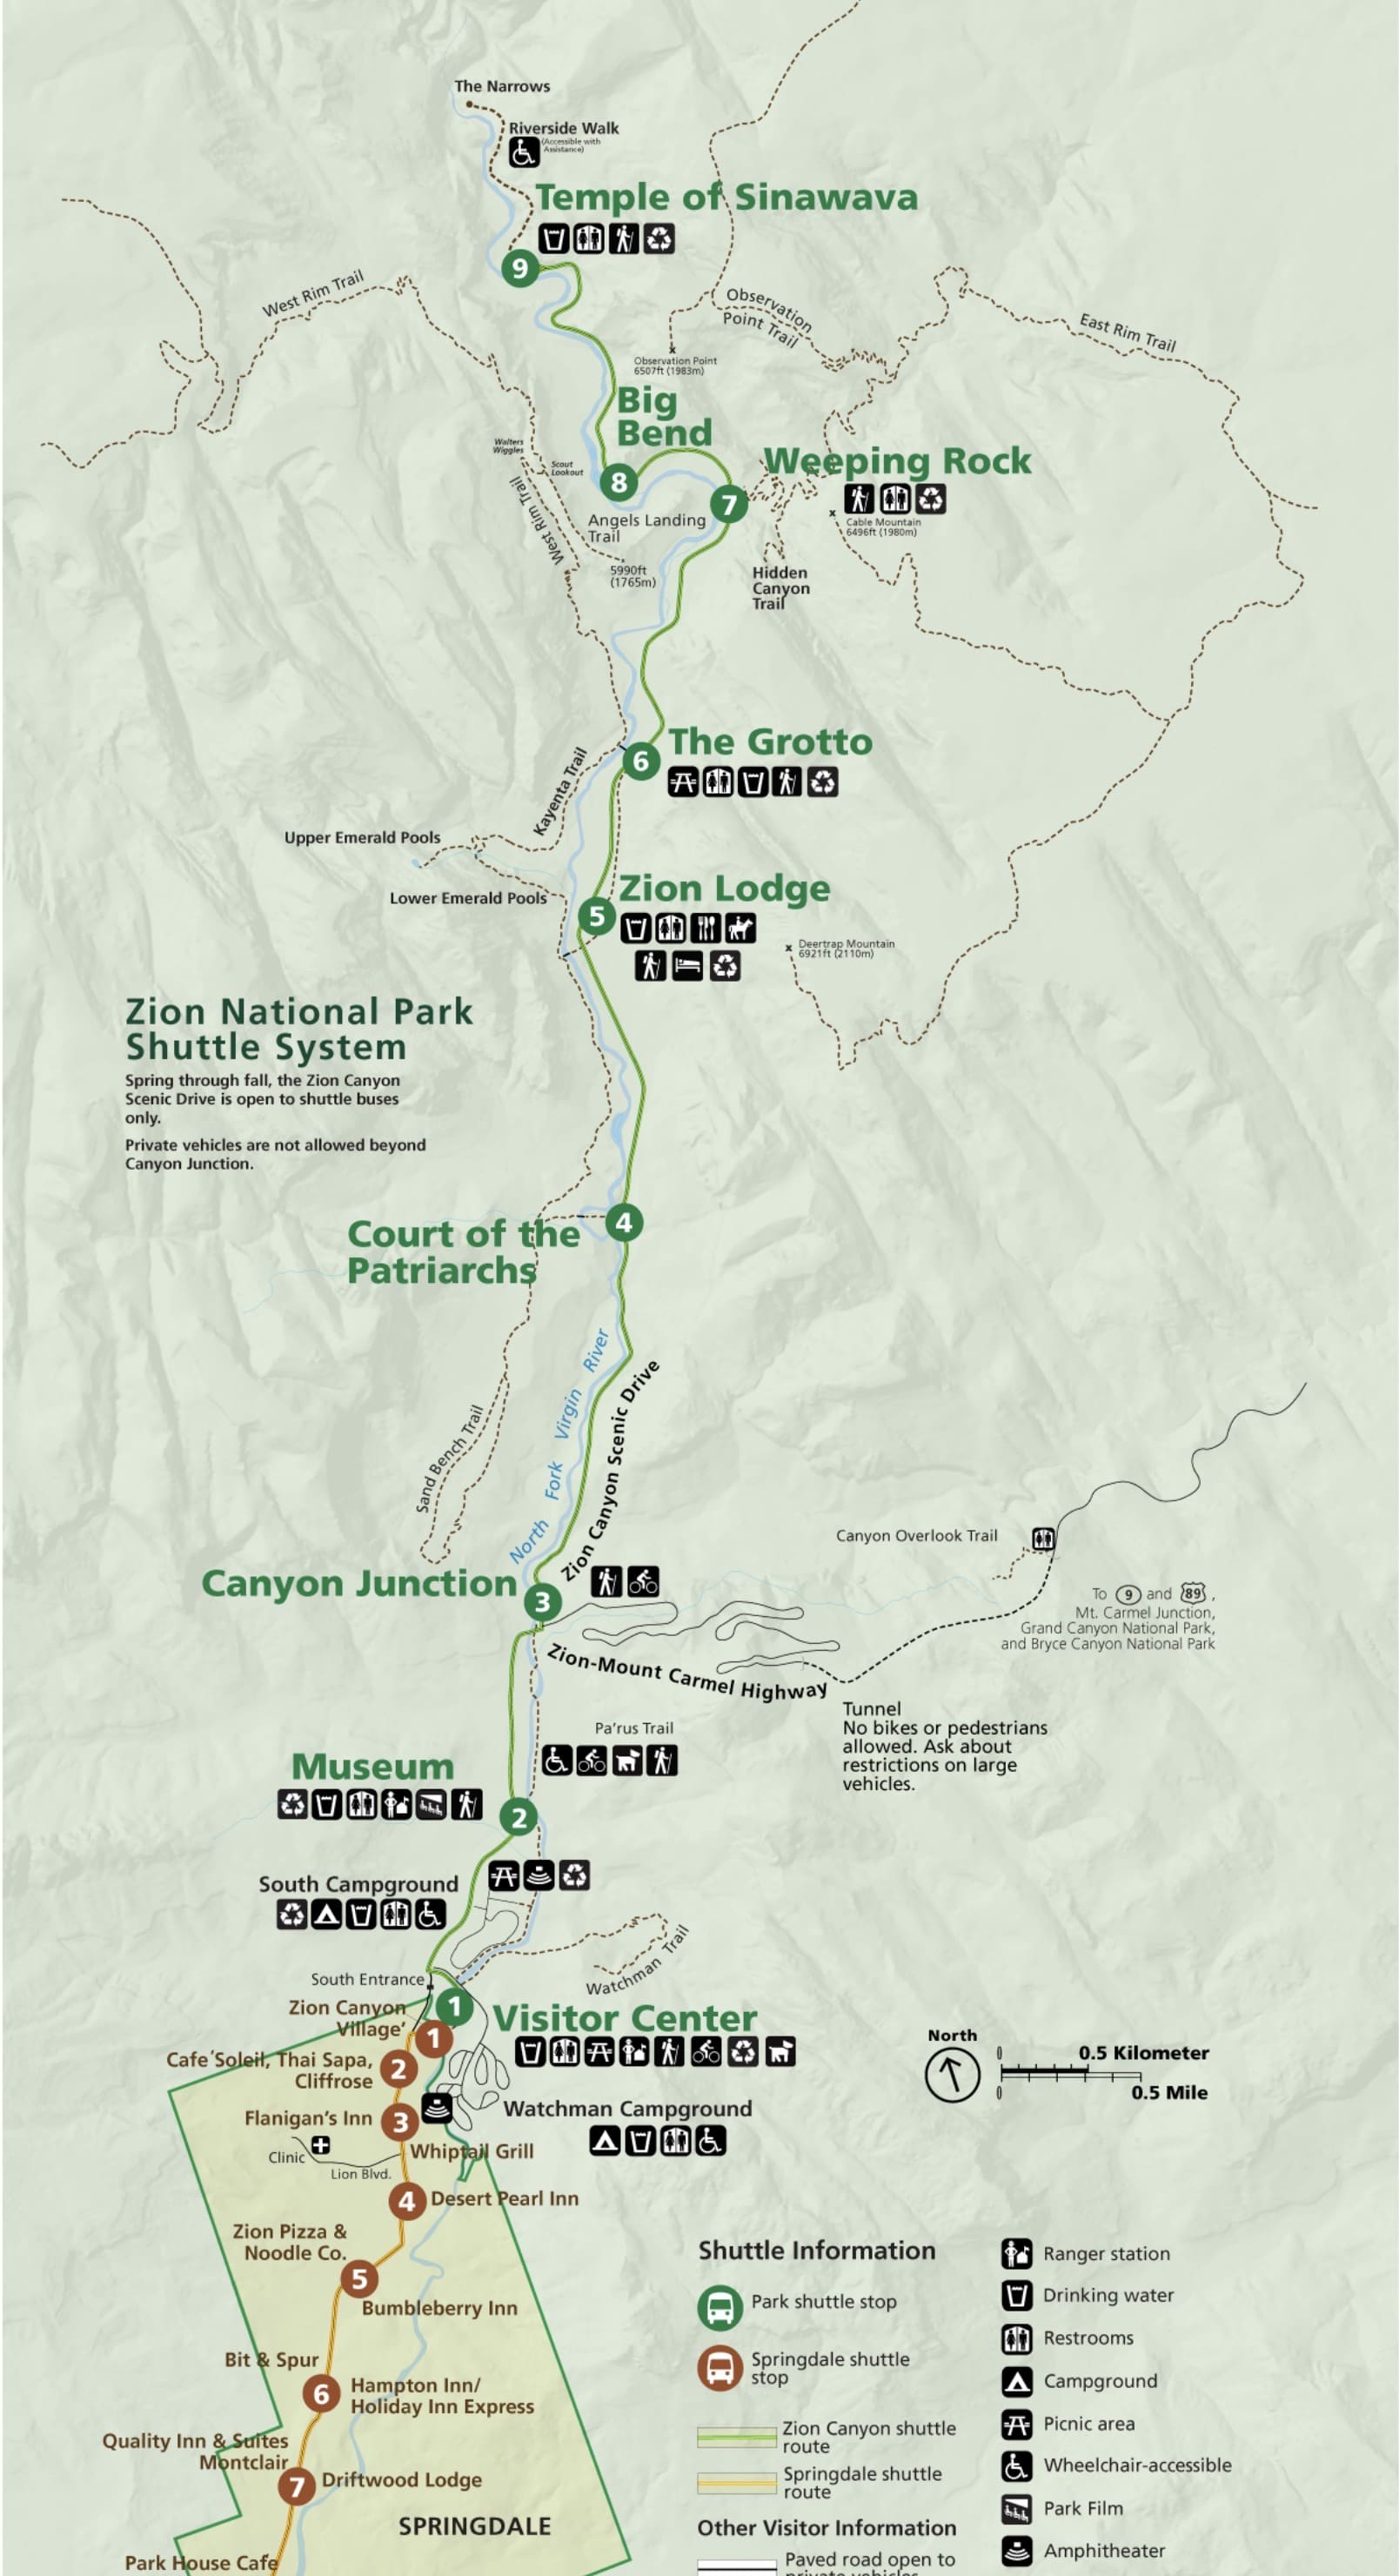
- From April through October, no passenger cars are allowed past Canyon Junction (3) in the map below unless you stay at the Zion Lodge. Get to the Visitor Center early (by 8 AM) to find a parking spot inside the park. If those spots run out you can park outside the park and take the Springdale Shuttle into the park.
- The shuttle ride from the Visitor Center to Temple of Sinawava takes 40-45 min, plan your trip accordingly.
- Wear hiking shoes; do not wear tennis shoes as many trails are rocky and unpaved and you need a good grip to hike safely.
- Bring a Camelbak if you plan on hiking. Water bottles are fine as well but won’t be comfortable on long hikes
Zion National Park – Stop by Stop Guide
We actually went to Zion National Park on 3 separate days. On the first day, after leaving Las Vegas we checked in first at our hotel in St. George (1 hr away from Zion), dropped off our bags and grabbed lunch. By the time we got to the park, it was 2 pm. As we planned on spending a few days in the area and have a flexible schedule, we asked the park ranger what they would recommend and they informed us to take Zion-Mount Carmel Highway and drive east through the park and familiarize ourselves with the landscape.
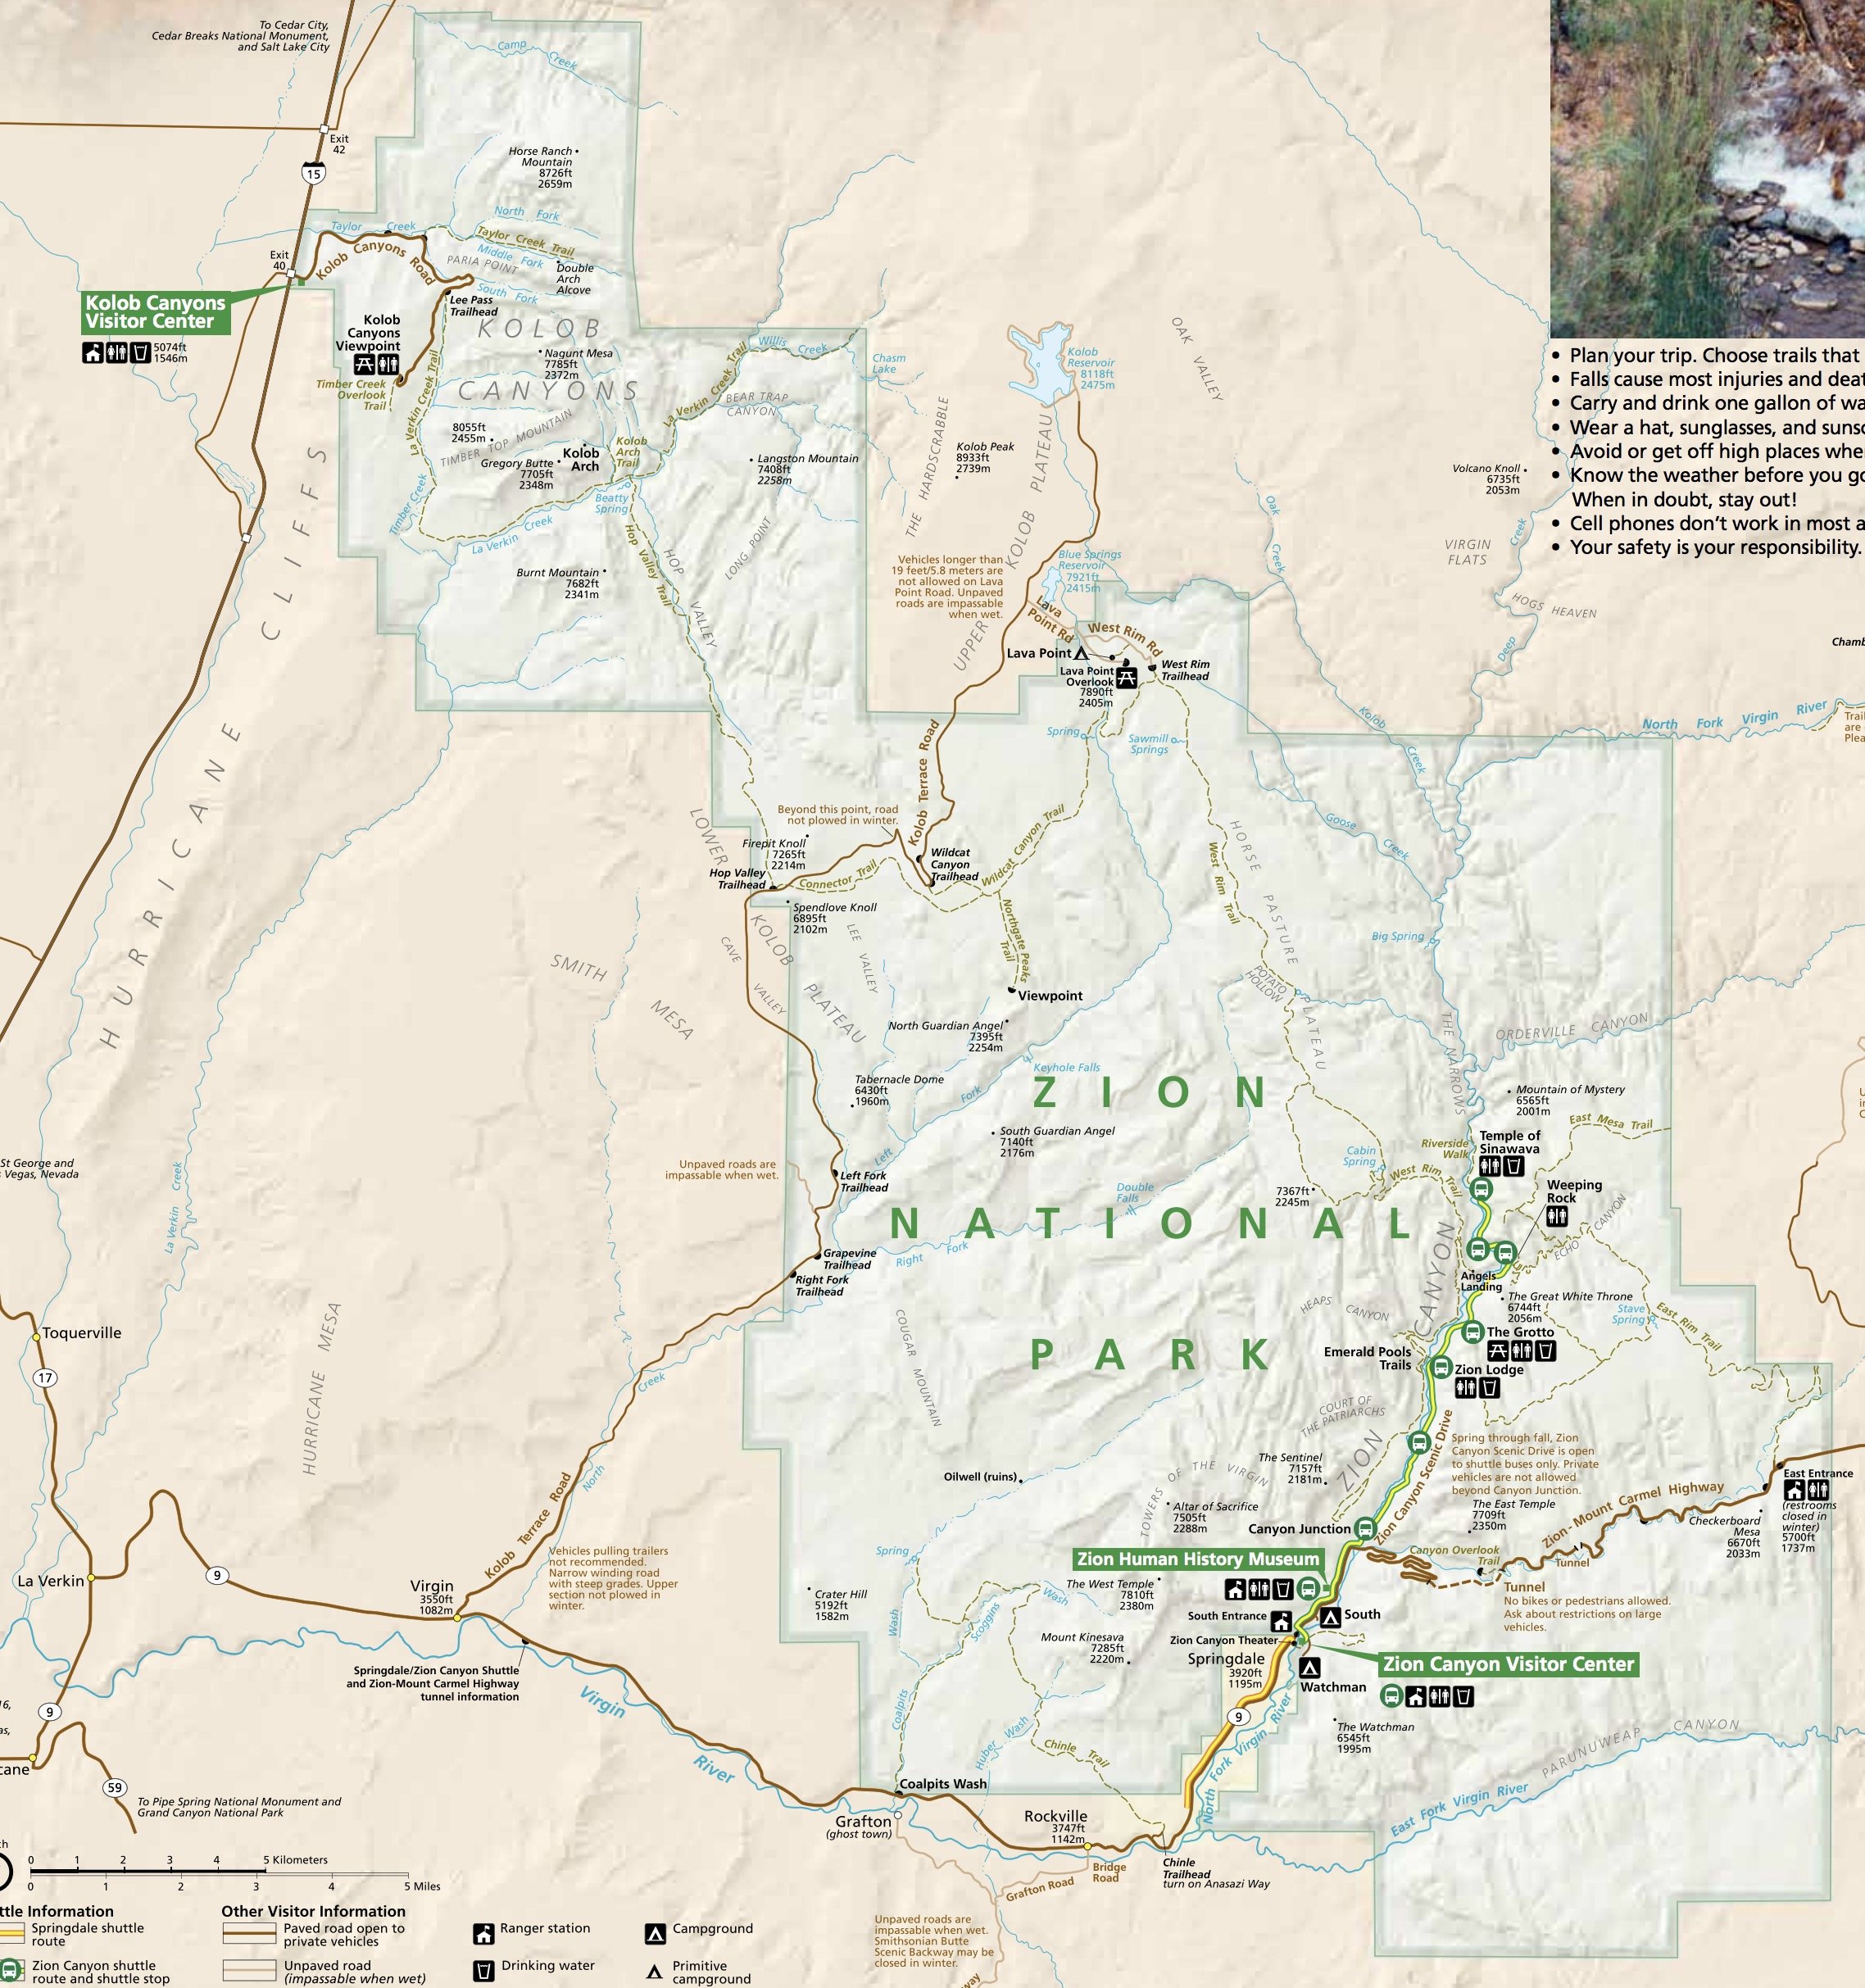
It might make sense to note here that Zion National Park is quite large (229 mi² / 600 km²) and we did not cover the entire park. There is Kolob Canyon to the west and other areas visitors can explore off Kolob Terrace Road which we did not experience (but we’ll be back when kids are older).
Click to enlarge.
If your time is limited and you only have 1 day, skip the drive to the east on Zion-Mount Carmel Highway and stay in the main canyon. Since the main canyon is where most visitors go, I’ll cover from those first below, then our trip to the east entrance. I’ll also be going from stop #9 down to stop #1, why? Stop #9 is the highest point along the Zion Canyon Scenic Drive and if you plan on exploring The Narrows get there early to avoid crowds.
Stop #9 – Temple of Sinawava
Stop #9 is the last and highest stop for the Zion Shuttle. You get off at stop #9 for the Riverside Walk and to explore one of Zion’s best-known feature – The Narrows. The Riverside Walk is an easy walk and paved so it’s wheelchair friendly. On the day we visited, it rained the night before and The Narrows was closed due to possible flash flood. The Narrows closes when the flow rate is over 150 cubic feet per second or when there is a flash flood warning. It was a bummer for us but we did get to see the beginning of the narrows.
The weather in Zion National Park could be extreme with large variation between the early morning/evening and daytime, when we were there it was 50 ºF (10 ºC) in the morning and 80 ºF (27 ºC) in the middle of the day. Tip: Dress accordingly; one thing we wished we brought was leg/knee warmers to wear when it’s chilly (if you wear shorts), and take them off during the day when it gets warmer.


The Riverside Walk is a paved walkway that runs along the Virgin River with tall protruding cliffs on both sides.


At the end of Riverside Walk, when the water is low enough you can continue hiking and walk up the riverbed.


If you continue to hike up The Narrows, here are the sceneries you would see. We can’t wait to go back and explore The Narrows on our next trip back!
![Zion National Park The Narrows - By Jon Sullivan [Public domain], via Wikimedia Commons](https://lh3.googleusercontent.com/blogger_img_proxy/AEn0k_tsoxXWg9cZ_Ko1sGQN10LOcXil6J4SUJ1KTbZvQRJr8w8oNmf9OmFZ0q70U6BR6cRV33VobQmHHpO6q3-NU3QYsJSCmmP6GGk0aurW2EEUx9GHxDt1fVWFMIOrqg-78jJEcZN1ziwLiAaupy6SMNIYpkDxAE80PISQjxkYxQ=s0-d)
Zion National Park The Narrows – By Jon Sullivan [Public domain], via Wikimedia Commons
![Zion National Park The Narrows - By Jon Sullivan [Public domain], via Wikimedia Commons](https://lh3.googleusercontent.com/blogger_img_proxy/AEn0k_snVOCftYNmlppCmZdJSZfFzqvTpVT0ZHFb8R3Qhj-_KUgvmzAxGTYHqVlDJDdKHchPff2vgBCo2gPQLlJOtcG8ShPG1yjndzjAZUQ_Hme-VmLY2SG515XxerVLlGSYlI4ean-fNolkcSDD1N1p4dFtf-x7emtkWqO_QB7oKiOq9XBHDQ=s0-d)
Zion National Park The Narrows – By Jon Sullivan [Public domain], via Wikimedia Commons
![Zion National Park The Narrows - By Jon Sullivan [Public domain], via Wikimedia Commons](https://lh3.googleusercontent.com/blogger_img_proxy/AEn0k_t_uZAIMWgfuUb43n7CkZCneTaDlhtkPvM50Uzvk0So0JqfbKgWWuEEEjHERuvETx4ubW68woJyXpNT4LwNXdGr7WFa4x2kATH6qkPIQNATob2U5QvQRkvcNDJpo0VP0SNmKdudlxdwwYfn_QfLJc-v4Bn1ei2G9V9mTBuVDB60NUNKpjy4=s0-d)
Zion National Park The Narrows – By Jon Sullivan [Public domain], via Wikimedia Commons
Stop #8 – Big Bend
Stop #8 the Big Bend is a viewpoint stop only and you can skip if you’re running short on time. If you look up the canyon wall in the 3rd image below, you can see hikers on the Angels Landing Trail at the top of the cliff.


Why is it called the Big Bend? You can see why it’s named so in the image below, it’s harder to visualize it when you’re at ground level but the bend is clear with the birds-eye view.

The Big Bend – Licensed from Adobe Photos.
Stop #7 – Weeping Rock
Ready to do some real hiking since you’re all warmed up? From the Weeping Rock stop, there are a number of trails visitors can take. You can take an easy stroll to Weeping Rock Trail (30 min) or challenge yourself to strenuous hikes and take on Hidden Canyon Trail (2.5 hrs) or Observation Point (via East Rim Trail – 6 hours). Since our children are not quite ready for strenuous hikes yet, we did some part of the Hidden Canyon Trail and viewed the hanging gardens of Weeping Rock.


The hike up Hidden Canyon Trail is on a steep narrow passage. The elevation rises quickly and it’s a very rocky trail, but the view is worth it!


Hidden Canyon Trail has long drop-offs and not recommended for anyone that’s scared of heights.

The views towards the top of the Hidden Canyon Trail looking down was amazing.


Weeping Rock – alcove with dripping springs.

Stop #6 – The Grotto
We spent about 1 hr exploring Hidden Canyon Trail and Weeping Rock. After coming down the hill, we actually stopped by stop #5 Zion Lodge to grab a quick lunch first before continuing our hikes. For this travel guide, we’ll continue hiking The Grotto first and then talk about Zion Lodge later on.
At stop #6 The Grotto, you can take the West Rim Trail to Angels Landing (4 hours) or Kayenta Trail to the Emerald Pools (2 hours).
After eating our lunch, we took the shuttle from #5 to #6 and headed to the Emerald Pools on Kayenta Trail. We could have hiked from the Zion Lodge to The Grotto as well but it’s always easier to go downhill than to hike uphill.


The trails from The Grotto loops to Lower Emerald Pools Trail back to Zion Lodge.


Children not recommended on Angels Landing.

The start of Kayenta Trail.
Kayenta Trail from The Grotto
The Kayenta Trail is a pretty easy hike but the trail is not paved so once again, a reminder to wear hiking shoes and not tennis shoes. The trail leads to both Upper and Lower Emerald Pools Trails.


Little travel blogger in the making.


Upper and Lower Emerald Pools in the background.

Got to have fun on the trail!

View of Zion from the Kayenta Trail.

Kayenta Trail ends at an intersection to Upper and Lower Emerald Pools.


Upper Emerald Pool.


After resting a bit at the Upper Emerald Pools, we continued on to the Lower Emerald Pools.


The Lower Emerald Pools trail is 1 mile long and connects to the Zion Lodge.


If you come from Zion Lodge, you’ll see the Emerald Pools Trailhead sign below.


Stop #5 – Zion Lodge & Horseback Rides
At Zion Lodge, you can stay, find food to eat, ride horses (it first time for our children!), rent bikes, etc. Click on the Zion Lodge Guide below for more info (way too much to cram into this post).

Stop #4 – Court of the Patriarchs
After stopping by Zion Lodge and filling up your tummy and CamelBak, continue to #4 Court of the Patriarchs. Similar #8 The Big Bend, the Court of the Patriarchs is a viewpoint with no trails.
The three peaks were named Abraham, Isaac, and Jacob for three towering figures of the Old Testament in 1916 by Frederick Vining Fisher.


Stop #3 – Canyon Junction
Ready to do a bit more walking? Head on to Canyon Junction, this is the point where passengers cars can’t go past from April through October. From Canyon Junction, you can hike the Pa’rus trail (3.5 mils 2 hrs) all the way to #1 Zion Visitor Center. The trail is very nicely paved and some of the best views, much better than from the car.


Taking the Pa’rus trail, you can either stop at #2 the Museum or continue to #1 Visitor Center.

Stop #2 – Museum
Stop #2 is the Zion National Park Human History Museum which displays the relationship between human and Zion National Park throughout history. The topics range from Indian culture, pioneers, and Zion’s establishment as a national park.


There is a detailed large scale model of Zion Canyon and a 22 min film that visitors can watch for free to learn more about the park.


Stop #1 – Visitor Center
Last stop, the Visitor Center. What a day. This is where we reflected on the amazing day and hikes we did. At the visitor center, there are 2 campgrounds for camping (South Campground and Watchman campground). There is also the Watchman Trail which we didn’t hike. At the end of the trail, you end up on a hilltop overlooking the entrance of the park.


There are signs to help first-time visitors to the park to know what to look out for and enjoy.


Similar to the museum, there is a model of Zion National Park but this one is more helpful with numbers and corresponding location name. The model will give you a good idea what Zion National Park looks like from the sky and what features to look for.


Zion-Mount Carmel Highway
If you have extra time, it’s time to take the Zion-Mount Carmel Highway and head east. You’ll find completely different rock formations and scenery from the canyon.


The Great Arch from Zion-Mount Carmel Highway.
As the car starts going up the slope, the views are breathtaking as you look all around you.


As you go up the hill you’ll pass through Zion-Mt. Carmel Tunnel.

At times there is traffic control through the tunnel, you might need to wait awhile before traffic allowed through. We waited for 5 min the first time and 7 min another time.


Immediately after the tunnel, there is a small parking lot on your right. You can park here for the Canyon Overlook Trail. If the parking lot is full and you can’t find a space, you can wait or continue to drive ahead and try to park on the other side.
Canyon Overlook Trail
The Canyon Overlook Trail trailhead is across the highway from the parking lot. It’s a short (1 hr round trip) but fun hike to the end of the trail. The end of the trail ends up somewhere near the top of the Great Arch. Keep in mind the trail is not paved, but it is not a difficult hike.


From the end of the Canyon Overlook trail, you can see the road the car drove on to get up the sandstone mountain.

Checkerboard Mesa
As you move your way eastward, the scenery completely changes. A major point of interest worth viewing is Checkerboard Mesa. On the way there, there are a few pullouts you can stop by. It’s quite difficult to explain how amazing and wild the scenery is along the way.


Leaving Zion National Park and head to Bryce Canyon.

We hope you enjoyed Zion National Park with us. Even after spending 2.5 days, there is a vast part of the park we didn’t even visit. If your schedule allows, spend 1.5 to 2 days there and fully enjoy the park and all it has to offer. Schedule your trip accordingly so you can hike up the Narrows, make sure you have a lot of water and enjoy. Next up is Bryce Canyon National Park!
Don’t want to miss a recipe? Sign up for the FREE Just One Cookbook newsletter delivered to your inbox! And stay in touch on Facebook, Pinterest, and Instagram for all the latest updates.
The post Zion National Park Travel Guide appeared first on Just One Cookbook.