Friday 31 August 2018

Simple Fruit Compote

Cookie and Kate
Simple Fruit Compote

Fruit compote recipe

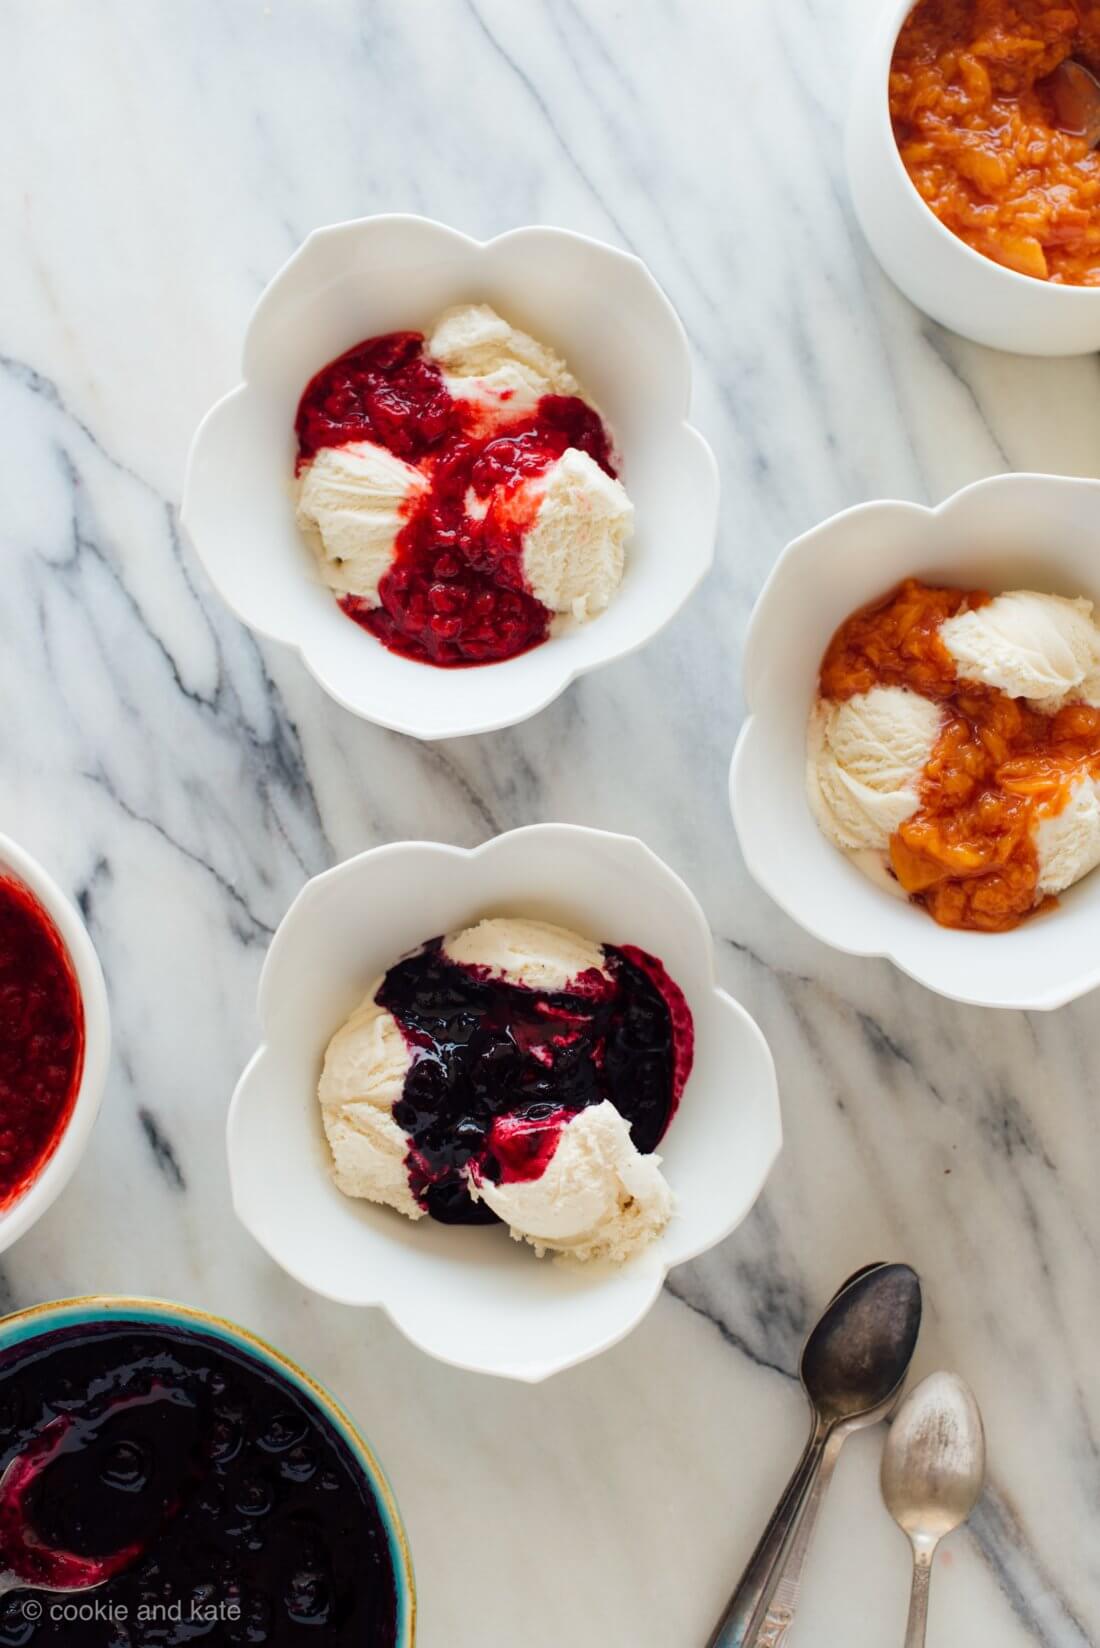
Looking for a simple dessert? It doesn’t get easier than fruit compote over vanilla ice cream. Compote is fresh, saucy and sweet, and ready in as little as 15 minutes.

You can make compote ahead of time and warm it up or throw it onto the stove after dinner. Serve it on ice cream for dessert, yogurt or toast the next morning, or anything else that could use some fruity flavor. You really can’t go wrong.

Fruit for compote (strawberries, peaches and frozen blueberries)

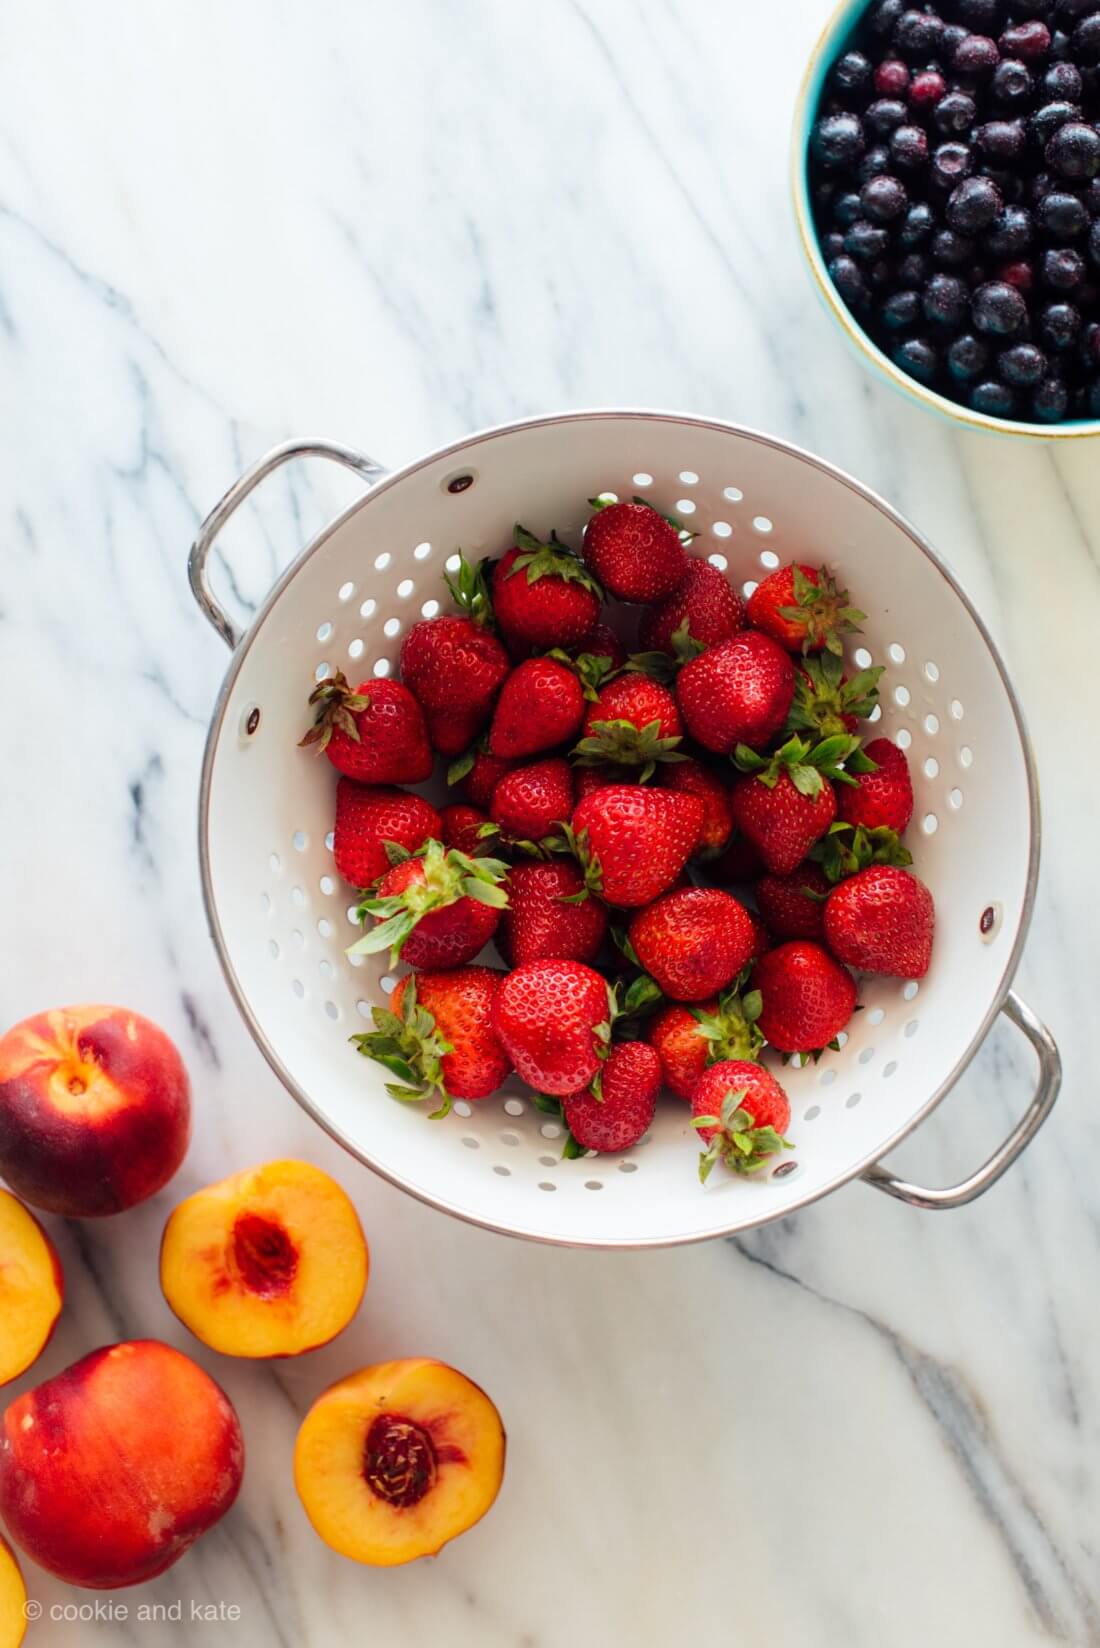
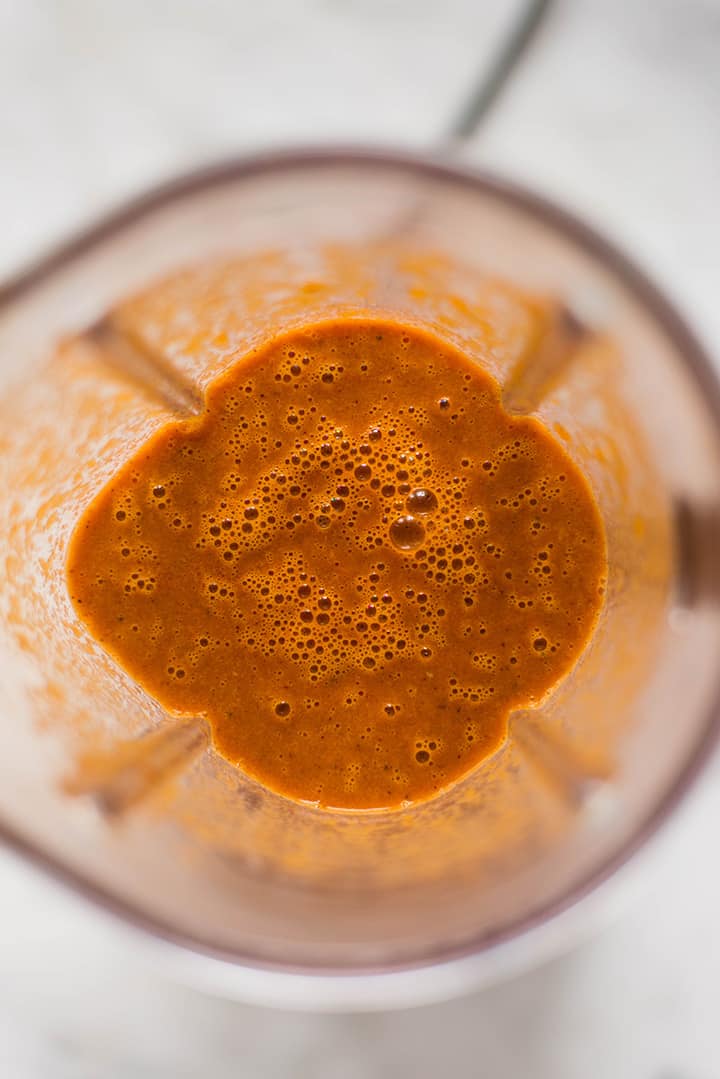
What is compote, exactly? Compote is a simple fruit sauce made with pieces of fresh (or frozen) fruit and some sugar, cooked briefly on the stove. You could call the end result a textured fruit sauce or chunky fruit syrup. I call it magic.

Instead of sugar, I use a small amount of maple syrup or honey to make naturally sweetened compote. Since it’s liquid, you can easily add more to taste after cooking if your compote isn’t quite sweet enough.

Compote is not as thick as jam or jelly, and it’s meant to be consumed relatively soon after making (it will keep for up to 2 weeks in the refrigerator). It’s not designed to be canned or preserved for the months or years ahead. Compote is so easy to make that you can throw together a batch at a moment’s notice!

Continue to the recipe...

The post Simple Fruit Compote appeared first on Cookie and Kate.

Ambitious Kitchen
30 Incredible Recipes to Make in September

30 incredible, seasonal recipes to make in September! Enjoy a new recipe each day this month, and celebrate delicious produce all month long. Happy September and Labor Day weekend! Summer technically isn’t over until September 22nd, so we have plenty of time for patio season, grilling, and hoarding as many fresh berries as possible. At [...]

The post 30 Incredible Recipes to Make in September appeared first on Ambitious Kitchen.

A Sweet Pea Chef
35 Minute Easy Baked Eggplant Parmesan (Just 265 Calories!)

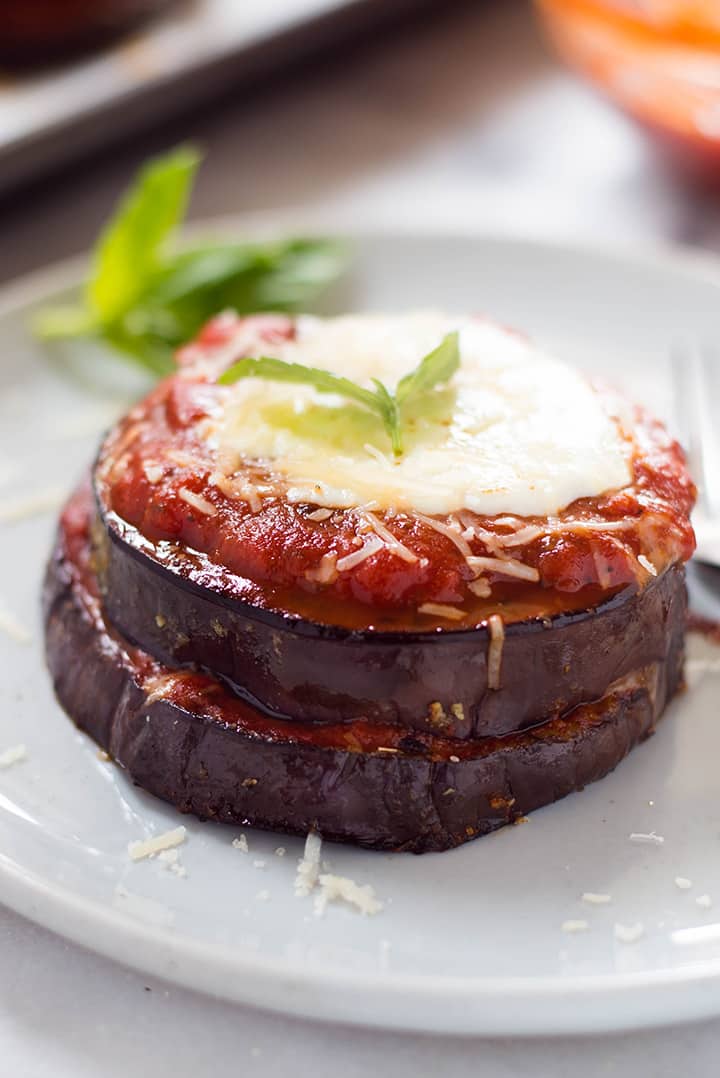
This is one healthy Italian dish that’s sure to be on your weekly menu and the best thing is that it’s so easy to make. Have you tried making healthy Easy Baked Eggplant Parmesan? Let me teach you how to make it clean, paleo, and gluten-free!

A close up image of a single serving of Baked Eggplant Parmesan made with roasted eggplant, homemade tomato sauce, mozzarella and grated parmesan.

For anyone who’s trying to eat healthy, finding a dish to love can sometimes be quite a journey. You have to go through the process of researching different recipes and experimenting on each dish until you find one that you’ll start to love.

Baked Eggplant Parmesan is one of those dishes that, after your first taste, you can’t easily forget. And if you’re like me, each bite brings you back to a favorite Italian restaurant you had in your childhood like I did with mine — La Trattoria in Ventura, California.

I don’t cook with eggplant too often, even though this is one of my favorite dishes. But after following this Baked Eggplant Parmesan recipe, I believe it’s time to change that.

An overhead image of 3 thoroughly washed eggplants on the kitchen counter for the Baked Eggplant Parmesan recipe.

How many calories are in Baked Eggplant Parmesan?

One thing you have to know about this dish is that it is commonly served in Italian restaurants. It is, however, very easy to recreate at home that you won’t have any trouble creating it several times a week.

The main difference with ordering this at a restaurant and making it at home, however, is that when you prepare your own ingredients, you know what goes into the dish. A serving of this dish from a restaurant can include over 1300 calories. But if you prepare this dish at home, you can lighten it up to just 260 or 400 calories per serving.

Of course, it will depend on the ingredients you use. But you will definitely be able to lower the number of calories in the dish when you prepare it at home.

An overhead image of thickly sliced raw eggplant on a kitchen counter for the Baked Eggplant Parmesan recipe.

How thick do I cut the eggplant for Baked Eggplant Parmesan?

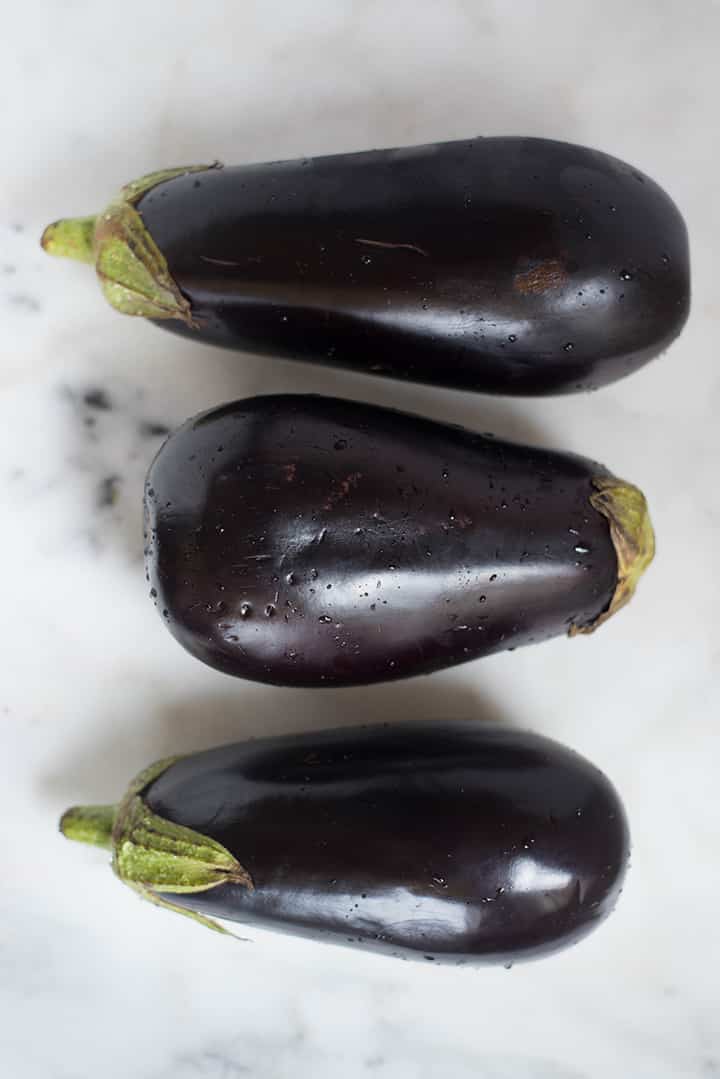
Most recipes recommend that you trim the eggplant and slice it ¼-inch thick before preparing. This ensures that each piece gets equally cooked and will have a good bite to it.

Once you’re done slicing the eggplant, you can choose to sprinkle it with some salt and allow to rest for a few minutes. The salt will draw out moisture from the eggplant so make sure you dry them before cooking.  I opt not to do this step because — again — I like it as easy as possible, but it’s certainly an option if you’d like to do it.  Eggplant contains a lot of water so this helps remove that to make the eggplant as crispy and not soggy as possible.

An overhead image of a glass bowl with seasoning including oregano, thyme and basil, and grated parmesan for the Baked Eggplant Parmesan Recipe. A close up image of coating a thick slice of eggplant in a mixture of seasoning and parmesan for the Baked Eggplant Parmesan Recipe.

How long does it take to make Baked Eggplant Parmesan?

One of the best reasons why people love to follow this Baked Eggplant Parmesan recipe is that it is so easy to make. You can have a delicious yet healthy dish under an hour. Not only that, you do not need to wait around for the dish to finish cooking since it is baked in the oven.

With the extra technique of frying the eggplant slices before baking, you always get a dish that has a nice, flavorful crisp to it, too.

Do you have to peel eggplant before you cook it?

There is no right or wrong way to prepare eggplant for this easy Baked Eggplant Parmesan recipe. While there are some who swear to peeling the skin of the eggplant before cooking it, others say that it isn’t necessary. It truly is a personal preference.

If you prefer having a deep purple color contrasting the hue of the sauce, you can opt to keep the skin on. Not to mention, the skin of the eggplant contains vitamins and additional flavors, which is another great reason to leave on the skin. You can choose to keep the skin on if you prefer it that way. It’s also much easier to prepare, to be honest.  If you want to remove the skin, just peel it with a vegetable peeler or use a sharp knife and slice it off.

A close up image of a spatula flipping over a cooked slice of eggplant for the Baked Eggplant Parmesan Recipe. An overhead image of a kitchen counter with all the ingredients for the Baked Eggplant Parmesan including roasted eggplant, homemade tomato sauce, mozzarella and grated parmesan.

How do I make a healthy tomato sauce for Baked Eggplant Parmesan?

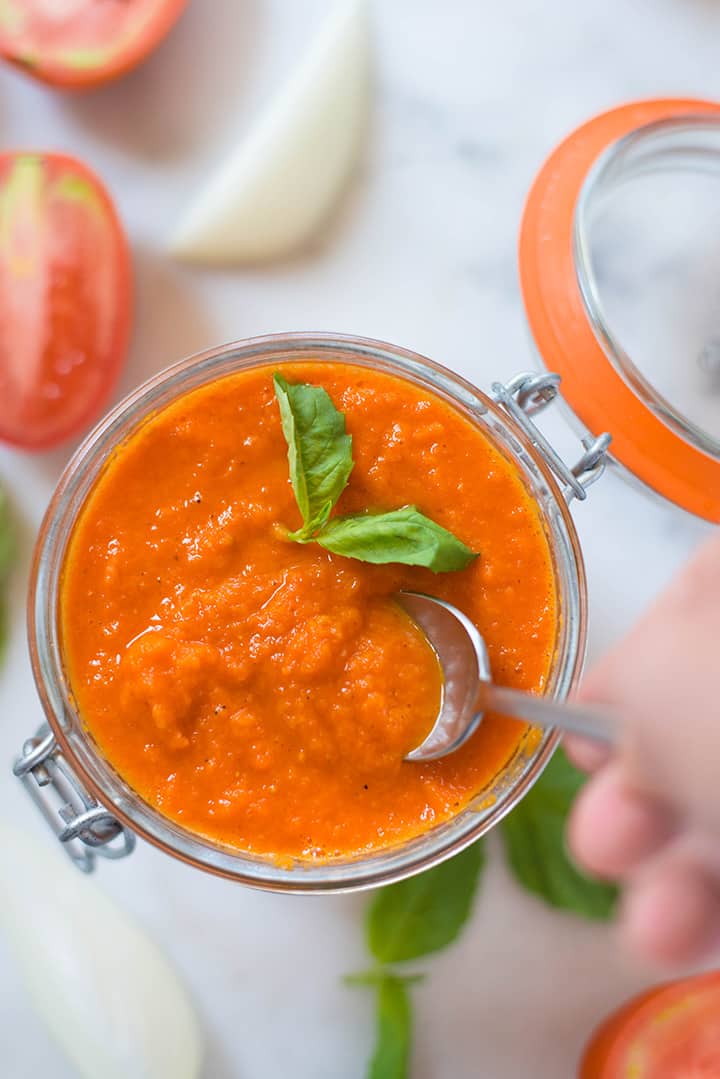
When it comes to making a healthy Baked Eggplant Parmesan, the secret is with its tomato sauce. While you can definitely save time by using store-bought tomato sauce, you’ll be more confident that you’re using real, clean ingredients by making your own homemade tomato sauce.   You can check out my easy homemade Roasted Tomato Sauce recipe here!

An overhead step-by-step image of assembling Baked Eggplant Parmesan on a baking sheet, before placing in the oven, by layering roasted eggplant, homemade tomato sauce, mozzarella and grated parmesan. A close up image of Baked Eggplant Parmesan, made with roasted eggplant, homemade tomato sauce, mozzarella and grated parmesan, before placing it in the oven.

How long does Baked Eggplant Parmesan last in the fridge?

There are certain dishes that are best made in large quantities. Like Lasagna, Baked Eggplant Parmesan is one of them. But if you can’t finish the entire dish, you can easily store it in the fridge in an air-tight container.

Or, you can choose to freeze the eggplant parmesan.  If you are storing this dish in freezer, make sure to wrap it well before doing so. This way, you can preserve its flavor and quality. When you’re ready, you can simply take it out of the freezer and reheat it in the oven until heated through it.

If stored properly, it can last up to two days in the refrigerator. The texture will become slightly more soggy, especially upon reheating, but it’ll still taste yummy.

An overhead image of a baking sheet with cooked Baked Eggplant Parmesan made with roasted eggplant, homemade tomato sauce, mozzarella and grated parmesan.

3 Healthy Pairings for Baked Eggplant Parmesan

When it comes to pairing ideas for Baked Eggplant Parmesan, people usually think of wine. This is because the dish stands out well on its own. At the same time, it is also a very rich and filling option for anyone who wants to have a healthy entrée.

An overhead image of 6 stacks of Baked Eggplant Parmesan on a baking sheet, made with roasted eggplant, homemade tomato sauce, mozzarella and grated parmesan.

But if you are looking for a good option to pair the dish with, you can try these options:
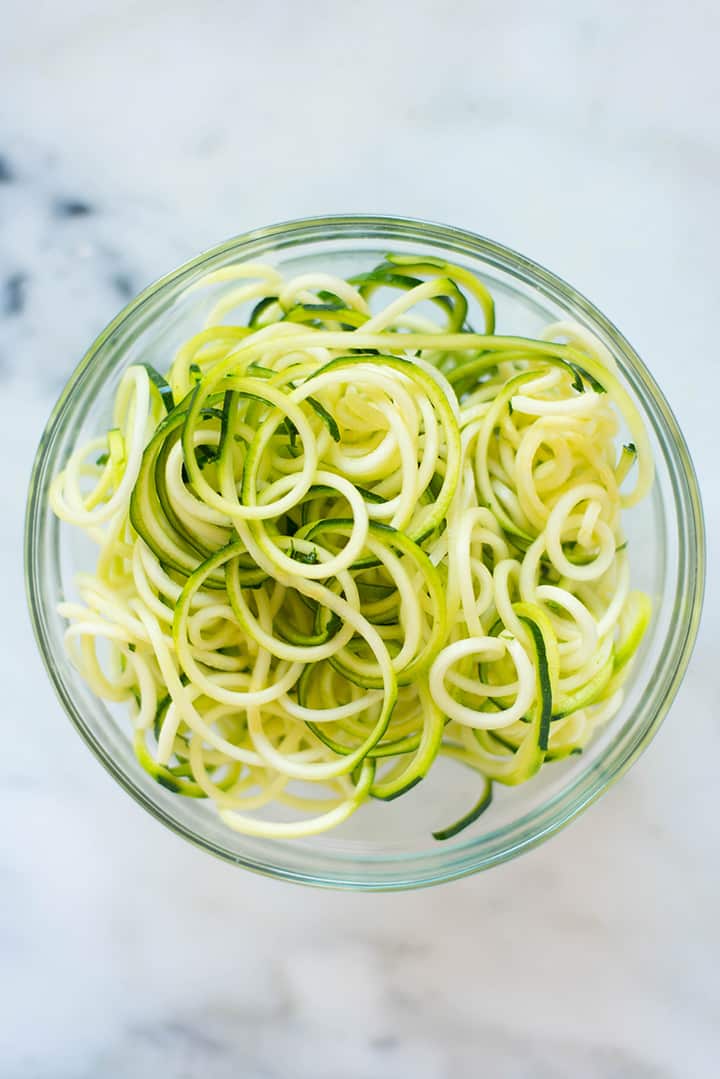
Zucchini Noodles

When you’re trying to eat healthy, it’s always a good idea to look for lower carb options, especially when you have a nutritious alternative. For some people, that means giving up staples like bread or pasta and going for healthier alternatives. If you’re the type of person who can’t seem to give up pasta, the best alternative is Zucchini Noodles. The good thing about this dish is that you can easily cook it with anything. You can even cook it with some olive oil and garlic and enjoy it as a perfect pair for easy Eggplant Parmesan.

Bowl filled with spiralized zucchini noodles to show spiralizer veggie recipe.

Roasted Tomato Sauce

Another healthy pairing that you can use with this dish is Roasted Tomato Sauce. You can use this sauce together with a Cauliflower Pizza Crust recipe and you’ll have a hearty meal with the two. Or you can opt to use this recipe together with your Baked Eggplant Parmesan so you have a dish that you made from scratch. Since these two are so easy to make, you won’t need an occasion to enjoy it.

An overhead image of a glass jar with Roasted Tomato Sauce made with roma tomatoes, garlic, yellow onion, carrot, olive oil, basil, salt and black pepper.

Spaghetti Squash Noodles

If you’re not fond of using zucchini as a noodle, another option you can use is spaghetti squash. You can use this recipe for Spaghetti Squash Noodles to substitute with pasta. Since it contains only 42 calories (pasta has 221 calories, gulp!), you’ll be enjoying a guilt-free dish. They will go perfect with a tomato-based dish like Eggplant Parmesan.

How To Make Easy Spaghetti Squash Noodles

How to reheat Baked Eggplant Parmesan

When you’re ready to eat the dish again, remember to take out a small portion that you will be using. This helps preserve the dish since you won’t have to reheat everything.

To reheat the dish, make sure to heat the oven to around 450 degrees Fahrenheit. Use an oven-safe dish and cover with foil. This practices helps ensure that the dish stays moist and as hot as possible. During the last 10 minutes of cooking you can take off the foil from the pan so that the casserole can create that gorgeous, crisp brown on top.

A side image of Baked Eggplant Parmesan made with roasted eggplant, homemade tomato sauce, mozzarella and grated parmesan.

You can follow this video along to make sure you create the dish perfectly. If done right, you’ll love how delicious this dish tastes and you’ll want to cook it every chance you get.

Easy Baked Eggplant Parmesan


Easy Baked Eggplant Parmesan

This is one healthy dish that’s sure to be on your weekly menu and the best thing is that it’s so easy to make. Have you tried making Healthy Baked Eggplant Parmesan? Let me teach you how…

1 medium eggplant, (cut into 1/4-inch slices) 1 1/4 cups almond meal 1/2 cup chickpea flour 1 tbsp dried oregano 1 tbsp dried thyme 1 tbsp dried basil 1 tsp sea salt 1/2 tsp ground black pepper 1/4 tsp garlic powder 2-4 tbsp olive oil, ( for frying) 2 cups tomato sauce ((or marinara sauce)) 1/2 cup Parmesan, (grated, divided) 8 oz fresh mozzarella, (thinly sliced) basil, (for garnish)

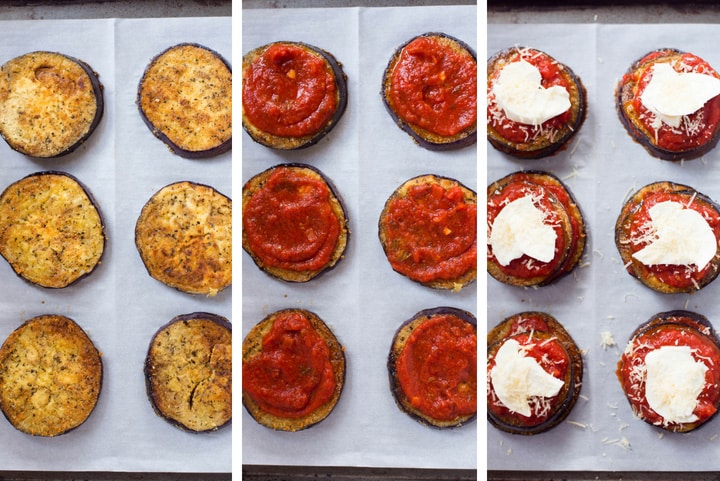
Preheat the oven to 400 degrees F and line a rimmed baking sheet with parchment paper.

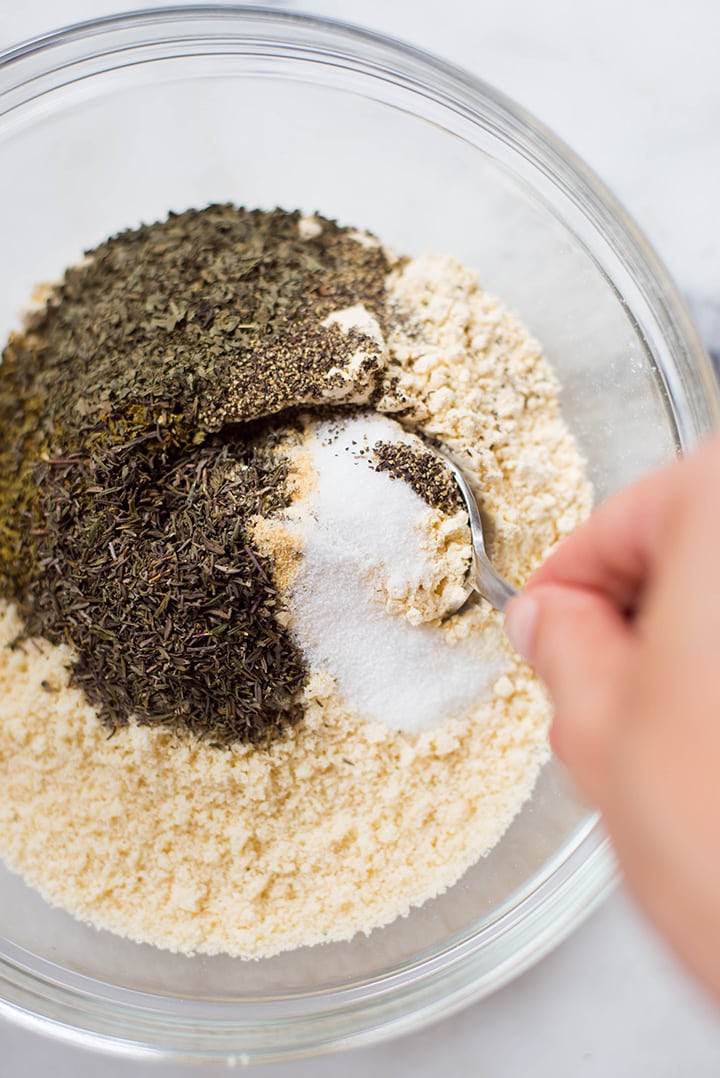
In a shallow dish, combine the almond meal, garbanzo bean flour, oregano, thyme, basil, sea salt, and pepper.

Heat 1 tbsp. of the olive oil in a large skillet over medium-high heat.

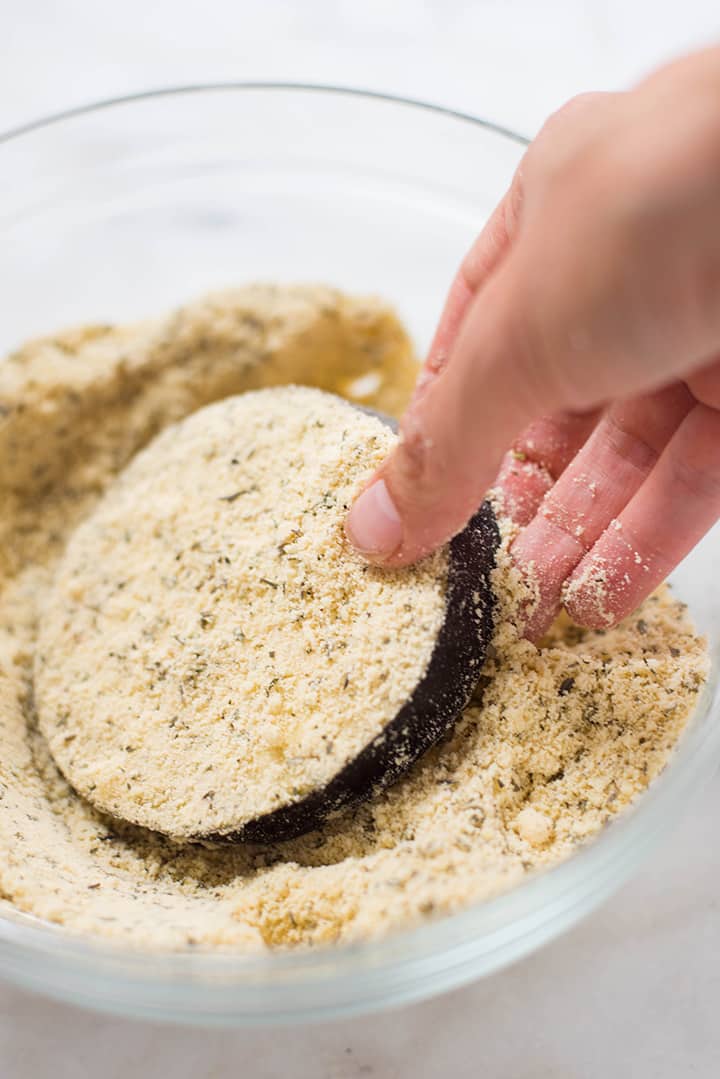
Dredge each eggplant slice in the almond meal mixture. Shake off any excess coating.

Transfer 3-5 eggplant slices at a time to the hot pan, depending on size. Try not to overcrowd the slices. Cook until golden brown on each side, about 2-3 minutes per side. Add more olive oil, as needed, to keep from sticking. Repeat with the remaining eggplant slices.

Place browned eggplant on a dish and set aside.

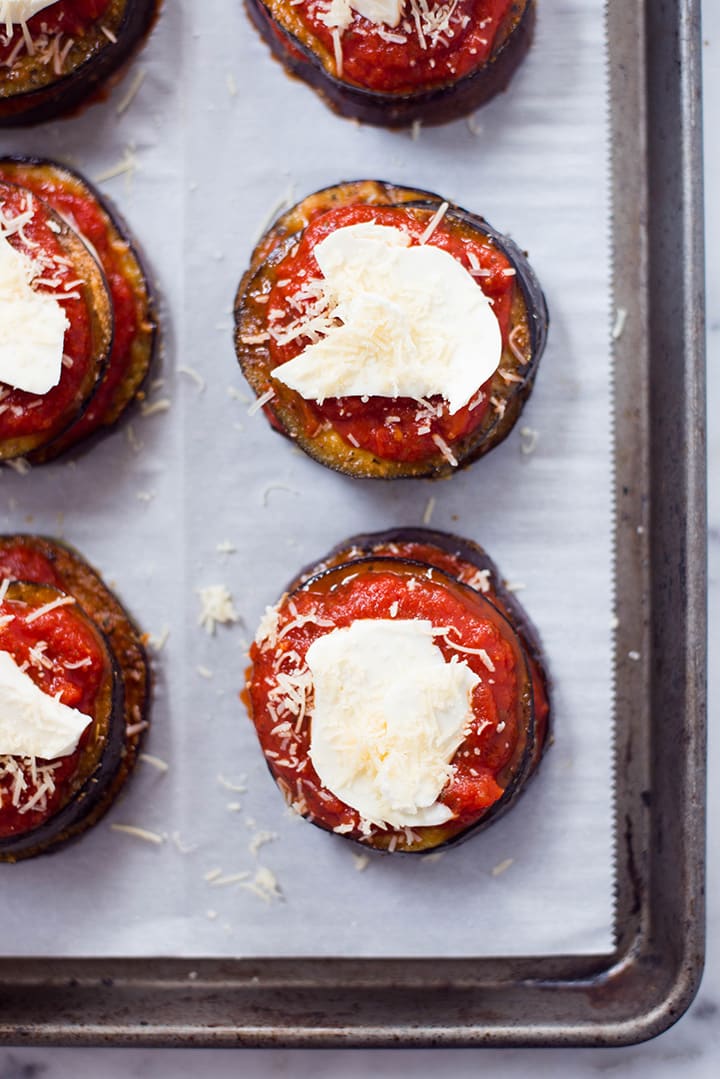
Once all slices are cooked, lay the largest eggplant slice onto the baking sheet. Gently spoon about 1-2 tbsp. of the tomato sauce over the eggplant until coated. 

Place a layer of sliced mozzarella evenly over the tomato sauce. Sprinkle grated parmesan over the layer. 

Place the second largest eggplant slice next and repeat steps for the tomato sauce and mozzarella. Sprinkle parmesan over the top layer. 

Repeat with the remaining eggplant, tomato sauce, parmesan and mozzarella.

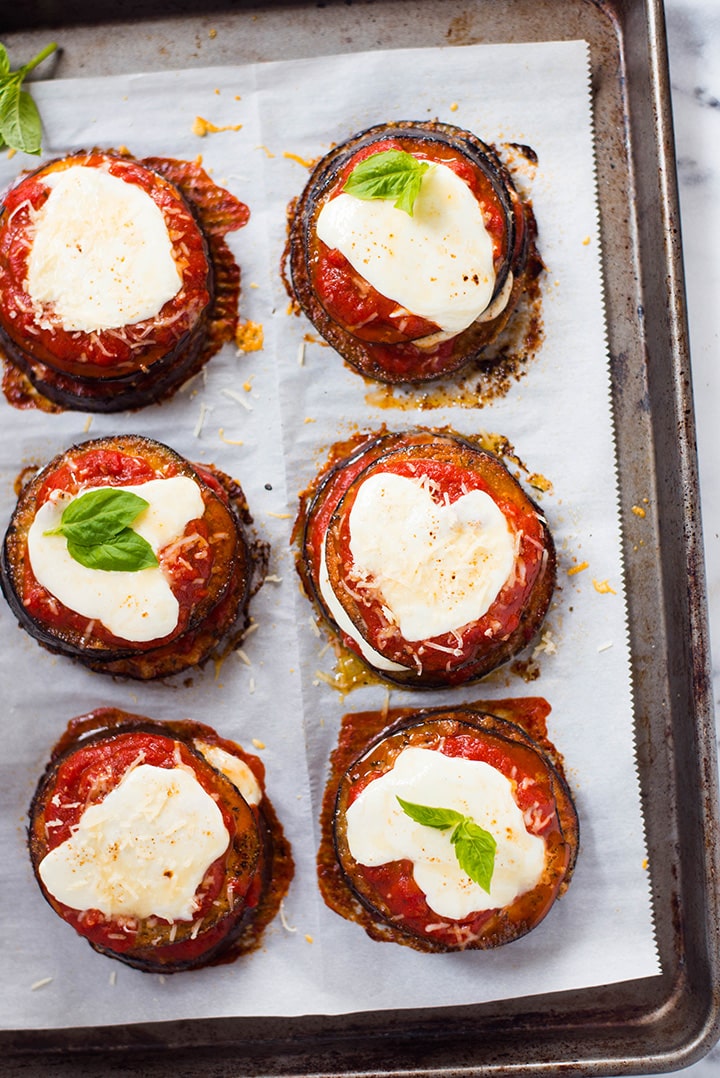
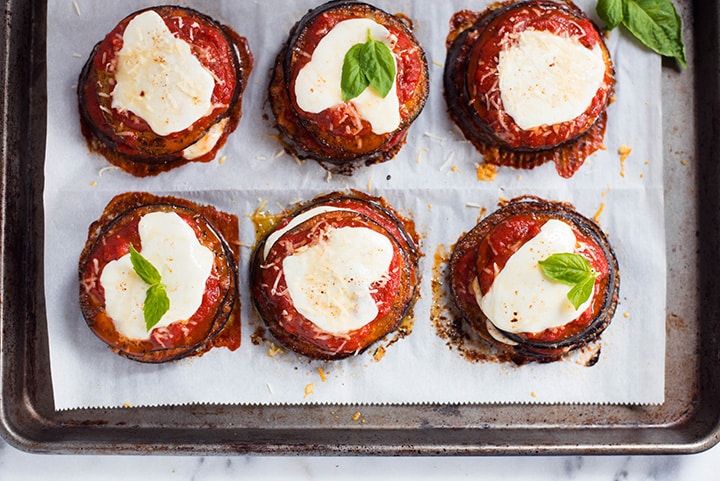
Bake until just beginning to brown, approximately 10-15 minutes.

Remove from oven, garnish with fresh basil, and serve.

This post contains affiliate links for products I use often and highly recommend.

The post 35 Minute Easy Baked Eggplant Parmesan (Just 265 Calories!) appeared first on A Sweet Pea Chef.

Why the Artist Mari Andrew Loves Solo Travel


By KELLY DINARDO from NYT Travel https://ift.tt/2oqwW7D

How to Protect Your Cellphone (and Your Data) When You Travel


By SHIVANI VORA from NYT Travel https://ift.tt/2NzSDwS

At These New European Hotels, a Night’s Stay Supports Worthy Causes


By TANYA MOHN from NYT Travel https://ift.tt/2NzFiEV

Thursday 30 August 2018

10-Minute Homemade Enchilada Sauce

A Sweet Pea Chef
10-Minute Homemade Enchilada Sauce

After learning how to make this 10-Minute Homemade Enchilada Sauce, you will never think of making enchiladas with store bought sauces again! This easy red enchilada sauce will take you just 10 minutes to prepare!

Overhead view of a blender with the blended homemade enchilada sauce, ready to be used in the shredded chicken enchiladas.

It’s very important to me is that I enjoy my favorite foods guilt-free. ‘Cuz who needs that guilt?! One of the first steps towards that is staying away from over-processed foods whenever possible. The easiest way to do it is by preparing your meals at home and so you can always choose the ingredients that are best for you.

Next time someone tells you that cooking at home takes a lot of time and effort, invite them to dinner and make them enchiladas with this delicious 10 Minute Homemade Enchilada Sauce.

“It took you just 10 Minutes to whip this up?” Yes, yes it did.

So, enchiladas anyone?

Side angle of pouring the homemade enchilada sauce over the chicken into the skillet to make the shredded chicken for the shredded chicken enchiladas.

How To Make Homemade Enchilada Sauce

OMG please please PLEASE make your own enchilada sauce. It’s unreal good and makes SUCH a difference in the flavor and texture of your enchiladas. Plus it literally will take you 10 extra minutes to make and doesn’t require a ton of ingredients.  I used to use the canned stuff and, now, I’m a total homemade enchilada sauce convert.

Here’s how to make homemade enchilada sauce: In a large skillet, heat olive oil over medium-high heat. Add in the fresh tomatoes and garlic, and stir to combine and reduce heat to medium. Stir frequently and cook for 4-6 minutes, until the tomatoes become softened. Stir in the tomato paste, low sodium chicken broth, chili powder, onion powder, cumin, oregano, sea salt, pepper into the skillet, and continue to cook over medium-high heat for 5 minutes until slightly thickened. Transfer to a blender or food processor and blend until smooth.

Done!

Overhead view of a skillet with seasoned chicken that is topped with the homemade enchilada sauce for making the shredded chicken for the shredded chicken enchiladas.

WHAT IS IN ENCHILADA SAUCE?

You mean other than that pure deliciousness?

If you’ve ever been to a Mexican restaurant, you’ve probably tasted the thick, flavorful red sauce. When it comes to the luscious, rich sauce you pour all over your enchiladas, you can easily customize it to your own delight. Traditionally, enchilada sauce is made of chilies, tomatoes, and a whole variety of seasonings. It can be red, like this homemade enchilada sauce, or it can be green, like this salsa verde.  But really, the choice is all yours!

Enchilada sauce is a red chili sauce very similar to taco sauce, just thicker.  The original recipe uses red chilis as a base, and then you add seasoning to make your sauce. Basically, enchilada sauce is blended red chilis or red tomatoes and seasoning.

WHAT INGREDIENTS ARE IN HOMEMADE ENCHILADA SAUCE?

Want to know exactly what ingredients are in homemade enchilada sauce?  To make Homemade Enchilada Sauce you will need the following:

a few large tomatoes tomato paste minced garlic olive oil low sodium chicken broth chili powder ground cumin dried oregano onion powder sea salt black pepper.

See?  Making Homemade Enchilada Sauce is very simple, and requires no fancy ingredients!

IS RED OR GREEN ENCHILADA SAUCE MORE SPICY?

The key difference between red and green enchilada sauce is that one is made from red chilies and the other from green chillies. With some exceptions, the red enchilada sauce is usually hotter than the green one, but it all depends on the chilies. Depending on the chilies used, both green and red enchilada sauce can range from mild to really hot.

As written, this homemade red enchilada sauce is not spicy at all, but it can be made more spicy if you added in hot red chilies or cayenne pepper.

Overhead view of a casserole dish which is filled with shredded chicken enchiladas that have been topped with jack cheese, cheddar cheese, cilantro and homemade red enchilada sauce, ready to bake.

HOW MANY CARBS ARE IN ENCHILADA SAUCE?

The store-bought sauces can tend to be full of refined sugar and unnecessary carbs. That’s why I love making my own homemade enchilada sauce.  Especially when it comes to homemade sauces, it’s so easy and quick, and they’re so much better for you. If you’re interested in how many carbs are in enchilada sauce, one serving (1 cup) of my Homemade Enchilada Sauce has only 9 grams of carbs, of which 4.8 grams is natural sugar.

3 GREAT ENCHILADA RECIPES THAT USE HOMEMADE ENCHILADA SAUCE

Now that you’ve learned how to make Homemade Enchilada Sauce, it’s time to make (and eat!) ALL the enchiladas! With enchiladas, the areas you can add unhealthy ingredients are really the tortillas and the cheese.  Look for clean, simple corn tortillas or make your own and try to use as little as cheese as possible, while still making it taste cheesy and delicious. Then, just use the meat and veggies you like to create your perfect flavor combo. Here are a few of my favorite enchilada recipes that I keep making over and over again!

SHREDDED CHICKEN ENCHILADAS

These Shredded Chicken Enchiladas are definitely one of my favorite homemade enchilada recipes. Follow my recipe and learn how to not only make the best shredded chicken enchiladas ever, but also how to shred chicken.  Get the recipe!

Close up horizontal shot of the shredded chicken enchiladas which have been baked so you can see the crispy edges of the corn tortillas and the melted cheese.

SPICY QUINOA AND BLACK BEAN VEGAN ENCHILADAS

If you were looking for a clean eating, vegan enchilada recipe, look no further! My Spicy Quinoa & Black Bean Vegan Enchiladas will curb all you cravings for Mexican food. Swap the traditional meat filling for quinoa that’s rich in fiber, protein and antioxidants. Healthy food never tasted better!  Get the recipe!

Horizontal image of the spicy quinoa and black bean vegan enchiladas, ready to eat, topped with fresh cilantro, diced tomatoes, lime wedges, and jalapeños.

GROUND BEEF ENCHILADAS

Nothing makes me happier than when I find a way to make healthier versions of my favorite restaurant meals. If you’ve already tried making some of my other enchilada recipes and loved them, it’s time you give these Ground Beef Enchiladas a try, too. They are super easy to make and pack a flavorful bite!  Get the recipe!

Ground Beef Enchiladas

HOW TO THICKEN ENCHILADA SAUCE

If your homemade enchilada sauce ends up too runny, it comes in handy to know some quick methods that will help you save the sauce (and the day!). If I want to thicken my enchilada sauce, I’ll usually use one of the following methods:

Masa harina paste (this is basically a mixture of corn masa flour and water) Arrowroot starch Corn starch

Just start with 1-2 tbsp and mix with a little water or chicken broth before adding to the sauce.  You could also add it to the blender and mix it together that way.  The idea is to avoid making the sauce lumpy from the added starch.  Also – keep in mind the sauce will thicken when baked in the oven so don’t worry too much if it seems a little runny when you’re adding it to your enchiladas.

Homemade Enchilada Sauce
HOW LONG DOES ENCHILADA SAUCE LAST IN THE FRIDGE?

If properly stored in an airtight container or mason jar, this homemade enchilada sauce will last up to 4-5 days in the fridge. Not only does that make Enchilada Sauce (and enchiladas!) great for meal prep, but it also means that, while you’re at it, you can make extra enchilada sauce and keep the rest safely in the fridge.

You can also freeze this sauce in a freezer safe sealable plastic container and store it in the fridge for up to 3 months.  When you’re ready to use, just thaw overnight in the fridge and you’re good to go make some tasty enchiladas!

10-Minute Homemade Enchilada Sauce

After learning how to make this 10-Minute Homemade Enchilada Sauce, you will never think of making enchiladas with store bought sauces again!

3 tbsp. olive oil 3 cloves garlic, (minced) 3 large tomatoes on the vine, (diced) 1 tbsp. chili powder 1 tsp. ground cumin 1/2 tsp. onion powder 1/2 tsp. dried oregano 1 tsp. sea salt 1/2 tsp. black pepper 2 tbsp. tomato paste 1 1/2 cups low sodium chicken broth ((use vegetable broth if vegan))
In a large skillet, heat olive oil over medium-high heat. Add in the fresh tomatoes and garlic, and stir to combine. Cook for 4-6 minutes, until the tomatoes become softened.

Stir in the remaining ingredients (tomato paste, low sodium chicken broth, chili powder, onion powder, cumin, oregano, sea salt, and black pepper) into the skillet, and continue to cook over medium-high heat for 5 minutes until slightly thickened.

Transfer to a blender or food processor and blend until smooth. 

This post contains affiliate links for the kitchen items I use regularly and highly recommend.

The post 10-Minute Homemade Enchilada Sauce appeared first on A Sweet Pea Chef.

Ambitious Kitchen
Good Morning Healthy Blueberry Zucchini Muffins

Healthy blueberry zucchini muffins made extra moist thanks to zucchini and applesauce! Naturally sweetened with pure maple syrup instead of sugar. Great for snacking & freezer-friendly too! Are you ready for yet another zucchini muffin recipe? I just can’t stop. These healthy blueberry zucchini muffins were originally published back in 2015 and I still can’t [...]

The post Good Morning Healthy Blueberry Zucchini Muffins appeared first on Ambitious Kitchen.

36 Hours in the Dolomites


By INGRID K. WILLIAMS from NYT Travel https://ift.tt/2wqVRvW

How to Get the Most Out of a Theme Park Trip


By SHIVANI VORA from NYT Travel https://ift.tt/2wrOdBL

Wednesday 29 August 2018

Miso Butter Salmon 味噌バターサーモン

Looking for a new way to serve up the versatile, Omega-rich salmon? Try this tender and succulent Miso Butter Salmon pan-fried in a delicious savory sauce. Cooking time from start to finish is less than 30 minutes!

White plate containing Miso Butter Salmon served with sauteed shiitake and shimeji mushrooms.

Now that your children are back in school and you as a parent is finally finding your way into the regular school-year routine, I assume you need a quick and easy dinner inspiration? My kids love Miso Salmon, which is frequent in our family dinner rotation and today I’m going to share a slightly different variation which has become such a staple – Miso Butter Salmon (味噌バターサーモン).  

The Golden Combination of Miso and Butter

Have you had a chance to combine miso and butter in your cooking? Does it sound strange or unusual to you? If that was the case, you’re gonna give this new flavor a try. I promise, they are so, so good together.

Miso and butter – miso is definitely Japanese, but butter? Well, for those who have visited Hokkaido, you’ve probably tried the legendary Hokkaido’s Miso Ramen that is adorned with a golden piece of butter on top. Yep, there is such a thing! Known for its delicious dairy and agricultural products, it is no surprise that the locals in Hokkaido utilize their best commodity in every way.

I’m not sure if that’s how the miso and butter combination was introduced to the Japanese, but you can certainly find many dishes that incorporate the two ingredients as a power duo. Miso is earthy and packed with umami, while butter is rich and creamy. Together they make the most versatile flavoring to dress up a dish.

White plate containing Miso Butter Salmon served with sauteed shiitake and shimeji mushrooms.

How to Pan-Fried Salmon Perfectly

Now if you don’t usually pan fry salmon, here are just a few quick techniques you may want to know before you start.

1. Make sure your salmon is closer or at room temperature

Before you’re ready to start cooking, remove the fish from the refrigerator about 15-20 minutes in advance. When the fish is at room temperature, not only it cooks more quickly, it also ensures even doneness throughout the salmon fillet.

2. Pat dry your fish before seasoning

If the fillets are wet, they are more likely to stick to the pan, and the skin won’t crisp as nicely. Before seasoning it with salt and pepper, use a paper towel to gently pat dry the fillets.

3. Use a spatula to press down the fish

Once you flip the salmon to the skin side, press down the fillet using your spatula to give some firm pressure so the ends of the fish won’t curl up.

4. Do not overcook salmon

This is always the key to juicy and tender salmon. Pay attention to the fish as it is cooking, watching for the change in color. You can see how far you’ve cooked the fish from the sides. Once it’s already more than 75% cooked, be sure to control your heat by turning it to low. It is completely okay when there is a bit of translucent pink in the middle. The remaining heat will continue to cook the rest of the fish. Using the spatula to give the sides a gentle squeeze. The flakes should begin to separate when it’s done.

White plate containing Miso Butter Salmon served with sauteed shiitake and shimeji mushrooms.

Different Types of Miso

For this salmon recipe, I used Hikari Miso® Organic Miso – Mild Sodium Miso (shown in left top). It is made of 100% USDA Certified Organic rice and soybeans and is additive-free. It has a light yellow color original to Shinshu-style miso. A high volume of rice koji produces its mild taste and smooth texture.

If you’re interested to try it out, you can purchase Hikari Miso from a majority of Japanese/Asian grocery stores or on Amazon. It is my favorite brand of miso paste. There is also a variety of miso, each with a different flavor you can use for various purposes.

Hikari Miso - Organic Miso Series

Accompanied by flavorful mushrooms, this Miso Butter Salmon is the ultimate weeknight dish for the entire family. It’s healthy and delicious, and I know your family will enjoy it often.

White plate containing Miso Butter Salmon served with sauteed shiitake and shimeji mushrooms.

Don’t want to miss a recipe? Sign up for the FREE Just One Cookbook newsletter delivered to your inbox! And stay in touch with me on FacebookPinterest, and Instagram for all the latest updates.

Miso Butter Salmon

Looking for a new way to serve up the versatile, Omega-rich salmon? Try this tender and succulent Miso Butter Salmon pan-fried in a delicious savory sauce. Cooking time from start to finish is less than 30 minutes!

  • 2 fillets salmon
  • kosher salt
  • freshly ground black pepper
  • ½ Tbsp all-purpose flour
  • shimeji mushrooms
  • shiitake mushrooms
  • 1 Tbsp neutral flavor oil (vegetable, canola, etc)
  • 1 Tbsp butter

Seasonings

  • 1 Tbsp miso ((I used Hikari Miso® organic mild sodium miso))
  • 1 Tbsp sugar
  • 2 Tbsp sake
  • 1 Tbsp mirin
  • 1 ½ Tbsp soy sauce

Toppings

  • chives
  • white sesame seeds (roasted/toasted)
  1. Gather all the ingredients.
  2. Combine the ingredients for the seasonings (1 Tbsp miso, 1 Tbsp sugar, 2 Tbsp sake, 1 Tbsp mirin, 1 ½ Tbsp soy sauce).
  3. Finely chop chives and cut off the stem of shimeji mushrooms. Separate shimeji into smaller pieces with hands.
  4. Cut off the stem of shimeji mushrooms and thinly slice them.
  5. Check to see if your salmon has any bone, and remove if there is any (it’s good to have a pair of fish bone tweezers). Pat dry the salmon with paper towel and season the salmon with kosher salt and freshly ground black pepper.

  6. Sprinkle flour on the salmon and thinly coat it all over the salmon. The flour will prevent the delicious juice leaking from the salmon and it also acts as a thickening agent for the sauce.

  7. Heat the olive oil in a frying pan over medium heat. Place the salmon from flesh side. You can see how far you’ve cooked from the side of the fillet. Don’t burn your salmon using high heat. Cook for 5 minutes.
  8. Flip so the skin side is on the bottom and add the shimeji and shiitake mushrooms. Cook the skin side for 5 minutes. 

  9. Then cook the sides of the salmon for 1 minute each. It is completely okay when there is a bit of translucent pink in the middle. The remaining heat will continue to cook the rest of the fish.

  10. Add the butter and saute the mushrooms. Put the mushrooms on the salmon so salmon gets some of the delicious sauce.

  11. Add the seasonings and coat the salmon using a spoon.

  12. Transfer the salmon and garnish with the chives.

Recipe by Namiko Chen of Just One Cookbook. All images and content on this site are copyright protected. Please do not use my images without my permission. If you’d like to share this recipe on your site, please re-write the recipe in your own words and link to this post as the original source. Thank you.

The post Miso Butter Salmon 味噌バターサーモン appeared first on Just One Cookbook.

Cheesy Vegan Spinach & Artichoke Dip

Minimalist Baker
Cheesy Vegan Spinach & Artichoke Dip

It’s here! Our go-to recipe for easy, vegan spinach and artichoke dip! Let’s do this!

This 10-ingredient recipe comes together quickly and easily with foolproof methods.

Inspired by our White Bean & Kale Artichoke Dip, we simplified things even more and removed vegan cream cheese as an ingredient, as it can be difficult to find for some and often contains processed soy (an ingredient many try to avoid).

Cheesy Vegan Spinach & Artichoke Dip from Minimalist Baker →

A Sweet Pea Chef
How To Make Homemade Chili (Easy Weeknight Dinner Idea!)

Want to learn how to make homemade chili?  This easy homemade chili recipe is full of satisfying meat, beans, and veggies, and will be the last chili recipe you’ll ever need.  It makes a great weeknight dinner and meal prep and is only 235 calories (15g protein, 2g fiber, 5g carbs).

Want to learn how to make delicious Homemade Chili? I’ve got some good news for you. Not just news, but a recipe, too. One that is easy to follow and always yields mouthwatering results. │A Sweet Pea Chef

By now, you probably know I like to keep it simple with my recipes. Same goes for my homemade chili. Chili in itself is not a complicated dish to physically make, but it is complex when it comes to flavors.

Just the thought of a big bowl of spicy, hearty homemade chili warms me up, and makes me dream of those cold winter nights when I’d curl up in front of the TV with a bowl of piping hot chili and some freshly baked cornbread.

An overhead image of a cutting board on a kitchen counter with sliced red and green bell peppers for the Homemade Chili

Just because you’re following a clean eating plan doesn’t mean chili is off limits to you! Follow this easy homemade chili recipe, which is made with whole, healthy chili ingredients. Serve it with these homemade corn tortillas and enjoy your completely clean easy weeknight dinner.

A close up image of a spoon stirring ground beef and garlic in a large skillet for the Homemade Chili.HOW TO COOK HOMEMADE CHILI WITHOUT BEANS

No beans about it, you can easily cook homemade chili without beans. Even though I love beans in my chili, if you prefer your chili meatier or just hate beans, you’re not alone.  In fact, I make this chili without beans for Dustin since he hates beans.

P.S. If you’re looking for a good recipe for chili without beans, try my Texas Chili recipe, too.

WHAT’S THE BEST MEAT TO USE IN HOMEMADE CHILI?

Ever wondered what is the best meat to use in homemade chili?  While making homemade chili isn’t rocket science, there’s definitely some science behind making truly great chili. This certainly applies when you’re choosing what meat to use in your chili recipe.

An overhead image of a large skillet with browned ground beef, bell peppers, garlic and spices for the Homemade Chili.

Traditionally, chili is made with either beef or pork. You can use ground meat or whole cuts, depending on your preferences.  Here are some of my favorite meats to use in homemade chili:

Ground Beef Beef Chuck Brisket Buffalo/Bison

My usual choice is to go with 85/15 grass-fed organic ground beef for good flavor and still a decent price point.  This will usually be the cheapest option, but that doesn’t mean it’s bad quality. If you’re wanting lots of flavor, but not too greasy, you can also add in some ground chuck for added fat and flavor.

An overhead image of a large skillet with ground beef, bell peppers, garlic, spices, diced tomatoes, tomato sauce, olives and pinto beans for the Homemade Chili.

Whichever kind of meat you use, what is important is browning it properly so it keeps all of its delicious meaty flavors no chili is complete without. My mom always told me the secret to tasty food is in browning the meat and she was right!

A close up image of a bowl of Homemade Chili made with ground beef, pinto beans, green and red bell peppers, canned diced tomatoes, black olives, yellow onion, garlic, olive oil and tomato sauce, garnished with grated cheddar cheese, green onions and greek yogurt.

CAN YOU COOK HOMEMADE CHILI IN A CROCK POT?

Can you cook homemade chili in a Crock Pot? Yes, you sure can!  I love using my slow cooker to make chili because it makes this super simple process EVEN simpler.  Just like most Crock Pot recipes, Homemade Chili made in a Crock Pot is shockingly easy and very satisfying – which is pretty much easy comfort food at its best.

In order to make this homemade chili in a slow cooker, you’ll still need to brown the meat before adding to the Crock Pot — remember the secret rule about browning your meat we talked about earlier!  Once that’s nicely browned, you can add everything but the beans to the crock pot and cook on High for 1-2 hours or on Low for 3-4 hours.  When about 10 minutes from being ready to serve, add in the beans and stir together.  Cook until the beans are heated through, and you’re good to go!

An overhead image of a bowl of Homemade Chili on a kitchen counter, made with ground beef, pinto beans, green and red bell pepper, canned diced tomatoes, black olives, yellow onion, garlic, olive oil and tomato sauce, garnished with grated cheddar cheese, green onions and greek yogurt.

HOW TO STORE HOMEMADE CHILI

If you’ve got yourself a big skillet full of delicious homemade chili and you’re interested in knowing how long it will last in the fridge, the good news is it will last up to 5-6 days.  To get your chili to last as long as possible in the fridge, make sure to properly store it in an air-tight container.

If you’d like to freeze your chili, you can easily freeze it and then just heat up the leftovers whenever you feel like diving into a bowl of this steamy, savory deliciousness right here.  Just allow the chili to cool down before transferring to a freezer safe sealable plastic bag, and then place n the freezer.

To save space in your freezer, you can first freeze the chili in the bag flat on a baking sheet in order to stack the frozen bag for later.  When ready to eat, just thaw in the fridge overnight and then reheat in the microwave for 2 minutes per serving or in a skillet until heated through.

An overhead image of a bowl of Homemade Chili made with ground beef, pinto beans, green and red bell peppers, canned diced tomatoes, black olives, yellow onion, garlic, olive oil and tomato sauce, garnished with grated cheddar cheese, green onions and greek yogurt.

MORE HEALTHY HOMEMADE CHILI RECIPES TEXAS CHILI RECIPE

This easy Texas Chili Recipe, made without beans and using red wine is seriously one of my favorite chili recipes ever. Well, I am a Texan after all! Made with lean ground beef, crushed tomatoes, and greek yogurt, my Texas Chili Recipe has only 203 calories per serving.

Texas Chili Recipe | Celebrate Texas Independence Day with this easy Texas Chili Recipe, made without beans and using Llano Estacado red wine. | A Sweet Pea Chef #AD

BUTTERNUT SQUASH INSTANT POT CHILI

Enjoy this hearty, healthy and easy to make Butternut Squash Instant Pot Chili – ready in just 20 minutes! My Butternut Squash Instant Pot chili is vegan, gluten-free, paleo and clean eating approved. If you don’t own an instant pot, worry not! This instant pot recipe can easily be converted into a slow cooker recipe.

Butternut Squash Instant Pot Chili | How to cook butternut squash Instant Pot chili with canned beans and fresh butternut squash. | A Sweet Pea Chef

How To Make Homemade Chili

Homemade Chili

Want to learn how to make homemade chili?  This easy homemade chili recipe is full of satisfying meat, beans, and veggies, and will be the last chili recipe you’ll ever need. 

1 tbsp olive oil 1 lb organic, grass-fed ground beef (85/15) 1 yellow onion, (diced) 1 green bell pepper, (diced) 1 red bell pepper, (diced) 4 cloves garlic, (minced) 1 tsp cumin 1 tsp chili powder 1/2 tsp sea salt 1/2 tsp ground black pepper 1/2 tsp dried oregano 1/2 tsp paprika 1/4 tsp cayenne pepper 2 14.5 oz cans diced tomatoes 1 8 oz can tomato sauce 1 cup black olives, (sliced) 1 15 oz can no sodium added pinto beans, ( rinsed and drained) cheddar cheese, (optional garnish) sliced green onions (optional garnish) full fat greek yogurt, (optional garnish)
In a large, deep skillet, heat olive oil over medium-high heat. 

When oil is hot, add onion and cook until tender.

Add ground beef and cook until browned.

Add bell peppers, garlic, and all the spices, and stir to incorporate.  Cook for 10 minutes, or until bell peppers begin to become tender. 

Add diced tomatoes, tomato sauce, olives, pinto beans, and bring to a boil. 

Reduce to a simmer over medium heat, cover, and cook for an additional 10 minutes, stirring occasionally.

Serve with a sprinkling of grated cheddar cheese, sliced green onions and a dollop of greek yogurt, if desired.

Nutrition information does not include optional toppings.

This post contains affiliate links for products I use often and highly recommend.

The post How To Make Homemade Chili (Easy Weeknight Dinner Idea!) appeared first on A Sweet Pea Chef.

A Couple Cooks
How to Make Vegan Nacho Cheese

Want to make a healthy vegan nacho cheese sauce at home? Basically vegan queso, this cashew cheese sauce recipe is ultra simple and delicious.

How to Make Vegan Nacho Cheese | A healthy vegan nacho cheese sauce recipe

Can we talk about vegan nacho cheese? Yes, vegan nacho cheese. If you’re like Alex’s brother and think vegan is a dirty word, you’re probably not reading this. So, I don’t have to convince you that vegan is indeed a delightful adjective that simply means this vegan nacho cheese recipe has no real cheese in it! However, this does not mean vegan nacho cheese tastes like fake cheese. It’s so creamy and flavorful that it has me swearing off that plastic processed nacho cheese forever! And let me tell you: I’m a huge cheese fan. Alex and I eat mostly vegetarian on the regular, but more and more vegan recipes have been creeping into our kitchen repertoire. And we think this vegan nacho cheese recipe should be in yours! Why we think so—and a new video—below.

Related: The Best Loaded Vegan Nachos

Watch how to make our vegan nacho cheese recipe

How to make vegan nacho cheese

The magic of this vegan nacho cheese recipe is in one word: cashews. We use cashews in many vegan recipes to make a creamy dairy free cashew cheese sauce: like in this Vegan Pasta Marinara, these Greek Nachos with Cilantro Drizzle, and these Vegan Tacos with Chipotle Cashew Cream. Oh and our Incredible No Mayo Potato Salad! After cashews are soaked, they blend into the perfect creamy consistency that can carry any flavors you like.

For this vegan nacho cheese (basically a vegan queso), we’ve added some traditional Mexican flavors. The special ingredient is a can of green chiles, which you should be able to find in most international grocery aisles. The canned green chiles we’ve specified are mild, but they do have a backend heat! Once it’s blended, you won’t notice too much heat: unless you use a hot chili powder! We’d done this by accident before, which resulted in a hot (but still delicious) vegan nacho cheese sauce. The other ingredients are all ones you likely have in your pantry and refrigerator: chili powder, cumin, onion powder, garlic powder, white wine vinegar, and yellow mustard.

How to Make Vegan Nacho Cheese | A healthy vegan nacho cheese sauce recipe

How to serve vegan nacho cheese

We created this vegan nacho cheese sauce to be used on our Best Loaded Vegan Nachos! These nachos combine use popular Smoky Instant Pot Lentils and Rice recipe — but if you don’t have an Instant Pot or other pressure cooker, you can use our Lentil Tacos recipe. This chip dip would be perfect as a gameday snack to nosh on while watching football! Here are some other ways to use this vegan nacho cheese sauce:

Plain: Just put in in a bowl and use it to dip chips! Buddha bowl or grain bowl: A Mexican or Latin themed Buddha bowl is much more delicious with vegan nacho cheese! Try this Southwestern Bowl with vegan nacho cheese! Chili: Our popular Vegetarian Chili turns into a vegan chili when topped with this cashew cheese sauce! Tot-chos: As in, Tater Tot Nachos. Need we say more?

A few other notes: the recipe is totally kid friendly! Larson absolutely loved this cashew cheese sauce and loved dipping small pieces of tortilla chips! However, important: this sauce is messy! Because it has turmeric, if it lands on clothes it makes a yellow mark. So, when Larson eats it we strip off his clothes and put on his silicone bib.

How to Make Vegan Nacho Cheese | A healthy vegan nacho cheese sauce recipe

Looking for more vegan recipes?

Here are some of our favorite vegan recipes!

Very Veggie Vegan Pizza Chocolate Tahini Vegan No Bake Cookies Vegan Banh Mi Sandwich This recipe is…

This vegan nacho cheese recipe is vegetarian, gluten free, vegan, plant based, refined sugar free, and naturally sweet.

How to Make Vegan Nacho Cheese | A healthy vegan nacho cheese sauce recipe

Print
.tasty-recipes-image { float: right; } .tasty-recipes-print-button { background-color: #666677; display: inline-block; padding-left: 1em; padding-right: 1em; padding-top: 0.5em; padding-bottom: 0.5em; text-decoration: none; } a.tasty-recipes-print-button { color: #FFF; } a.tasty-recipes-print-button:hover { color: #FFF; } .tasty-recipes-rating.tasty-recipes-clip-10 { -webkit-clip-path: polygon(0 0, 10% 0%, 10% 100%, 0% 100%); clip-path: polygon(0 0, 10% 0%, 10% 100%, 0% 100%); } .tasty-recipes-rating.tasty-recipes-clip-20 { -webkit-clip-path: polygon(0 0, 20% 0%, 20% 100%, 0% 100%); clip-path: polygon(0 0, 20% 0%, 20% 100%, 0% 100%); } .tasty-recipes-rating.tasty-recipes-clip-30 { -webkit-clip-path: polygon(0 0, 30% 0%, 30% 100%, 0% 100%); clip-path: polygon(0 0, 30% 0%, 30% 100%, 0% 100%); } .tasty-recipes-rating.tasty-recipes-clip-40 { -webkit-clip-path: polygon(0 0, 40% 0%, 40% 100%, 0% 100%); clip-path: polygon(0 0, 40% 0%, 40% 100%, 0% 100%); } .tasty-recipes-rating.tasty-recipes-clip-50 { -webkit-clip-path: polygon(0 0, 50% 0%, 50% 100%, 0% 100%); clip-path: polygon(0 0, 50% 0%, 50% 100%, 0% 100%); } .tasty-recipes-rating.tasty-recipes-clip-60 { -webkit-clip-path: polygon(0 0, 60% 0%, 60% 100%, 0% 100%); clip-path: polygon(0 0, 60% 0%, 60% 100%, 0% 100%); } .tasty-recipes-rating.tasty-recipes-clip-70 { -webkit-clip-path: polygon(0 0, 70% 0%, 70% 100%, 0% 100%); clip-path: polygon(0 0, 70% 0%, 70% 100%, 0% 100%); } .tasty-recipes-rating.tasty-recipes-clip-80 { -webkit-clip-path: polygon(0 0, 80% 0%, 80% 100%, 0% 100%); clip-path: polygon(0 0, 80% 0%, 80% 100%, 0% 100%); } .tasty-recipes-rating.tasty-recipes-clip-90 { -webkit-clip-path: polygon(0 0, 90% 0%, 90% 100%, 0% 100%); clip-path: polygon(0 0, 90% 0%, 90% 100%, 0% 100%); } .tasty-recipes-nutrition ul { list-style-type: none; margin: 0; padding: 0; } .tasty-recipes-nutrition ul:after { display: block; content: ' '; clear: both; } .tasty-recipes-nutrition li { float: left; margin-right: 1em; } @media print { .tasty-recipes-no-print, .tasty-recipes-no-print * { display: none !important; } } .tasty-recipes { border: 5px solid #666677; margin-top: 6em; margin-bottom: 4em; } .tasty-recipes-print-button { display: none; } .tasty-recipes-image-shim { height: 69.5px; clear: both; } .tasty-recipes-entry-header { background-color: #666677; color: #FFF; text-align: center; padding-top: 35px; padding-bottom: 1.5em; padding-left: 2.5em; padding-right: 2.5em; } .tasty-recipes-entry-header.tasty-recipes-has-image { padding-top: 0px; } .tasty-recipes-entry-header .tasty-recipes-image { float: none; text-align: center; transform: translateY(-115px); margin-bottom: 1em; /* Decide if we need this */ } .tasty-recipes-entry-header .tasty-recipes-image img { -webkit-border-radius: 50%; -moz-border-radius: 50%; border-radius: 50%; border: 5px solid #666677; height: 150px; width: 150px; display: inline-block; } .tasty-recipes-entry-header h2 { font-size: 2em; font-weight: 400; text-transform: lowercase; margin-bottom: 0; text-align: center; color: #FFF; margin-top: 0; padding-top: 0; padding-bottom: 0; } .tasty-recipes-has-image .tasty-recipes-entry-header h2 { margin-top: -115px; } .tasty-recipes-entry-header hr { border: 1px solid #B7BBC6; background-color: #B7BBC6; margin-bottom: 1em; margin-top: 1em; } .tasty-recipes-entry-header div.tasty-recipes-rating { text-decoration: none; border: none; } .tasty-recipes-entry-header .tasty-recipes-rating:hover { text-decoration: none; } .tasty-recipes-entry-header div.tasty-recipes-rating { font-size: 1.375em; display: block; } .tasty-recipes-entry-header .tasty-recipes-rating p { margin-bottom: 0; } .tasty-recipes-entry-header span.tasty-recipes-rating { margin-left: .25em; margin-right: .25em; color: #FFF; } .tasty-recipes-entry-header .rating-label { font-style: italic; color: #B7BBC6; font-size: .6875em; display: block; } .tasty-recipes-entry-header .tasty-recipes-details { margin-top: 1em; } .tasty-recipes-entry-header .tasty-recipes-details ul { list-style-type: none; margin: 0; } .tasty-recipes-entry-header .tasty-recipes-details ul li { display: inline-block; margin-left: .5em; margin-right: .5em; font-size: 1em; line-height: 2.5em; color: #fff; } .tasty-recipes-entry-header .tasty-recipes-details ul li.author, .tasty-recipes-entry-header .tasty-recipes-details ul li.total-time { display: none; } @media only screen and (max-width: 520px) { .tasty-recipes-entry-header .tasty-recipes-details .detail-icon { height: .8em; margin-top: .4em; } .tasty-recipes-entry-header .tasty-recipes-details ul li { font-size: .875em; line-height: 1.75em; } } @media only screen and (min-width: 520px) { .tasty-recipes-entry-header .tasty-recipes-details .detail-icon { height: 1em; margin-top: .6em; } .tasty-recipes-entry-header .tasty-recipes-details ul li { font-size: 1em; line-height: 2.5em; } } .tasty-recipes-entry-header .tasty-recipes-details .tasty-recipes-label { font-style: italic; color: #B7BBC6; margin-right: .125em; } .tasty-recipes-entry-header .tasty-recipes-details .detail-icon { vertical-align: top; margin-right: .2em; display: inline-block; } .tasty-recipes-entry-content { padding-top: 1.25em; } .tasty-recipes-entry-content .tasty-recipes-buttons { margin-bottom: 1.25em; margin-left: 1.25em; margin-right: 1.25em; } .tasty-recipes-entry-content .tasty-recipes-buttons:after { content: " "; display: block; clear: both; } .tasty-recipes-entry-content .tasty-recipes-button-wrap { width: 50%; display: inline-block; float: left; box-sizing: border-box; } .tasty-recipes-entry-content .tasty-recipes-buttons a { text-transform: uppercase; text-align: center; display: block; color: #FFF; background-color: #666677; font-size: 1em; line-height: 1.375em; padding-top: 1em; padding-bottom: 1em; font-weight: bold; margin-top: 0; border: none; border-radius: 0; text-decoration: none; } .tasty-recipes-entry-content a img { box-shadow: none; -webkit-box-shadow: none; } .tasty-recipes-entry-content .tasty-recipes-buttons a:hover { background-color: #979599; text-decoration: none; } .tasty-recipes-entry-content .tasty-recipes-buttons img { vertical-align: top; } .tasty-recipes-entry-content .tasty-recipes-buttons img.svg-print, .tasty-recipes-entry-content .tasty-recipes-buttons img.svg-pinterest { height: 1.25em; margin-right: .375em; margin-bottom: 0; background: none; display: inline-block; } @media only screen and (min-width: 520px) { .tasty-recipes-entry-content .tasty-recipes-button-wrap:first-child { padding-right: .625em; } .tasty-recipes-entry-content .tasty-recipes-button-wrap:last-child { padding-left: .625em; } } @media only screen and (max-width: 520px) { .tasty-recipes-entry-content .tasty-recipes-button-wrap { width: 100%; } .tasty-recipes-entry-content .tasty-recipes-button-wrap:nth-child(2) { padding-top: 1em; } } .tasty-recipes-entry-content h3 { text-transform: uppercase; font-size: .75em; color: #979599; margin-bottom: 1.5em; } .tasty-recipes-entry-content h4 { font-size: 1em; padding-top: 0; margin-bottom: 1.5em; margin-top: 1.5em; } .tasty-recipes-entry-content hr { background-color: #EAE9EB; border: 1px solid #EAE9EB; margin-top: 1em; margin-bottom: 1em; } .tasty-recipes-entry-content .tasty-recipes-description, .tasty-recipes-entry-content .tasty-recipes-ingredients, .tasty-recipes-entry-content .tasty-recipes-instructions, .tasty-recipes-entry-content .tasty-recipes-keywords { padding-left: 1.25em; padding-right: 1.25em; } .tasty-recipes-entry-content .tasty-recipes-description p { margin-bottom: 1em; } .tasty-recipes-entry-content .tasty-recipes-ingredients ul, .tasty-recipes-entry-content .tasty-recipes-instructions ul { list-style-type: none; margin-left: 0; margin-bottom: 1.5em; padding: 0; } .tasty-recipes-entry-content .tasty-recipes-ingredients ul li, .tasty-recipes-entry-content .tasty-recipes-instructions ul li { margin-bottom: .625em; list-style-type: none; position: relative; margin-left: 2.5em; line-height: 1.46; } .tasty-recipes-entry-content .tasty-recipes-ingredients ul li:before, .tasty-recipes-entry-content .tasty-recipes-instructions ul li:before { background-color: #666677; -webkit-border-radius: 50%; -moz-border-radius: 50%; border-radius: 50%; height: .5em; width: .5em; display: block; content: " "; left: -1.25em; top: .375em; position: absolute; } .tasty-recipes-entry-content .tasty-recipes-ingredients ol, .tasty-recipes-entry-content .tasty-recipes-instructions ol { counter-reset:li; margin-left: 0; padding: 0; } .tasty-recipes-entry-content .tasty-recipes-ingredients ol li, .tasty-recipes-entry-content .tasty-recipes-instructions ol li { list-style-type: none; position: relative; margin-bottom: 1em; margin-left: 2.5em; line-height: 1.46; } .tasty-recipes-entry-content .tasty-recipes-ingredients ol li:before, .tasty-recipes-entry-content .tasty-recipes-instructions ol li:before { content:counter(li); counter-increment: li; position: absolute; background-color: #666677; -webkit-border-radius: 50%; -moz-border-radius: 50%; border-radius: 50%; height: 1.45em; width: 1.45em; color: #FFF; left: -1.25em; transform: translateX(-50%); line-height: 1.5em; font-size: .6875em; text-align: center; top: .1875em; } @media only screen and (max-width: 520px) { .tasty-recipes-entry-content .tasty-recipes-ingredients ol, .tasty-recipes-entry-content .tasty-recipes-instructions ol { margin-left: 0; } } .tasty-recipes-entry-content .tasty-recipes-notes { padding: 1.25em; background-color: #EDF0F2; } .tasty-recipes-entry-content .tasty-recipes-notes ol { counter-reset:li; margin-left: 0; padding: 0; } .tasty-recipes-entry-content .tasty-recipes-notes ul { margin-left: 0; padding: 0; } .tasty-recipes-entry-content .tasty-recipes-notes p, .tasty-recipes-entry-content .tasty-recipes-notes ul li, .tasty-recipes-entry-content .tasty-recipes-notes ol li { background-color: #FFF; padding-left: 1.5625em; padding-right: 1.5625em; padding-top: 1.25em; padding-bottom: 1.25em; position: relative; -webkit-clip-path: polygon(20px 0, 100% 0, 100% 100%, 0 100%, 0 20px); clip-path: polygon(20px 0, 100% 0, 100% 100%, 0 100%, 0 20px); margin-bottom: 1.5em; } @media only screen and (min-width: 520px) { .tasty-recipes-entry-content .tasty-recipes-notes p, .tasty-recipes-entry-content .tasty-recipes-notes ul li, .tasty-recipes-entry-content .tasty-recipes-notes ol li { padding-left: 2.5em; } .tasty-recipes-entry-content .tasty-recipes-notes p:before, .tasty-recipes-entry-content .tasty-recipes-notes ul li:before { content: "i"; display: block; background-color: #666677; -webkit-border-radius: 50%; -moz-border-radius: 50%; border-radius: 50%; height: 1.3em; width: 1.3em; font-size: .75em; line-height: 1.3em; text-align: center; color: #FFF; position: absolute; left: 1.167em; top: 1.9em; } .tasty-recipes-entry-content .tasty-recipes-notes ol li:before { content:counter(li); counter-increment: li; position: absolute; background-color: #666677; -webkit-border-radius: 50%; -moz-border-radius: 50%; border-radius: 50%; height: 1.45em; width: 1.45em; color: #FFF; left: 2em; transform: translateX(-50%); line-height: 1.5em; font-size: .6875em; text-align: center; top: 2em; } } .tasty-recipes-entry-content .tasty-recipes-notes p:last-child { margin-bottom: 0; } .tasty-recipes-entry-content .tasty-recipes-keywords { background-color: #EDF0F2; padding-bottom: 1em; padding-top: 1em; } .tasty-recipes-entry-content .tasty-recipes-keywords p { font-size: 0.7em; font-style: italic; color: #979599; margin-bottom: 0; } .tasty-recipes-entry-content .tasty-recipes-keywords p span { font-weight: bold; } .tasty-recipes-nutrifox { text-align: center; margin: 0; } .nutrifox-label { background-color: #EDF0F2; } .tasty-recipes-nutrifox iframe { width: 100%; display: block; margin: 0; } .tasty-recipes-entry-content .tasty-recipes-nutrition { padding: 1.25em; color: #666677; } .tasty-recipes-nutrition .tasty-recipes-label { font-style: italic; color: #B7BBC6; margin-right: .125em; font-weight: 400; } .tasty-recipes-nutrition ul { text-align: center; } .tasty-recipes-nutrition li { float: none; display: inline-block; line-height: 2em; } .tasty-recipes-entry-footer { background-color: #666677; padding-top: 1.5625em; padding-bottom: 1.25em; padding-left: 2.5em; padding-right: 2.5em; text-align: center; } .tasty-recipes-entry-footer .tasty-recipes-footer-content { display: inline-block; } .tasty-recipes-entry-footer img { width: 65px; } .tasty-recipes-entry-footer h3 { color: #B7BBC6; font-size: 1.25em; line-height: 2.25em; margin-top: .5em; margin-bottom: .125em; padding: 0; line-height: 1em; } .tasty-recipes-entry-footer p { margin-bottom: 0; color: #FFF; font-size: .75em; } .tasty-recipes-entry-footer p a { color: #FFF; text-decoration: underline; box-shadow: none; border-bottom: none; } .tasty-recipes-entry-footer:after { content: " "; display: block; clear:both; } @media only screen and (max-width: 520px) { .tasty-recipes-entry-footer h3 { margin-top: .5em; margin-bottom: .5em; } .tasty-recipes-entry-footer { text-align: center; } } @media only screen and (min-width: 520px) { .tasty-recipes-entry-footer img { float: left; } .tasty-recipes-entry-footer h3, .tasty-recipes-entry-footer p { margin-left: 90px; clear: none; text-align: left; } } /* Print view styles */ .tasty-recipes-print-view { font-size: 11px; background-color: #fff; } .tasty-recipes-print-view .tasty-recipes-print-button { display: inline-block; } .tasty-recipes-print { padding:0; font-size: 11px; } .tasty-recipes-print-view .tasty-recipes { margin-top: 1em; } .tasty-recipes-print .tasty-recipes-entry-header { background-color: inherit; color: inherit; padding-bottom: 0; padding-left: 1em; padding-right: 1em; padding-top: 1em; } .tasty-recipes-print .tasty-recipes-entry-header .tasty-recipes-image { float: right; transform: none; } .tasty-recipes-print.tasty-recipes-has-image .tasty-recipes-entry-header h2 { margin-top: 0; } .tasty-recipes-print .tasty-recipes-entry-header h2 { color: inherit; margin-bottom: .5em; } .tasty-recipes-print .tasty-recipes-entry-header hr { display: none; } .tasty-recipes-print .tasty-recipes-entry-header span.tasty-recipes-rating { color: #000; } .tasty-recipes-print .tasty-recipes-entry-header .tasty-recipes-details ul { padding: 0; clear: none; } .tasty-recipes-print .tasty-recipes-entry-header .tasty-recipes-details ul li { line-height: 1.5em; color: #000; } .tasty-recipes-print .tasty-recipes-entry-header .tasty-recipes-details .detail-icon { display: none; } .tasty-recipes-print .tasty-recipes-entry-content img { max-width: 50%; height: auto; } .tasty-recipes-print .tasty-recipes-entry-content .tasty-recipes-ingredients ul li, .tasty-recipes-print .tasty-recipes-entry-content .tasty-recipes-ingredients ol li { margin-bottom: 0.25em; line-height: 1.1; } .tasty-recipes-print .tasty-recipes-entry-content .tasty-recipes-instructions ul li, .tasty-recipes-print .tasty-recipes-entry-content .tasty-recipes-instructions ol li { margin-bottom: 0.5em; line-height: 1.1; } .tasty-recipes-print .tasty-recipes-entry-content .tasty-recipes-ingredients ul li:before, .tasty-recipes-print .tasty-recipes-entry-content .tasty-recipes-instructions ul li:before { top: 0.3em; } .tasty-recipes-print .tasty-recipes-entry-content .tasty-recipes-ingredients ol li:before, .tasty-recipes-print .tasty-recipes-entry-content .tasty-recipes-instructions ol li:before { top: 0; } .tasty-recipes-print .tasty-recipes-entry-content .tasty-recipes-notes p, .tasty-recipes-print .tasty-recipes-entry-content .tasty-recipes-notes ul li, .tasty-recipes-print .tasty-recipes-entry-content .tasty-recipes-notes ol li { padding-top: 0; padding-bottom: 0; background-color: #EDF0F2; clip-path: none; } .tasty-recipes-print .tasty-recipes-entry-content .tasty-recipes-notes p:before, .tasty-recipes-print .tasty-recipes-entry-content .tasty-recipes-notes ul li:before { top: 0; clip-path: none; margin-bottom: 0.5em; } @media print { .tasty-recipes-print .tasty-recipes-entry-footer img { display: none; } } .tasty-recipes-print .tasty-recipes-source-link { text-align: center; } .tasty-recipes { border: 5px solid #4d4d4e; margin-top: 6em; margin-bottom: 4em; } .tasty-recipes-print-button { display: none; } .tasty-recipes-image-shim { height: 69.5px; clear: both; } .tasty-recipes-entry-header { background-color: #4d4d4e; color: #FFF; text-align: center; padding-top: 35px; padding-bottom: 1.5em; padding-left: 2.5em; padding-right: 2.5em; } .tasty-recipes-entry-header.tasty-recipes-has-image { padding-top: 0px; } .tasty-recipes-entry-header .tasty-recipes-image { float: none; text-align: center; transform: translateY(-115px); margin-bottom: 1em; /* Decide if we need this */ } .tasty-recipes-entry-header .tasty-recipes-image img { -webkit-border-radius: 50%; -moz-border-radius: 50%; border-radius: 50%; border: 5px solid #4d4d4e; height: 150px; width: 150px; } .tasty-recipes-entry-header h2 { font-size: 2em; letter-spacing: 1px; margin-bottom: 0; text-align: center; color: #FFF; margin-top: 0; padding-top: 0; padding-bottom: 0; } .tasty-recipes-has-image .tasty-recipes-entry-header h2 { margin-top: -115px; } .tasty-recipes-entry-header hr { border: 1px solid #cacaca; background-color: #cacaca; margin-bottom: 1em; margin-top: 1em; } .tasty-recipes-rating { text-align: center; margin-top: 19px; font-size: 12px; color: #6b6e77; } .tasty-recipes-entry-header .tasty-recipes-rating a { text-decoration: none; text-decoration: none; border: none; } .tasty-recipes-entry-header .tasty-recipes-rating a:hover { text-decoration: none; } .tasty-recipes-entry-header .tasty-recipes-rating-stars { font-size: 1.375em; display: block; } .tasty-recipes-entry-header .tasty-recipes-rating-stars span { margin-left: .25em; margin-right: .25em; color: #FFF; } .tasty-recipes-entry-header .tasty-recipes-rating-label { font-style: italic; color: #cacaca; font-size: .6875em; display: block; } .tasty-recipes-entry-header .tasty-recipes-details { margin-top: 1em; } .tasty-recipes-entry-header .tasty-recipes-details ul { list-style-type: none; margin: 0; } .tasty-recipes-entry-header .tasty-recipes-details ul li { display: inline-block; margin-left: .5em; margin-right: .5em; font-size: 1em; line-height: 2.5em; } .tasty-recipes-entry-header .tasty-recipes-details ul li.author, .tasty-recipes-entry-header .tasty-recipes-details ul li.total-time { display: none; } @media only screen and (max-width: 520px) { .tasty-recipes-entry-header .tasty-recipes-details .detail-icon { height: .8em; margin-top: .4em; } .tasty-recipes-entry-header .tasty-recipes-details ul li { font-size: .875em; line-height: 1.75em; } } @media only screen and (min-width: 520px) { .tasty-recipes-entry-header .tasty-recipes-details .detail-icon { height: 1em; margin-top: .6em; } .tasty-recipes-entry-header .tasty-recipes-details ul li { font-size: 1em; line-height: 2.5em; } } .tasty-recipes-entry-header .tasty-recipes-details .tasty-recipes-label { font-style: italic; color: #cacaca; margin-right: .125em; } .tasty-recipes-entry-header .tasty-recipes-details .detail-icon { vertical-align: top; margin-right: .2em; } .tasty-recipes-entry-content { padding-top: 1.25em; } .tasty-recipes-entry-content .tasty-recipes-buttons { margin-bottom: 1.25em; margin-left: 1.25em; margin-right: 1.25em; } .tasty-recipes-entry-content .tasty-recipes-buttons:after { content: " "; display: block; clear: both; } .tasty-recipes-entry-content .tasty-recipes-button-wrap { width: 50%; display: inline-block; float: left; box-sizing: border-box; } .tasty-recipes-entry-content .tasty-recipes-buttons a { text-transform: uppercase; text-align: center; display: block; color: #FFF; background-color: #4d4d4e; font-size: 1em; line-height: 1.375em; padding-top: 1em; padding-bottom: 1em; font-weight: bold; margin-top: 0; border: none; border-radius: 0; text-decoration: none; } .tasty-recipes-entry-content a img { box-shadow: none; -webkit-box-shadow: none; } .tasty-recipes-entry-content .tasty-recipes-buttons a:hover { background-color: #979599; text-decoration: none; } .tasty-recipes-entry-content .tasty-recipes-buttons img { vertical-align: top; } .tasty-recipes-entry-content .tasty-recipes-buttons img.svg-print, .tasty-recipes-entry-content .tasty-recipes-buttons img.svg-pinterest { height: 1.25em; margin-right: .375em; margin-bottom: 0; background: none; display: inline-block; } @media only screen and (min-width: 520px) { .tasty-recipes-entry-content .tasty-recipes-button-wrap:first-child { padding-right: .625em; } .tasty-recipes-entry-content .tasty-recipes-button-wrap:last-child { padding-left: .625em; } } @media only screen and (max-width: 520px) { .tasty-recipes-entry-content .tasty-recipes-button-wrap { width: 100%; } .tasty-recipes-entry-content .tasty-recipes-button-wrap:nth-child(2) { padding-top: 1em; } } .tasty-recipes-entry-content h3 { text-transform: uppercase; font-size: .75em; color: #979599; margin-bottom: 1.5em; } .tasty-recipes-entry-content h4 { font-size: 1em; padding-top: 0; margin-bottom: 1.5em; margin-top: 1.5em; } .tasty-recipes-entry-content hr { background-color: #EAE9EB; border: 1px solid #EAE9EB; margin-top: 1em; margin-bottom: 1em; } .tasty-recipes-entry-content .tasty-recipes-description, .tasty-recipes-entry-content .tasty-recipes-ingredients, .tasty-recipes-entry-content .tasty-recipes-instructions { padding-left: 1.25em; padding-right: 1.25em; } .tasty-recipes-entry-content .tasty-recipes-description p { margin-bottom: 1em; } .tasty-recipes-entry-content .tasty-recipes-ingredients ul, .tasty-recipes-entry-content .tasty-recipes-instructions ul { list-style-type: none; margin-left: 0; margin-bottom: 1.5em; padding: 0; } .tasty-recipes-entry-content .tasty-recipes-ingredients ul li, .tasty-recipes-entry-content .tasty-recipes-instructions ul li { margin-bottom: .625em; list-style-type: none; position: relative; margin-left: 2.5em; line-height: 1.46; } .tasty-recipes-entry-content .tasty-recipes-ingredients ul li:before, .tasty-recipes-entry-content .tasty-recipes-instructions ul li:before { background-color: #4d4d4e; -webkit-border-radius: 50%; -moz-border-radius: 50%; border-radius: 50%; height: .5em; width: .5em; display: block; content: " "; left: -1.25em; top: .375em; position: absolute; } .tasty-recipes-entry-content .tasty-recipes-ingredients ol, .tasty-recipes-entry-content .tasty-recipes-instructions ol { counter-reset:li; margin-left: 0; padding: 0; } .tasty-recipes-entry-content .tasty-recipes-ingredients ol li, .tasty-recipes-entry-content .tasty-recipes-instructions ol li { list-style-type: none; position: relative; margin-bottom: 1em; margin-left: 2.5em; line-height: 1.46; } .tasty-recipes-entry-content .tasty-recipes-ingredients ol li:before, .tasty-recipes-entry-content .tasty-recipes-instructions ol li:before { content:counter(li); counter-increment: li; position: absolute; background-color: #4d4d4e; -webkit-border-radius: 50%; -moz-border-radius: 50%; border-radius: 50%; height: 1.45em; width: 1.45em; color: #FFF; left: -1.25em; transform: translateX(-50%); line-height: 1.5em; font-size: .6875em; text-align: center; top: .1875em; } @media only screen and (max-width: 520px) { .tasty-recipes-entry-content .tasty-recipes-ingredients ol, .tasty-recipes-entry-content .tasty-recipes-instructions ol { margin-left: 0; } .tasty-recipes-entry-content .tasty-recipes-ingredients ol li, .tasty-recipes-entry-content .tasty-recipes-instructions ol li { } } .tasty-recipes-entry-content .tasty-recipes-notes { padding: 1.25em; background-color: #EDF0F2; } .tasty-recipes-entry-content .tasty-recipes-notes ol { counter-reset:li; margin-left: 0; padding: 0; } .tasty-recipes-entry-content .tasty-recipes-notes ul { margin-left: 0; padding: 0; } .tasty-recipes-entry-content .tasty-recipes-notes p, .tasty-recipes-entry-content .tasty-recipes-notes ul li, .tasty-recipes-entry-content .tasty-recipes-notes ol li { background-color: #FFF; padding-left: 1.5625em; padding-right: 1.5625em; padding-top: 1.25em; padding-bottom: 1.25em; position: relative; -webkit-clip-path: polygon(20px 0, 100% 0, 100% 100%, 0 100%, 0 20px); clip-path: polygon(20px 0, 100% 0, 100% 100%, 0 100%, 0 20px); margin-bottom: 1.5em; } @media only screen and (min-width: 520px) { .tasty-recipes-entry-content .tasty-recipes-notes p, .tasty-recipes-entry-content .tasty-recipes-notes ul li, .tasty-recipes-entry-content .tasty-recipes-notes ol li { padding-left: 2.5em; } .tasty-recipes-entry-content .tasty-recipes-notes p:before, .tasty-recipes-entry-content .tasty-recipes-notes ul li:before { content: "i"; display: block; background-color: #4d4d4e; -webkit-border-radius: 50%; -moz-border-radius: 50%; border-radius: 50%; height: 1.3em; width: 1.3em; font-size: .75em; line-height: 1.3em; text-align: center; color: #FFF; position: absolute; left: 1.167em; top: 1.9em; } .tasty-recipes-entry-content .tasty-recipes-notes ol li:before { content:counter(li); counter-increment: li; position: absolute; background-color: #4d4d4e; -webkit-border-radius: 50%; -moz-border-radius: 50%; border-radius: 50%; height: 1.45em; width: 1.45em; color: #FFF; left: 2em; transform: translateX(-50%); line-height: 1.5em; font-size: .6875em; text-align: center; top: 2em; } } .tasty-recipes-entry-content .tasty-recipes-notes p:last-child { margin-bottom: 0; } .tasty-recipes-nutrifox { text-align: center; margin: 0; } .tasty-recipes-nutrifox iframe { width: 100%; display: block; margin: 0; } .tasty-recipes-entry-content .tasty-recipes-nutrition { padding: 1.25em; color: #4d4d4e; } .tasty-recipes-nutrition .tasty-recipes-label { font-style: italic; color: #cacaca; margin-right: .125em; font-weight: 400; } .tasty-recipes-nutrition ul { text-align: center; } .tasty-recipes-nutrition li { float: none; display: inline-block; line-height: 2em; } .tasty-recipes-entry-footer { background-color: #4d4d4e; padding-top: 1.5625em; padding-bottom: 1.25em; padding-left: 2.5em; padding-right: 2.5em; text-align: center; } .tasty-recipes-entry-footer .tasty-recipes-footer-content { display: inline-block; } .tasty-recipes-entry-footer img { width: 65px; } .tasty-recipes-entry-footer h3 { color: #cacaca; font-size: 1.25em; line-height: 2.25em; margin-top: .5em; margin-bottom: .125em; padding: 0; line-height: 1em; } .tasty-recipes-entry-footer p { margin-bottom: 0; color: #FFF; font-size: .75em; } .tasty-recipes-entry-footer p a { color: #FFF; text-decoration: underline; box-shadow: none; border-bottom: none; } .tasty-recipes-entry-footer:after { content: " "; display: block; clear:both; } @media only screen and (max-width: 520px) { .tasty-recipes-entry-footer h3 { margin-top: .5em; margin-bottom: .5em; } .tasty-recipes-entry-footer { text-align: center; } } @media only screen and (min-width: 520px) { .tasty-recipes-entry-footer img { float: left; } .tasty-recipes-entry-footer h3, .tasty-recipes-entry-footer p { margin-left: 90px; clear: none; text-align: left; } } /* Print view styles */ .tasty-recipes-print-view .tasty-recipes-print-button { display: inline-block; } .tasty-recipes-print { padding:0; } .tasty-recipes-print-view .tasty-recipes { margin-top: 1em; } .tasty-recipes-print .tasty-recipes-entry-header { background-color: inherit; color: inherit; padding-bottom: 0; padding-left: 1em; padding-right: 1em; } .tasty-recipes-print .tasty-recipes-entry-header .tasty-recipes-image { float: right; transform: none; } .tasty-recipes-print.tasty-recipes-has-image .tasty-recipes-entry-header h2 { margin-top: 0; } .tasty-recipes-print .tasty-recipes-entry-header h2 { color: inherit; margin-bottom: .5em; } .tasty-recipes-print .tasty-recipes-entry-header hr { display: none; } .tasty-recipes-print .tasty-recipes-entry-header .tasty-recipes-rating-stars span { color: #000; } .tasty-recipes-print .tasty-recipes-entry-header .tasty-recipes-details ul { padding: 0; clear: both; } .tasty-recipes-print .tasty-recipes-entry-header .tasty-recipes-details ul li { line-height: 1.5em; } .tasty-recipes-print .tasty-recipes-entry-header .tasty-recipes-details .detail-icon { display: none; } .tasty-recipe-responsive-iframe-container { position: relative; overflow: hidden; padding-top: 56.23%; } .tasty-recipe-responsive-iframe-container iframe { position: absolute; top: 0; left: 0; width: 100%; height: 100%; border: 0; }
How to Make Vegan Nacho Cheese | A healthy vegan nacho cheese sauce recipe
How to Make Vegan Nacho Cheese

1 Star (No Ratings Yet)

Author: Sonja Prep Time: 35 minutes Cook Time: 0 minutes Total Time: 35 minutes Yield: About 1 cup Category: Sauce Method: Blended Cuisine: Mexican
Description

Want to make a healthy vegan nacho cheese sauce at home? Basically vegan queso, this cashew cheese sauce recipe is ultra simple and delicious.

Ingredients 1 cup raw unsalted whole cashews 1 7 ounce can mild green chiles 1 tablespoon yellow mustard 1/2 teaspoon garlic powder 1/2 teaspoon onion powder 1/2 teaspoon chili powder (make sure it’s not spicy!) 1/2 teaspoon cumin 1/2 teaspoon turmeric (for color, optional) 1 teaspoon kosher salt 1/2 cup water
Instructions

Place the cashews in a bowl with water and allow them to soak for at least 30 minutes. (You can soak even longer if time allows, or even overnight if desired. If you don’t have a high speed blender, we recommend soaking at least 1 hour.)

Place all ingredients in a high speed blender and blend on high until creamy and fully combined. Place in a sealed container and store in the refrigerator.

Keywords: Nacho Cheese, Vegan Nacho Cheese, Queso, Vegan Queso, Mexican, Cashew Cheese, Vegan Cashew Cheese, Nacho Cheese Sauce

A Couple Cooks - Recipes for Healthy & Whole Living

The Best Loaded Vegan Nachos

These loaded vegan nachos are the best because they’re plant based, healthy nachos that are so flavorful no one will miss the meat!

Vegan nachos | Healthy nachos | Loaded gluten free nachos

Turns out Alex and I are into nachos. Clarification: we’re into healthy nachos. Or, nachos with a healthy twist? Healthyish? Pick your favorite word for a recipe that’s a whole food, from scratch, lighter take on comfort food, and that’s what we love. There’s our Loaded Grilled Nachos, made on the grill in a cast iron skillet. And our Greek Nachos that use pita chips as a base. And then our fusion style Mexican Fried Rice Nachos we made around the time our son Larson was born. There’s even Loaded Vegan Tater Tot Nachos, made with our homemade tater tots! But these *new* Loaded Vegan Nachos are our new favorite! They star our very favorite new Vegan Cashew Cheese recipe and are quick and easy to make once you have a few components on hand.

Watch how to make healthy loaded vegan nachos

How to make healthy vegan nachos

Nachos is a pretty loose concept, so there’s no “perfect” way to make vegan nachos. And in this case, healthy nachos are nachos that are healthier than normal, using lots of fresh plant based toppings and homemade sauces. Making these loaded nachos is very simple once you have made up a few of the components. Here are a few of our secrets:

Organic corn chips: Chips are where issues with processed ingredients can come into play if you’re not careful! So, for healthy vegan nachos we suggest buying organic corn chips that have only 3 ingredients: corn, oil, and salt! Look on the back of the package to determine whether your chips fit this description. Another way to get around processed chips is to make your own! We have a recipe for homemade tortilla chips in our Pretty Simple Cooking cookbook. Lentil topping: These nachos were born out of our popular Instant Pot recipe, these Smoky Instant Pot Lentils and Rice. The fantastic thing about this lentils recipe is that it makes a big pot that you can use in different ways throughout the week! We used them in our Instant Pot Lentil Tacos, and then agreed that nachos would be another great fit! If you don’t have an Instant Pot, use this Lentil Tacos Filling. Vegan nacho cheese: This vegan nacho cheese recipe is so delicious and simple to make: and it tastes way better than the plastic store bought nacho cheese! It’s made simply of cashews and a few spices. It’s also incredibly kid friendly!

Vegan nachos | Healthy nachos | Gluten free nachos

When to serve vegan nachos

These healthy vegan nachos are a perfect gameday appetizer for watching football — just don’t mention the word healthy! We’ve found that if you call something “healthy,” people automatically expect certain things from it. Even vegan is a negative buzzword for some people in our family! However, everyone in the family can enjoy these vegan nachos: vegan doesn’t have to sound lofty, unattainable, or tasteless! The experience of these vegan nachos is like any other: except that it leaves your body feeling good, instead of the typical gut bomb of salt and fat!

Vegan nachos | Healthy nachos | Gluten free nachos

Looking for more vegan recipes?

Here are some of our favorite vegan recipes!

Instant Pot Thai Sweet Potatoes Grilled Mango Tacos with Dream Sauce Very Veggie Vegan Pizza Chocolate Tahini Vegan No Bake Cookies Vegan nachos | Healthy nachos | Gluten free nachos This recipe is…

This best loaded vegan nachos recipe is vegetarian, gluten free, vegan, plant based, refined sugar free, and naturally sweet.

Print
.tasty-recipes-image { float: right; } .tasty-recipes-print-button { background-color: #666677; display: inline-block; padding-left: 1em; padding-right: 1em; padding-top: 0.5em; padding-bottom: 0.5em; text-decoration: none; } a.tasty-recipes-print-button { color: #FFF; } a.tasty-recipes-print-button:hover { color: #FFF; } .tasty-recipes-rating.tasty-recipes-clip-10 { -webkit-clip-path: polygon(0 0, 10% 0%, 10% 100%, 0% 100%); clip-path: polygon(0 0, 10% 0%, 10% 100%, 0% 100%); } .tasty-recipes-rating.tasty-recipes-clip-20 { -webkit-clip-path: polygon(0 0, 20% 0%, 20% 100%, 0% 100%); clip-path: polygon(0 0, 20% 0%, 20% 100%, 0% 100%); } .tasty-recipes-rating.tasty-recipes-clip-30 { -webkit-clip-path: polygon(0 0, 30% 0%, 30% 100%, 0% 100%); clip-path: polygon(0 0, 30% 0%, 30% 100%, 0% 100%); } .tasty-recipes-rating.tasty-recipes-clip-40 { -webkit-clip-path: polygon(0 0, 40% 0%, 40% 100%, 0% 100%); clip-path: polygon(0 0, 40% 0%, 40% 100%, 0% 100%); } .tasty-recipes-rating.tasty-recipes-clip-50 { -webkit-clip-path: polygon(0 0, 50% 0%, 50% 100%, 0% 100%); clip-path: polygon(0 0, 50% 0%, 50% 100%, 0% 100%); } .tasty-recipes-rating.tasty-recipes-clip-60 { -webkit-clip-path: polygon(0 0, 60% 0%, 60% 100%, 0% 100%); clip-path: polygon(0 0, 60% 0%, 60% 100%, 0% 100%); } .tasty-recipes-rating.tasty-recipes-clip-70 { -webkit-clip-path: polygon(0 0, 70% 0%, 70% 100%, 0% 100%); clip-path: polygon(0 0, 70% 0%, 70% 100%, 0% 100%); } .tasty-recipes-rating.tasty-recipes-clip-80 { -webkit-clip-path: polygon(0 0, 80% 0%, 80% 100%, 0% 100%); clip-path: polygon(0 0, 80% 0%, 80% 100%, 0% 100%); } .tasty-recipes-rating.tasty-recipes-clip-90 { -webkit-clip-path: polygon(0 0, 90% 0%, 90% 100%, 0% 100%); clip-path: polygon(0 0, 90% 0%, 90% 100%, 0% 100%); } .tasty-recipes-nutrition ul { list-style-type: none; margin: 0; padding: 0; } .tasty-recipes-nutrition ul:after { display: block; content: ' '; clear: both; } .tasty-recipes-nutrition li { float: left; margin-right: 1em; } @media print { .tasty-recipes-no-print, .tasty-recipes-no-print * { display: none !important; } } .tasty-recipes { border: 5px solid #666677; margin-top: 6em; margin-bottom: 4em; } .tasty-recipes-print-button { display: none; } .tasty-recipes-image-shim { height: 69.5px; clear: both; } .tasty-recipes-entry-header { background-color: #666677; color: #FFF; text-align: center; padding-top: 35px; padding-bottom: 1.5em; padding-left: 2.5em; padding-right: 2.5em; } .tasty-recipes-entry-header.tasty-recipes-has-image { padding-top: 0px; } .tasty-recipes-entry-header .tasty-recipes-image { float: none; text-align: center; transform: translateY(-115px); margin-bottom: 1em; /* Decide if we need this */ } .tasty-recipes-entry-header .tasty-recipes-image img { -webkit-border-radius: 50%; -moz-border-radius: 50%; border-radius: 50%; border: 5px solid #666677; height: 150px; width: 150px; display: inline-block; } .tasty-recipes-entry-header h2 { font-size: 2em; font-weight: 400; text-transform: lowercase; margin-bottom: 0; text-align: center; color: #FFF; margin-top: 0; padding-top: 0; padding-bottom: 0; } .tasty-recipes-has-image .tasty-recipes-entry-header h2 { margin-top: -115px; } .tasty-recipes-entry-header hr { border: 1px solid #B7BBC6; background-color: #B7BBC6; margin-bottom: 1em; margin-top: 1em; } .tasty-recipes-entry-header div.tasty-recipes-rating { text-decoration: none; border: none; } .tasty-recipes-entry-header .tasty-recipes-rating:hover { text-decoration: none; } .tasty-recipes-entry-header div.tasty-recipes-rating { font-size: 1.375em; display: block; } .tasty-recipes-entry-header .tasty-recipes-rating p { margin-bottom: 0; } .tasty-recipes-entry-header span.tasty-recipes-rating { margin-left: .25em; margin-right: .25em; color: #FFF; } .tasty-recipes-entry-header .rating-label { font-style: italic; color: #B7BBC6; font-size: .6875em; display: block; } .tasty-recipes-entry-header .tasty-recipes-details { margin-top: 1em; } .tasty-recipes-entry-header .tasty-recipes-details ul { list-style-type: none; margin: 0; } .tasty-recipes-entry-header .tasty-recipes-details ul li { display: inline-block; margin-left: .5em; margin-right: .5em; font-size: 1em; line-height: 2.5em; color: #fff; } .tasty-recipes-entry-header .tasty-recipes-details ul li.author, .tasty-recipes-entry-header .tasty-recipes-details ul li.total-time { display: none; } @media only screen and (max-width: 520px) { .tasty-recipes-entry-header .tasty-recipes-details .detail-icon { height: .8em; margin-top: .4em; } .tasty-recipes-entry-header .tasty-recipes-details ul li { font-size: .875em; line-height: 1.75em; } } @media only screen and (min-width: 520px) { .tasty-recipes-entry-header .tasty-recipes-details .detail-icon { height: 1em; margin-top: .6em; } .tasty-recipes-entry-header .tasty-recipes-details ul li { font-size: 1em; line-height: 2.5em; } } .tasty-recipes-entry-header .tasty-recipes-details .tasty-recipes-label { font-style: italic; color: #B7BBC6; margin-right: .125em; } .tasty-recipes-entry-header .tasty-recipes-details .detail-icon { vertical-align: top; margin-right: .2em; display: inline-block; } .tasty-recipes-entry-content { padding-top: 1.25em; } .tasty-recipes-entry-content .tasty-recipes-buttons { margin-bottom: 1.25em; margin-left: 1.25em; margin-right: 1.25em; } .tasty-recipes-entry-content .tasty-recipes-buttons:after { content: " "; display: block; clear: both; } .tasty-recipes-entry-content .tasty-recipes-button-wrap { width: 50%; display: inline-block; float: left; box-sizing: border-box; } .tasty-recipes-entry-content .tasty-recipes-buttons a { text-transform: uppercase; text-align: center; display: block; color: #FFF; background-color: #666677; font-size: 1em; line-height: 1.375em; padding-top: 1em; padding-bottom: 1em; font-weight: bold; margin-top: 0; border: none; border-radius: 0; text-decoration: none; } .tasty-recipes-entry-content a img { box-shadow: none; -webkit-box-shadow: none; } .tasty-recipes-entry-content .tasty-recipes-buttons a:hover { background-color: #979599; text-decoration: none; } .tasty-recipes-entry-content .tasty-recipes-buttons img { vertical-align: top; } .tasty-recipes-entry-content .tasty-recipes-buttons img.svg-print, .tasty-recipes-entry-content .tasty-recipes-buttons img.svg-pinterest { height: 1.25em; margin-right: .375em; margin-bottom: 0; background: none; display: inline-block; } @media only screen and (min-width: 520px) { .tasty-recipes-entry-content .tasty-recipes-button-wrap:first-child { padding-right: .625em; } .tasty-recipes-entry-content .tasty-recipes-button-wrap:last-child { padding-left: .625em; } } @media only screen and (max-width: 520px) { .tasty-recipes-entry-content .tasty-recipes-button-wrap { width: 100%; } .tasty-recipes-entry-content .tasty-recipes-button-wrap:nth-child(2) { padding-top: 1em; } } .tasty-recipes-entry-content h3 { text-transform: uppercase; font-size: .75em; color: #979599; margin-bottom: 1.5em; } .tasty-recipes-entry-content h4 { font-size: 1em; padding-top: 0; margin-bottom: 1.5em; margin-top: 1.5em; } .tasty-recipes-entry-content hr { background-color: #EAE9EB; border: 1px solid #EAE9EB; margin-top: 1em; margin-bottom: 1em; } .tasty-recipes-entry-content .tasty-recipes-description, .tasty-recipes-entry-content .tasty-recipes-ingredients, .tasty-recipes-entry-content .tasty-recipes-instructions, .tasty-recipes-entry-content .tasty-recipes-keywords { padding-left: 1.25em; padding-right: 1.25em; } .tasty-recipes-entry-content .tasty-recipes-description p { margin-bottom: 1em; } .tasty-recipes-entry-content .tasty-recipes-ingredients ul, .tasty-recipes-entry-content .tasty-recipes-instructions ul { list-style-type: none; margin-left: 0; margin-bottom: 1.5em; padding: 0; } .tasty-recipes-entry-content .tasty-recipes-ingredients ul li, .tasty-recipes-entry-content .tasty-recipes-instructions ul li { margin-bottom: .625em; list-style-type: none; position: relative; margin-left: 2.5em; line-height: 1.46; } .tasty-recipes-entry-content .tasty-recipes-ingredients ul li:before, .tasty-recipes-entry-content .tasty-recipes-instructions ul li:before { background-color: #666677; -webkit-border-radius: 50%; -moz-border-radius: 50%; border-radius: 50%; height: .5em; width: .5em; display: block; content: " "; left: -1.25em; top: .375em; position: absolute; } .tasty-recipes-entry-content .tasty-recipes-ingredients ol, .tasty-recipes-entry-content .tasty-recipes-instructions ol { counter-reset:li; margin-left: 0; padding: 0; } .tasty-recipes-entry-content .tasty-recipes-ingredients ol li, .tasty-recipes-entry-content .tasty-recipes-instructions ol li { list-style-type: none; position: relative; margin-bottom: 1em; margin-left: 2.5em; line-height: 1.46; } .tasty-recipes-entry-content .tasty-recipes-ingredients ol li:before, .tasty-recipes-entry-content .tasty-recipes-instructions ol li:before { content:counter(li); counter-increment: li; position: absolute; background-color: #666677; -webkit-border-radius: 50%; -moz-border-radius: 50%; border-radius: 50%; height: 1.45em; width: 1.45em; color: #FFF; left: -1.25em; transform: translateX(-50%); line-height: 1.5em; font-size: .6875em; text-align: center; top: .1875em; } @media only screen and (max-width: 520px) { .tasty-recipes-entry-content .tasty-recipes-ingredients ol, .tasty-recipes-entry-content .tasty-recipes-instructions ol { margin-left: 0; } } .tasty-recipes-entry-content .tasty-recipes-notes { padding: 1.25em; background-color: #EDF0F2; } .tasty-recipes-entry-content .tasty-recipes-notes ol { counter-reset:li; margin-left: 0; padding: 0; } .tasty-recipes-entry-content .tasty-recipes-notes ul { margin-left: 0; padding: 0; } .tasty-recipes-entry-content .tasty-recipes-notes p, .tasty-recipes-entry-content .tasty-recipes-notes ul li, .tasty-recipes-entry-content .tasty-recipes-notes ol li { background-color: #FFF; padding-left: 1.5625em; padding-right: 1.5625em; padding-top: 1.25em; padding-bottom: 1.25em; position: relative; -webkit-clip-path: polygon(20px 0, 100% 0, 100% 100%, 0 100%, 0 20px); clip-path: polygon(20px 0, 100% 0, 100% 100%, 0 100%, 0 20px); margin-bottom: 1.5em; } @media only screen and (min-width: 520px) { .tasty-recipes-entry-content .tasty-recipes-notes p, .tasty-recipes-entry-content .tasty-recipes-notes ul li, .tasty-recipes-entry-content .tasty-recipes-notes ol li { padding-left: 2.5em; } .tasty-recipes-entry-content .tasty-recipes-notes p:before, .tasty-recipes-entry-content .tasty-recipes-notes ul li:before { content: "i"; display: block; background-color: #666677; -webkit-border-radius: 50%; -moz-border-radius: 50%; border-radius: 50%; height: 1.3em; width: 1.3em; font-size: .75em; line-height: 1.3em; text-align: center; color: #FFF; position: absolute; left: 1.167em; top: 1.9em; } .tasty-recipes-entry-content .tasty-recipes-notes ol li:before { content:counter(li); counter-increment: li; position: absolute; background-color: #666677; -webkit-border-radius: 50%; -moz-border-radius: 50%; border-radius: 50%; height: 1.45em; width: 1.45em; color: #FFF; left: 2em; transform: translateX(-50%); line-height: 1.5em; font-size: .6875em; text-align: center; top: 2em; } } .tasty-recipes-entry-content .tasty-recipes-notes p:last-child { margin-bottom: 0; } .tasty-recipes-entry-content .tasty-recipes-keywords { background-color: #EDF0F2; padding-bottom: 1em; padding-top: 1em; } .tasty-recipes-entry-content .tasty-recipes-keywords p { font-size: 0.7em; font-style: italic; color: #979599; margin-bottom: 0; } .tasty-recipes-entry-content .tasty-recipes-keywords p span { font-weight: bold; } .tasty-recipes-nutrifox { text-align: center; margin: 0; } .nutrifox-label { background-color: #EDF0F2; } .tasty-recipes-nutrifox iframe { width: 100%; display: block; margin: 0; } .tasty-recipes-entry-content .tasty-recipes-nutrition { padding: 1.25em; color: #666677; } .tasty-recipes-nutrition .tasty-recipes-label { font-style: italic; color: #B7BBC6; margin-right: .125em; font-weight: 400; } .tasty-recipes-nutrition ul { text-align: center; } .tasty-recipes-nutrition li { float: none; display: inline-block; line-height: 2em; } .tasty-recipes-entry-footer { background-color: #666677; padding-top: 1.5625em; padding-bottom: 1.25em; padding-left: 2.5em; padding-right: 2.5em; text-align: center; } .tasty-recipes-entry-footer .tasty-recipes-footer-content { display: inline-block; } .tasty-recipes-entry-footer img { width: 65px; } .tasty-recipes-entry-footer h3 { color: #B7BBC6; font-size: 1.25em; line-height: 2.25em; margin-top: .5em; margin-bottom: .125em; padding: 0; line-height: 1em; } .tasty-recipes-entry-footer p { margin-bottom: 0; color: #FFF; font-size: .75em; } .tasty-recipes-entry-footer p a { color: #FFF; text-decoration: underline; box-shadow: none; border-bottom: none; } .tasty-recipes-entry-footer:after { content: " "; display: block; clear:both; } @media only screen and (max-width: 520px) { .tasty-recipes-entry-footer h3 { margin-top: .5em; margin-bottom: .5em; } .tasty-recipes-entry-footer { text-align: center; } } @media only screen and (min-width: 520px) { .tasty-recipes-entry-footer img { float: left; } .tasty-recipes-entry-footer h3, .tasty-recipes-entry-footer p { margin-left: 90px; clear: none; text-align: left; } } /* Print view styles */ .tasty-recipes-print-view { font-size: 11px; background-color: #fff; } .tasty-recipes-print-view .tasty-recipes-print-button { display: inline-block; } .tasty-recipes-print { padding:0; font-size: 11px; } .tasty-recipes-print-view .tasty-recipes { margin-top: 1em; } .tasty-recipes-print .tasty-recipes-entry-header { background-color: inherit; color: inherit; padding-bottom: 0; padding-left: 1em; padding-right: 1em; padding-top: 1em; } .tasty-recipes-print .tasty-recipes-entry-header .tasty-recipes-image { float: right; transform: none; } .tasty-recipes-print.tasty-recipes-has-image .tasty-recipes-entry-header h2 { margin-top: 0; } .tasty-recipes-print .tasty-recipes-entry-header h2 { color: inherit; margin-bottom: .5em; } .tasty-recipes-print .tasty-recipes-entry-header hr { display: none; } .tasty-recipes-print .tasty-recipes-entry-header span.tasty-recipes-rating { color: #000; } .tasty-recipes-print .tasty-recipes-entry-header .tasty-recipes-details ul { padding: 0; clear: none; } .tasty-recipes-print .tasty-recipes-entry-header .tasty-recipes-details ul li { line-height: 1.5em; color: #000; } .tasty-recipes-print .tasty-recipes-entry-header .tasty-recipes-details .detail-icon { display: none; } .tasty-recipes-print .tasty-recipes-entry-content img { max-width: 50%; height: auto; } .tasty-recipes-print .tasty-recipes-entry-content .tasty-recipes-ingredients ul li, .tasty-recipes-print .tasty-recipes-entry-content .tasty-recipes-ingredients ol li { margin-bottom: 0.25em; line-height: 1.1; } .tasty-recipes-print .tasty-recipes-entry-content .tasty-recipes-instructions ul li, .tasty-recipes-print .tasty-recipes-entry-content .tasty-recipes-instructions ol li { margin-bottom: 0.5em; line-height: 1.1; } .tasty-recipes-print .tasty-recipes-entry-content .tasty-recipes-ingredients ul li:before, .tasty-recipes-print .tasty-recipes-entry-content .tasty-recipes-instructions ul li:before { top: 0.3em; } .tasty-recipes-print .tasty-recipes-entry-content .tasty-recipes-ingredients ol li:before, .tasty-recipes-print .tasty-recipes-entry-content .tasty-recipes-instructions ol li:before { top: 0; } .tasty-recipes-print .tasty-recipes-entry-content .tasty-recipes-notes p, .tasty-recipes-print .tasty-recipes-entry-content .tasty-recipes-notes ul li, .tasty-recipes-print .tasty-recipes-entry-content .tasty-recipes-notes ol li { padding-top: 0; padding-bottom: 0; background-color: #EDF0F2; clip-path: none; } .tasty-recipes-print .tasty-recipes-entry-content .tasty-recipes-notes p:before, .tasty-recipes-print .tasty-recipes-entry-content .tasty-recipes-notes ul li:before { top: 0; clip-path: none; margin-bottom: 0.5em; } @media print { .tasty-recipes-print .tasty-recipes-entry-footer img { display: none; } } .tasty-recipes-print .tasty-recipes-source-link { text-align: center; } .tasty-recipes { border: 5px solid #4d4d4e; margin-top: 6em; margin-bottom: 4em; } .tasty-recipes-print-button { display: none; } .tasty-recipes-image-shim { height: 69.5px; clear: both; } .tasty-recipes-entry-header { background-color: #4d4d4e; color: #FFF; text-align: center; padding-top: 35px; padding-bottom: 1.5em; padding-left: 2.5em; padding-right: 2.5em; } .tasty-recipes-entry-header.tasty-recipes-has-image { padding-top: 0px; } .tasty-recipes-entry-header .tasty-recipes-image { float: none; text-align: center; transform: translateY(-115px); margin-bottom: 1em; /* Decide if we need this */ } .tasty-recipes-entry-header .tasty-recipes-image img { -webkit-border-radius: 50%; -moz-border-radius: 50%; border-radius: 50%; border: 5px solid #4d4d4e; height: 150px; width: 150px; } .tasty-recipes-entry-header h2 { font-size: 2em; letter-spacing: 1px; margin-bottom: 0; text-align: center; color: #FFF; margin-top: 0; padding-top: 0; padding-bottom: 0; } .tasty-recipes-has-image .tasty-recipes-entry-header h2 { margin-top: -115px; } .tasty-recipes-entry-header hr { border: 1px solid #cacaca; background-color: #cacaca; margin-bottom: 1em; margin-top: 1em; } .tasty-recipes-rating { text-align: center; margin-top: 19px; font-size: 12px; color: #6b6e77; } .tasty-recipes-entry-header .tasty-recipes-rating a { text-decoration: none; text-decoration: none; border: none; } .tasty-recipes-entry-header .tasty-recipes-rating a:hover { text-decoration: none; } .tasty-recipes-entry-header .tasty-recipes-rating-stars { font-size: 1.375em; display: block; } .tasty-recipes-entry-header .tasty-recipes-rating-stars span { margin-left: .25em; margin-right: .25em; color: #FFF; } .tasty-recipes-entry-header .tasty-recipes-rating-label { font-style: italic; color: #cacaca; font-size: .6875em; display: block; } .tasty-recipes-entry-header .tasty-recipes-details { margin-top: 1em; } .tasty-recipes-entry-header .tasty-recipes-details ul { list-style-type: none; margin: 0; } .tasty-recipes-entry-header .tasty-recipes-details ul li { display: inline-block; margin-left: .5em; margin-right: .5em; font-size: 1em; line-height: 2.5em; } .tasty-recipes-entry-header .tasty-recipes-details ul li.author, .tasty-recipes-entry-header .tasty-recipes-details ul li.total-time { display: none; } @media only screen and (max-width: 520px) { .tasty-recipes-entry-header .tasty-recipes-details .detail-icon { height: .8em; margin-top: .4em; } .tasty-recipes-entry-header .tasty-recipes-details ul li { font-size: .875em; line-height: 1.75em; } } @media only screen and (min-width: 520px) { .tasty-recipes-entry-header .tasty-recipes-details .detail-icon { height: 1em; margin-top: .6em; } .tasty-recipes-entry-header .tasty-recipes-details ul li { font-size: 1em; line-height: 2.5em; } } .tasty-recipes-entry-header .tasty-recipes-details .tasty-recipes-label { font-style: italic; color: #cacaca; margin-right: .125em; } .tasty-recipes-entry-header .tasty-recipes-details .detail-icon { vertical-align: top; margin-right: .2em; } .tasty-recipes-entry-content { padding-top: 1.25em; } .tasty-recipes-entry-content .tasty-recipes-buttons { margin-bottom: 1.25em; margin-left: 1.25em; margin-right: 1.25em; } .tasty-recipes-entry-content .tasty-recipes-buttons:after { content: " "; display: block; clear: both; } .tasty-recipes-entry-content .tasty-recipes-button-wrap { width: 50%; display: inline-block; float: left; box-sizing: border-box; } .tasty-recipes-entry-content .tasty-recipes-buttons a { text-transform: uppercase; text-align: center; display: block; color: #FFF; background-color: #4d4d4e; font-size: 1em; line-height: 1.375em; padding-top: 1em; padding-bottom: 1em; font-weight: bold; margin-top: 0; border: none; border-radius: 0; text-decoration: none; } .tasty-recipes-entry-content a img { box-shadow: none; -webkit-box-shadow: none; } .tasty-recipes-entry-content .tasty-recipes-buttons a:hover { background-color: #979599; text-decoration: none; } .tasty-recipes-entry-content .tasty-recipes-buttons img { vertical-align: top; } .tasty-recipes-entry-content .tasty-recipes-buttons img.svg-print, .tasty-recipes-entry-content .tasty-recipes-buttons img.svg-pinterest { height: 1.25em; margin-right: .375em; margin-bottom: 0; background: none; display: inline-block; } @media only screen and (min-width: 520px) { .tasty-recipes-entry-content .tasty-recipes-button-wrap:first-child { padding-right: .625em; } .tasty-recipes-entry-content .tasty-recipes-button-wrap:last-child { padding-left: .625em; } } @media only screen and (max-width: 520px) { .tasty-recipes-entry-content .tasty-recipes-button-wrap { width: 100%; } .tasty-recipes-entry-content .tasty-recipes-button-wrap:nth-child(2) { padding-top: 1em; } } .tasty-recipes-entry-content h3 { text-transform: uppercase; font-size: .75em; color: #979599; margin-bottom: 1.5em; } .tasty-recipes-entry-content h4 { font-size: 1em; padding-top: 0; margin-bottom: 1.5em; margin-top: 1.5em; } .tasty-recipes-entry-content hr { background-color: #EAE9EB; border: 1px solid #EAE9EB; margin-top: 1em; margin-bottom: 1em; } .tasty-recipes-entry-content .tasty-recipes-description, .tasty-recipes-entry-content .tasty-recipes-ingredients, .tasty-recipes-entry-content .tasty-recipes-instructions { padding-left: 1.25em; padding-right: 1.25em; } .tasty-recipes-entry-content .tasty-recipes-description p { margin-bottom: 1em; } .tasty-recipes-entry-content .tasty-recipes-ingredients ul, .tasty-recipes-entry-content .tasty-recipes-instructions ul { list-style-type: none; margin-left: 0; margin-bottom: 1.5em; padding: 0; } .tasty-recipes-entry-content .tasty-recipes-ingredients ul li, .tasty-recipes-entry-content .tasty-recipes-instructions ul li { margin-bottom: .625em; list-style-type: none; position: relative; margin-left: 2.5em; line-height: 1.46; } .tasty-recipes-entry-content .tasty-recipes-ingredients ul li:before, .tasty-recipes-entry-content .tasty-recipes-instructions ul li:before { background-color: #4d4d4e; -webkit-border-radius: 50%; -moz-border-radius: 50%; border-radius: 50%; height: .5em; width: .5em; display: block; content: " "; left: -1.25em; top: .375em; position: absolute; } .tasty-recipes-entry-content .tasty-recipes-ingredients ol, .tasty-recipes-entry-content .tasty-recipes-instructions ol { counter-reset:li; margin-left: 0; padding: 0; } .tasty-recipes-entry-content .tasty-recipes-ingredients ol li, .tasty-recipes-entry-content .tasty-recipes-instructions ol li { list-style-type: none; position: relative; margin-bottom: 1em; margin-left: 2.5em; line-height: 1.46; } .tasty-recipes-entry-content .tasty-recipes-ingredients ol li:before, .tasty-recipes-entry-content .tasty-recipes-instructions ol li:before { content:counter(li); counter-increment: li; position: absolute; background-color: #4d4d4e; -webkit-border-radius: 50%; -moz-border-radius: 50%; border-radius: 50%; height: 1.45em; width: 1.45em; color: #FFF; left: -1.25em; transform: translateX(-50%); line-height: 1.5em; font-size: .6875em; text-align: center; top: .1875em; } @media only screen and (max-width: 520px) { .tasty-recipes-entry-content .tasty-recipes-ingredients ol, .tasty-recipes-entry-content .tasty-recipes-instructions ol { margin-left: 0; } .tasty-recipes-entry-content .tasty-recipes-ingredients ol li, .tasty-recipes-entry-content .tasty-recipes-instructions ol li { } } .tasty-recipes-entry-content .tasty-recipes-notes { padding: 1.25em; background-color: #EDF0F2; } .tasty-recipes-entry-content .tasty-recipes-notes ol { counter-reset:li; margin-left: 0; padding: 0; } .tasty-recipes-entry-content .tasty-recipes-notes ul { margin-left: 0; padding: 0; } .tasty-recipes-entry-content .tasty-recipes-notes p, .tasty-recipes-entry-content .tasty-recipes-notes ul li, .tasty-recipes-entry-content .tasty-recipes-notes ol li { background-color: #FFF; padding-left: 1.5625em; padding-right: 1.5625em; padding-top: 1.25em; padding-bottom: 1.25em; position: relative; -webkit-clip-path: polygon(20px 0, 100% 0, 100% 100%, 0 100%, 0 20px); clip-path: polygon(20px 0, 100% 0, 100% 100%, 0 100%, 0 20px); margin-bottom: 1.5em; } @media only screen and (min-width: 520px) { .tasty-recipes-entry-content .tasty-recipes-notes p, .tasty-recipes-entry-content .tasty-recipes-notes ul li, .tasty-recipes-entry-content .tasty-recipes-notes ol li { padding-left: 2.5em; } .tasty-recipes-entry-content .tasty-recipes-notes p:before, .tasty-recipes-entry-content .tasty-recipes-notes ul li:before { content: "i"; display: block; background-color: #4d4d4e; -webkit-border-radius: 50%; -moz-border-radius: 50%; border-radius: 50%; height: 1.3em; width: 1.3em; font-size: .75em; line-height: 1.3em; text-align: center; color: #FFF; position: absolute; left: 1.167em; top: 1.9em; } .tasty-recipes-entry-content .tasty-recipes-notes ol li:before { content:counter(li); counter-increment: li; position: absolute; background-color: #4d4d4e; -webkit-border-radius: 50%; -moz-border-radius: 50%; border-radius: 50%; height: 1.45em; width: 1.45em; color: #FFF; left: 2em; transform: translateX(-50%); line-height: 1.5em; font-size: .6875em; text-align: center; top: 2em; } } .tasty-recipes-entry-content .tasty-recipes-notes p:last-child { margin-bottom: 0; } .tasty-recipes-nutrifox { text-align: center; margin: 0; } .tasty-recipes-nutrifox iframe { width: 100%; display: block; margin: 0; } .tasty-recipes-entry-content .tasty-recipes-nutrition { padding: 1.25em; color: #4d4d4e; } .tasty-recipes-nutrition .tasty-recipes-label { font-style: italic; color: #cacaca; margin-right: .125em; font-weight: 400; } .tasty-recipes-nutrition ul { text-align: center; } .tasty-recipes-nutrition li { float: none; display: inline-block; line-height: 2em; } .tasty-recipes-entry-footer { background-color: #4d4d4e; padding-top: 1.5625em; padding-bottom: 1.25em; padding-left: 2.5em; padding-right: 2.5em; text-align: center; } .tasty-recipes-entry-footer .tasty-recipes-footer-content { display: inline-block; } .tasty-recipes-entry-footer img { width: 65px; } .tasty-recipes-entry-footer h3 { color: #cacaca; font-size: 1.25em; line-height: 2.25em; margin-top: .5em; margin-bottom: .125em; padding: 0; line-height: 1em; } .tasty-recipes-entry-footer p { margin-bottom: 0; color: #FFF; font-size: .75em; } .tasty-recipes-entry-footer p a { color: #FFF; text-decoration: underline; box-shadow: none; border-bottom: none; } .tasty-recipes-entry-footer:after { content: " "; display: block; clear:both; } @media only screen and (max-width: 520px) { .tasty-recipes-entry-footer h3 { margin-top: .5em; margin-bottom: .5em; } .tasty-recipes-entry-footer { text-align: center; } } @media only screen and (min-width: 520px) { .tasty-recipes-entry-footer img { float: left; } .tasty-recipes-entry-footer h3, .tasty-recipes-entry-footer p { margin-left: 90px; clear: none; text-align: left; } } /* Print view styles */ .tasty-recipes-print-view .tasty-recipes-print-button { display: inline-block; } .tasty-recipes-print { padding:0; } .tasty-recipes-print-view .tasty-recipes { margin-top: 1em; } .tasty-recipes-print .tasty-recipes-entry-header { background-color: inherit; color: inherit; padding-bottom: 0; padding-left: 1em; padding-right: 1em; } .tasty-recipes-print .tasty-recipes-entry-header .tasty-recipes-image { float: right; transform: none; } .tasty-recipes-print.tasty-recipes-has-image .tasty-recipes-entry-header h2 { margin-top: 0; } .tasty-recipes-print .tasty-recipes-entry-header h2 { color: inherit; margin-bottom: .5em; } .tasty-recipes-print .tasty-recipes-entry-header hr { display: none; } .tasty-recipes-print .tasty-recipes-entry-header .tasty-recipes-rating-stars span { color: #000; } .tasty-recipes-print .tasty-recipes-entry-header .tasty-recipes-details ul { padding: 0; clear: both; } .tasty-recipes-print .tasty-recipes-entry-header .tasty-recipes-details ul li { line-height: 1.5em; } .tasty-recipes-print .tasty-recipes-entry-header .tasty-recipes-details .detail-icon { display: none; } .tasty-recipe-responsive-iframe-container { position: relative; overflow: hidden; padding-top: 56.23%; } .tasty-recipe-responsive-iframe-container iframe { position: absolute; top: 0; left: 0; width: 100%; height: 100%; border: 0; } The Best Loaded Vegan Nachos

1 Star (No Ratings Yet)

Author: Sonja Prep Time: 15 minutes Cook Time: 0 minutes Total Time: 15 minutes Yield: 4 servings Category: Main Dish, Appetizer Method: Pressure Cooker Cuisine: Mexican
Description

These loaded vegan nachos are the best because they’re plant based, healthy nachos that are so flavorful no one will miss the meat!

Ingredients 2 cups Smoky Instant Pot Lentils and Rice or Lentil Taco Filling 1/4 cup Vegan Nacho Cheese 1 small tomato 1/4 red onion 1 to 2 green onions 4 cups organic corn chips Fresh cilantro, for garnish Hot sauce, for garnish
Instructions

Make the Smoky Instant Pot Lentils and Rice or Lentil Taco Filling. Before serving, make sure the lentils are warm (reheat them if made in advance).

Make the Vegan Cashew Cheese.

Seed and dice the tomato. Mince the red onion. Thinly slice the green onions.

To serve, place the chips on a plate. Top with lentils, tomato, red onion, green onion, Vegan Nacho Cheese, torn cilantro, and hot sauce.

Notes

*Note: The timing for this recipe assumes that the Lentils and Rice and Nacho Cheese are made in advance.

Keywords: Nachos, Nacho Cheese, Vegan Nacho Cheese, Vegan Nachos, Lentils, Rice, Cilantro, Healthy Nachos, Gluten Free Nachos, Vegetarian, Vegan, Gluten Free

A Couple Cooks - Recipes for Healthy & Whole Living