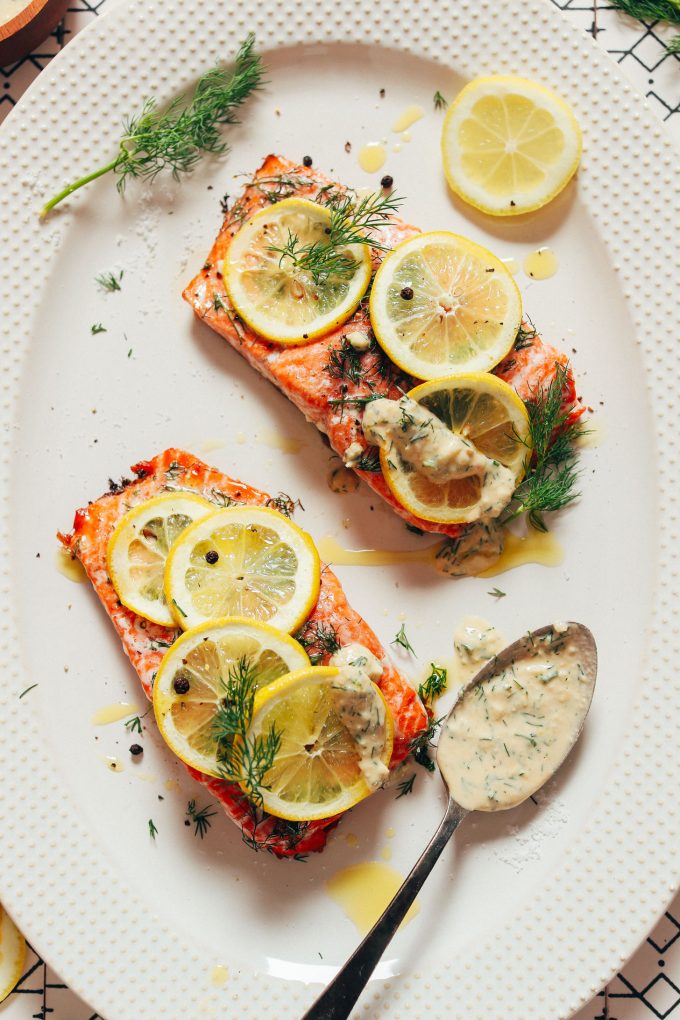
My family didn’t eat a ton of fish growing up, but we did enjoy salmon from time to time. It’s one type of seafood I tend to gravitate toward on menus.
Over the years I’ve come to refine my preparation of it at home and narrowed it down to this: my go-to easy baked salmon recipe with plenty of fresh herbs, lemon, and garlic dill sauce for serving.
Plus, it requires just 20 minutes and 7 ingredients to prepare.
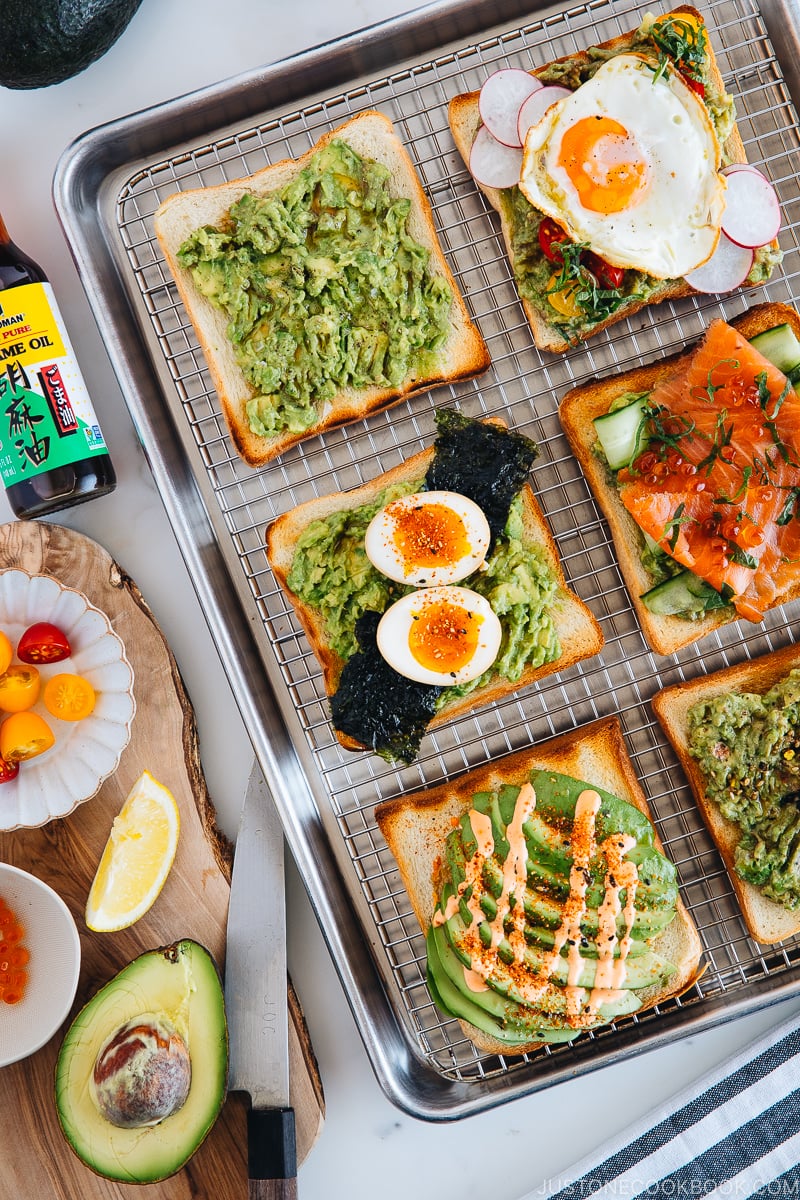
Try these six irresistible Japanese twists on Avocado Toast! Add some creative toppings like ramen egg, furikake, or sesame oil on creamy mashed or sliced avocado. Slightly sweet Japanese milk bread Shokupan is a great base for your avocado toast playground!
It’s fun to try something new. That’s what most people would say, including Mr. JOC, but I actually tend to stick to things that I’m used to. I always order the same flavored ice cream, the same kind of sandwich I like for years, and of course, the same avocado toast.
Without Mr. JOC around, I think my avocado toast would be very basic. Although nothing wrong with the same avocado toast, life is just decidedly more interesting when you experience something new.
Today, I resolved to try something different, something small but enough to challenge my inner creativity. Here’s what I have for you – 6 Different Avocado Toasts with Japanese twists!
5 Tips to Make Delicious Avocado Toast
Before I share my 6 creations, here are some best tips on how to make the best avocado toast:
Buy “ripe” avocado: Your grocery stores sell avocado with a “ripe” sticker on avocados. Get them when you’re ready to make avocado toast.
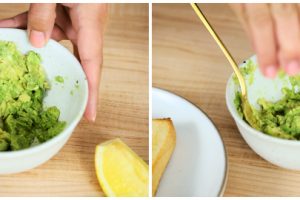
A squeeze of lemon juice: To keep the fresh green avocado color, add 1 tablespoon of squeezed lemon juice to half of the avocado.
Mash to your liking: I believe mashed avocado works best for avocado toast (than sliced avocado), but that’s just my preference. I tend to mash mine finer so it’s creamy and lay cozily like a thick coat over the toasty bread. Leave it chunkier if that’s what you favor.
Toast your bread: This is pretty obvious of course, but do make sure your bread is nicely toasted. Not only you’d get a crunchy and toasty flavor, but toasting the bread gives it a sturdy base to support the weight of avocado.
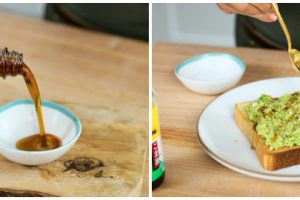
Drizzle sesame oil: If you have been drizzling extra virgin olive oil, give it a break and try toasted/roasted (dark) sesame oil. It’s a game changer!
Watch How to Make Avocado Toast
Try these six irresistible Japanese twists on Avocado Toast! Add some creative toppings like ramen egg, furikake, or sesame oil on creamy mashed or sliced avocado. Slightly sweet Japanese milk bread Shokupan is a great base for your avocado toast playground!
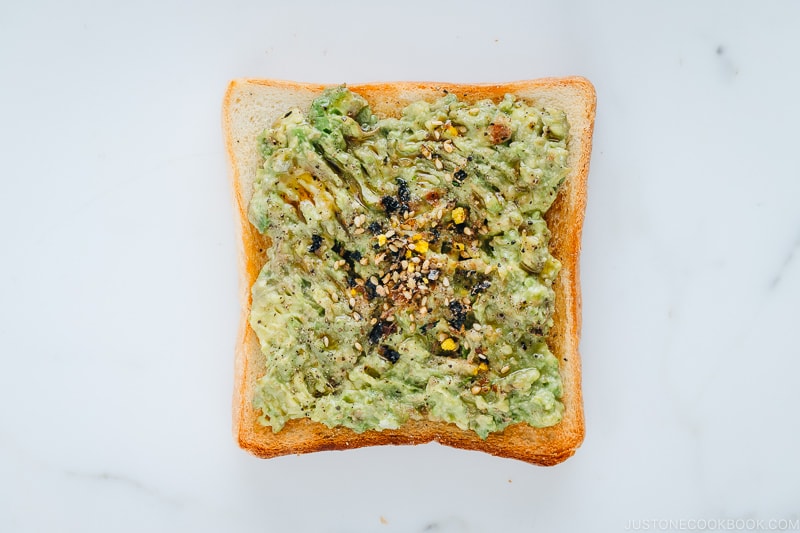
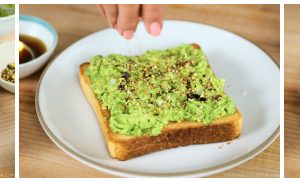
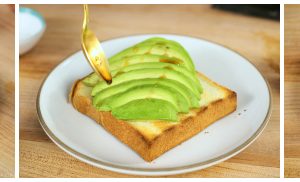
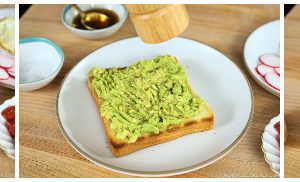
1. The Basic Avocado Toast (with Sesame Oil)
For the longest time, I’ve always eaten my avocado toast in this exact fashion: perfectly toasted Shokupan (Japanese toast), mashed avocado, flaked sea salt, freshly ground black pepper, and a drizzle of good quality sesame oil. It’s SO simple, yet really delicious.
Now the use of sesame oil is nothing revolutionary, but it does change up the character of your avocado toast than using regular olive oil. I always mash my avocado to finer chunks because sliced avocado does look pretty to eyes, but they fall off while I eat, and that’s not fun. Flake sea salt is fantastic as it melts in your mouth when you bite into the creamy avocado toast. The sharp saltiness hits all the flavor highs and gives the extra oomph.
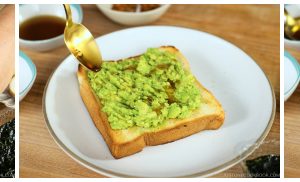
2. Avocado Toast with Furikake
Furikake is the all-rounded Japanese rice seasoning comparable to the Bagel seasoning that everyone can’t live without. If you have been sprinkling the Trader Joe’s Everything Bagel Seasoning on your avocado toast, I have a feeling that you’d like furikake just the same, or even more!
Furikake often includes umami-packed ingredients such as katsuobushi (dried bonito flakes) and nori seaweed. There are different flavors of furikake at Japanese grocery stores, so pick the one you like (look out for one without MSG). Most brands of furikake contain salt so go easy on flake salt. You can also use your Homemade Furikake for this recipe!
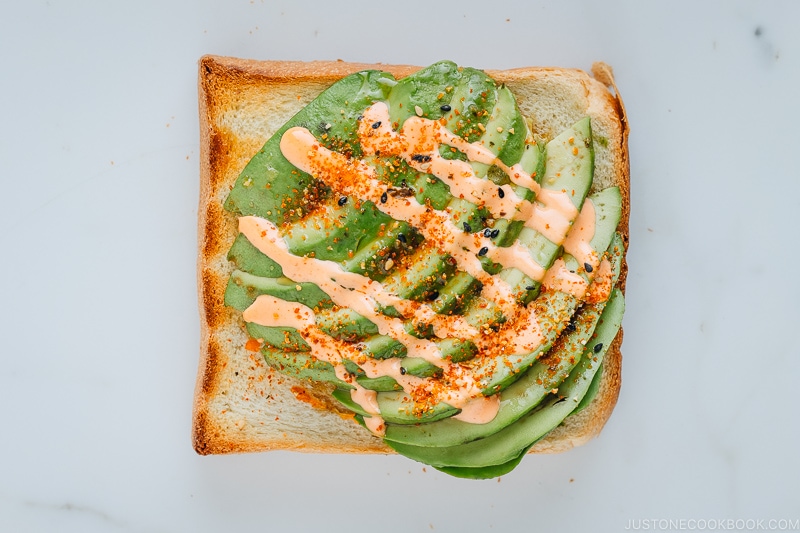
3. Avocado Toast with Spicy Mayo and Shichimi Togarashi
If you love some spicy note on avocado toast, try it with spicy mayo and shichimi togarashi! Here, I used sliced avocado for presentation purpose, but I’d much prefer mashing the avocado. It’s creamier and you don’t have to worry about avocado go ‘head-over-heels’ scenario.
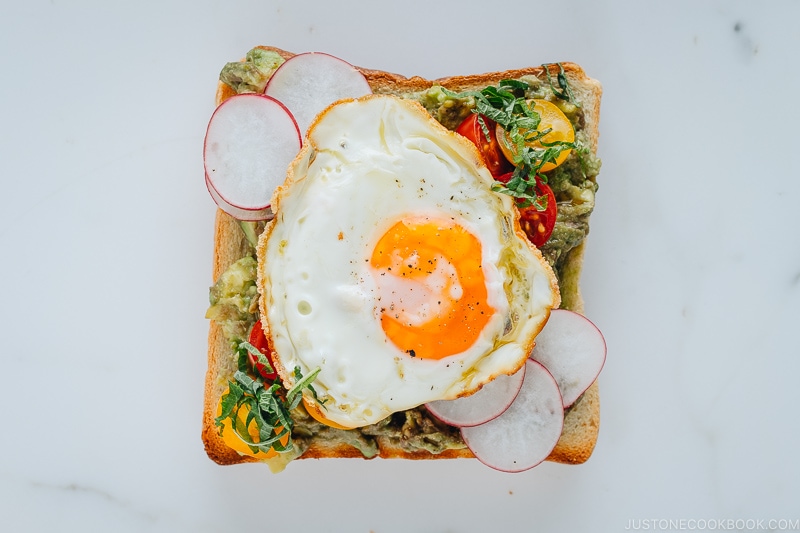
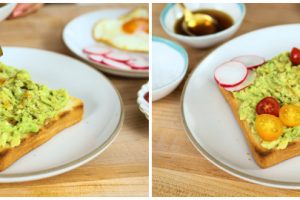
4. Avocado Toast with Fried Egg
I love my egg to be sunnyside-up and if you want to add volume to avocado toast, a crispy fried egg is the easy solution. Here I added mini heirloom tomatoes and thinly sliced red radish for additional crunch and color.
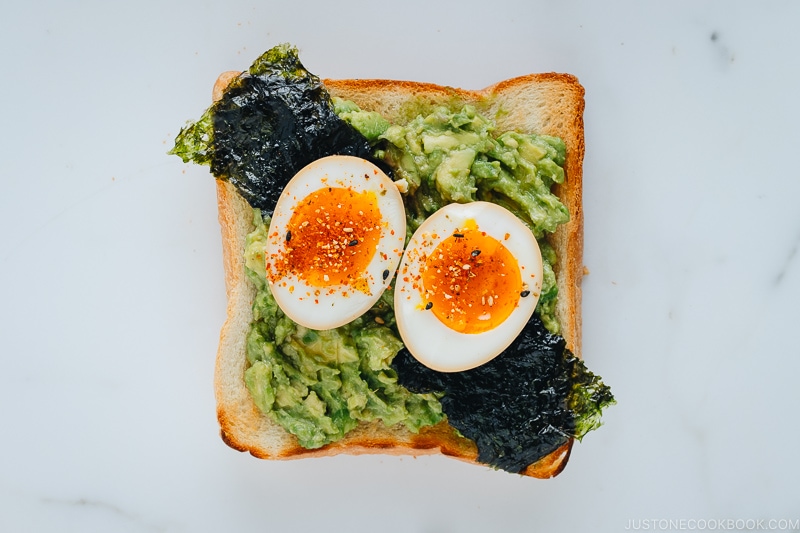
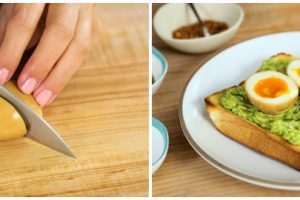
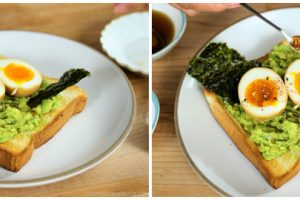
5. Avocado Toast with Ramen Egg
Yes, ramen egg! Eggs on avo toast are the ideal pair, but Ramen Egg (Ajitsuke Tamago) is a whole level of ingenuity. Accent with a sheet of Korean seaweed before you top it with the ramen eggs. You can use Japanese nori but I love the texture and saltiness from Korean roasted seasoned seaweed. You can get the Korean seaweed from Asian grocery stores, Trader Joe’s, Target, Walmart or even major grocery stores.
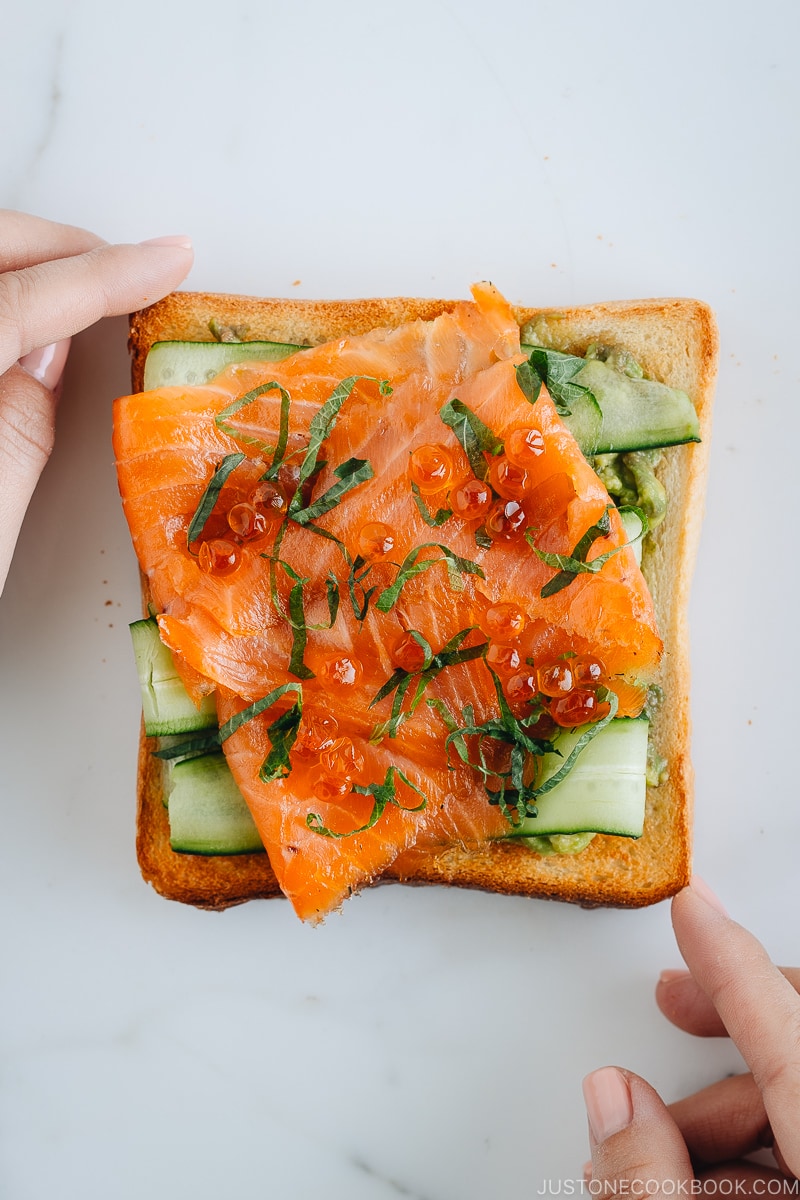
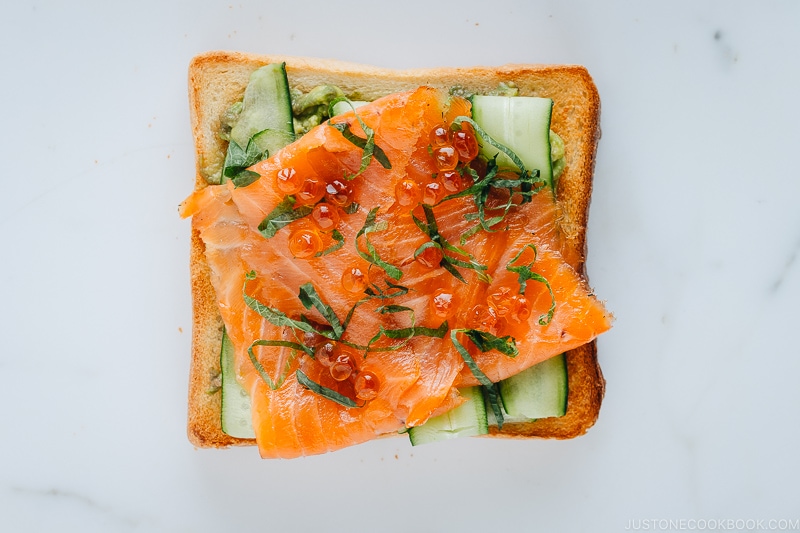
6. Avocado Toast with Smoked Salmon
Smoke salmon is my son’s favorite, and he wishes he can eat this particular avocado toast for breakfast every single day. I bejeweled the toast with some dainty ikura (salmon fish roes), drizzle with some soy sauce and garnish with ribbons of shiso leaves. The Japanese touches feel extra luxurious but totally doable.
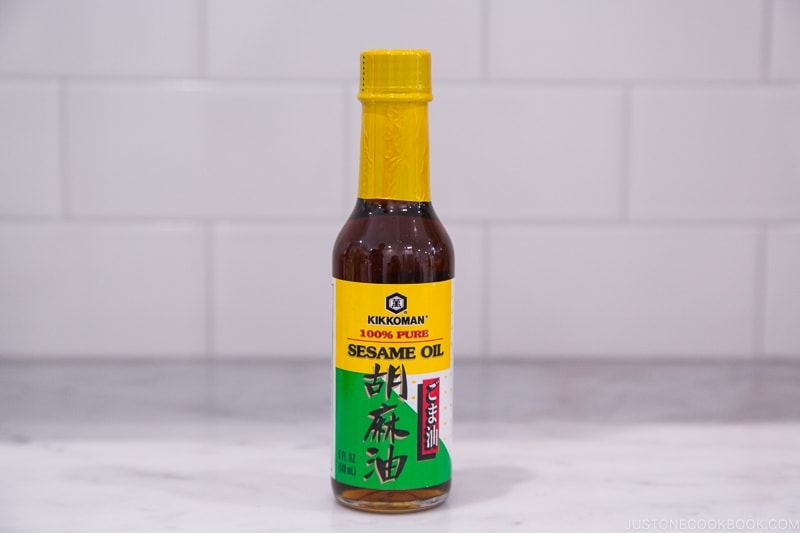
Kikkoman® 100% Pure Sesame Oil
You may know Kikkoman® as a soy sauce brand, but do you know they also carry Kikkoman Sesame Oil?
Made from 100% pure toasted sesame seeds, Kikkoman Sesame Oil adds an extra burst of nutty flavor to dressings, marinades, and dips. It’s also an essential flavor in Asian dishes and is perfect for seasoning stir-fries or soups after cooking.
In one of our meetings with Kikkoman®, I mentioned how much I love sesame oil and drizzle sesame oil on my avocado toast. That casual conversation led to this Japanese inspired avocado toast recipe challenge post. Thank you for partnering with us, Kikkoman®!
You can easily find Kikkoman® Sesame Oil at an Asian food section of the local supermarkets.
Avocado toast maybe so passé for the foodie trend standard, but I am all about practicality and the staying power when comes to food. Ever since it took over the internet craze that seems yesteryear, I am still eating avocado toast for breakfast, lunch, and snack until these days. I could eat it a few times a week. Are you with me?
Apparently, the existence of avocado toast has been around for a very long time (although the exact date was unclear). There was even a 1920 recipe found in the archives of BonAppétit that titled ‘Avocado on Toast’. Trivia aside, I think the many greatness about avocado toast is – it’s delicious, easy to make, filling and good for you! It’s also very satisfactory any time of the day, be it breakfast, lunch or snack, or a lazy dinner.
Will you try any of these avocado toast with Japanese twists? If you try them, tell me which is your favorite.
Japanese Ingredient Substitution: If you want to look for substitutes for Japanese condiments and ingredients, click here.
Try these six irresistible Japanese twists on Avocado Toast! Add some creative toppings like ramen egg, furikake, or sesame oil on creamy mashed or sliced avocado. Slightly sweet Japanese milk bread Shokupan is a great base for your avocado toast playground!
#1 Basic Avocado Toast
1 slice Shokupan (Japanese pullman loaf bread)
½ avocado
1 wedge lemon
freshly ground black pepper
flake sea salt
sesame oil
#2 Avocado Toast with Furikake
1 slice Shokupan (Japanese pullman loaf bread)
½ avocado
1 wedge lemon
flake sea salt
sesame oil
Furikake
#3 Avocado Toast with Japanee (Spicy) Mayo and Shichimi Togarashi
1 slice Shokupan (Japanese pullman loaf bread)
½ avocado
1 wedge lemon
sesame oil
flake sea salt
½ Tbsp Japanese mayo
½ Tbsp sriracha sauce
Shichimi Togarashi (Japanese seven spice)
#4 Avocado Toast with Ramen Egg
1 slice Shokupan (Japanese pullman loaf bread)
½ avocado
1 wedge lemon
sesame oil
flake sea salt
Ramen Egg ((Recipe in Notes))
roasted seasoned seaweed
Shichimi Togarashi (Japanese seven spice)
#5 Avocado Toast with Smoked Salmon
1 slice Shokupan (Japanese pullman loaf bread)
½ avocado
1 wedge lemon
sesame oil
flake sea salt
sliced cucumber
smoked salmon
2 shiso leaves
Ikura (salmon roe)
Soy sauce
#6 Avocado Toast with Fried Egg
1 slice Shokupan (Japanese pullman loaf bread)
½ avocado
1 wedge lemon
freshly ground black pepper
flake sea salt
sesame oil
cherry tomatoes ((optional))
red radish ((optional))
fried egg
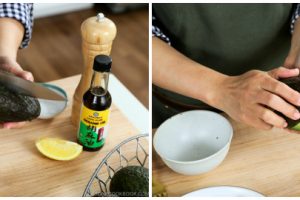
How to Prepare Avocado
Gather all the ingredients. This is for the Basic Avocado Toast. Toast a slice of Shokupan (Japanese pullman loaf bread).
Cut the avocado in half by running the knife around it. Twist.
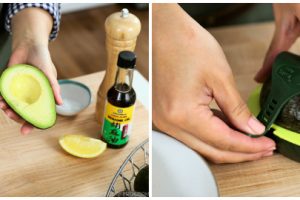
If you are using only half an avocado, keep the one with seed for later. I use this avocado keeper to avoid oxidation. You can also squeeze lemon juice on the surface.
Smack the seed and remove it. Scoop the avocado flesh with a spoon.
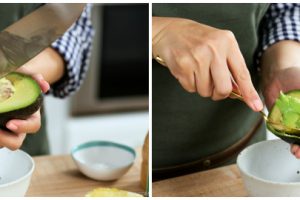
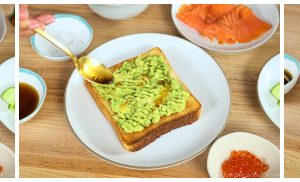
Mash avocado with a fork and squeeze the lemon. Mix all together.
#1 Basic Avocado Toast
Transfer the mashed avocado onto a toasted shokupan. Press the avocado gently to evenly distribute with a fork. Season with freshly ground black pepper and flaked sea salt.
Drizzle sesame oil over the avocado. Serve immediately.
#2 Avocado Toast with Furikake
Transfer the mashed avocado onto a toasted shokupan. Press the avocado gently to evenly distribute with a fork. Season with flake sea salt and furikake. Drizzle sesame oil over the avocado. Serve immediately.
#3 Avocado Toast with Japanese Mayo or Spicy Mayo and Shichimi Togarashi
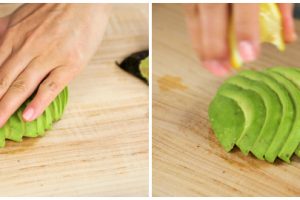
Instead of mashed avocado, you can serve with sliced avocado. Peel the avocado skin, and cut the avocado into ¼ inch slices.
Gently pressed to stagger and squeeze the lemon to coat the avocado with lemon juice.
Transfer the sliced avocado to a toasted shokupan, drizzle sesame oil over the avocado, and season with flake sea salt.
To make spicy mayo, mix Japanese mayo and sriracha sauce. If you don’t like spicy mayo, simply use just mayo. Drizzle Japanese mayo or spicy mayo on top of the avocado slices and sprinkle Shichimi Togarashi on top. Serve immediately.
#4 Avocado Toast with Ramen Egg
Transfer the mashed avocado onto a toasted shokupan. Press the avocado gently to evenly distribute with a fork. Drizzle sesame oil and season with flake sea salt.
Cut the ramen egg (Ajitsuke Tamago) in half and place on top of the mashed avocado toast.
Garnish with Korean seaweed and sprinkle Shichimi Togarashi on top. Serve immediately.
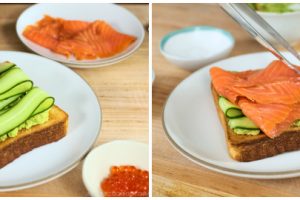
#5 Avocado Toast with Smoked Salmon
Transfer the mashed avocado onto a toasted shokupan. Press the avocado gently to evenly distribute with a fork. Drizzle sesame oil and season with flake sea salt.
Using a peeler, thinly slice the cucumber and remove excess moisture with a paper towel. Put the sliced cucumber and then smoked salmon on top.
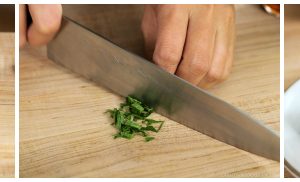
Roll up shiso leaves and cut into julienned strips. Garnish on top of the smoked salmon.
Place some ikura and drizzle soy sauce on top. Serve immediately.
#6 Avocado Toast with Fried Egg
Transfer the mashed avocado onto a toasted shokupan. Press the avocado gently to evenly distribute with a fork. Season with freshly ground black pepper and flake sea salt.
Drizzle sesame oil and place some halved cherry tomatoes and sliced red radish.
Put the fried egg on top and season with flake sea salt and freshly ground black pepper.
Flake Sea Salt: This salt has soft, sheer, pyramid-like flakes, which give food a beautiful look and crunchy finish. This salt will add a complex, a hint of briny flavor to the food. England’s Essex coast is where the most popular brand, Maldon, is harvested.
Japanese Ingredient Substitution: If you want to look for substitutes for Japanese condiments and ingredients, click here.
Recipe by Namiko Chen of Just One Cookbook. All images and content on this site are copyright protected. Please do not use my images without my permission. If you’d like to share this recipe on your site, please re-write the recipe in your own words and link to this post as the original source. Thank you.d link to this post as the original source. Thank you.
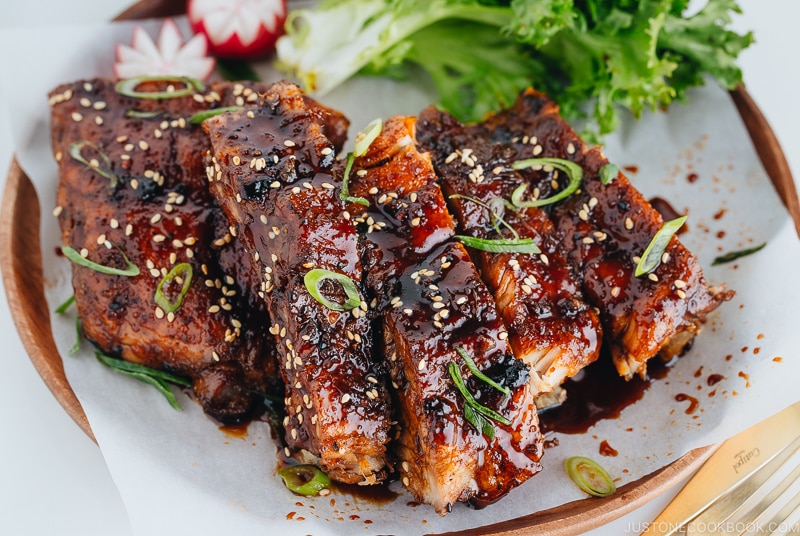
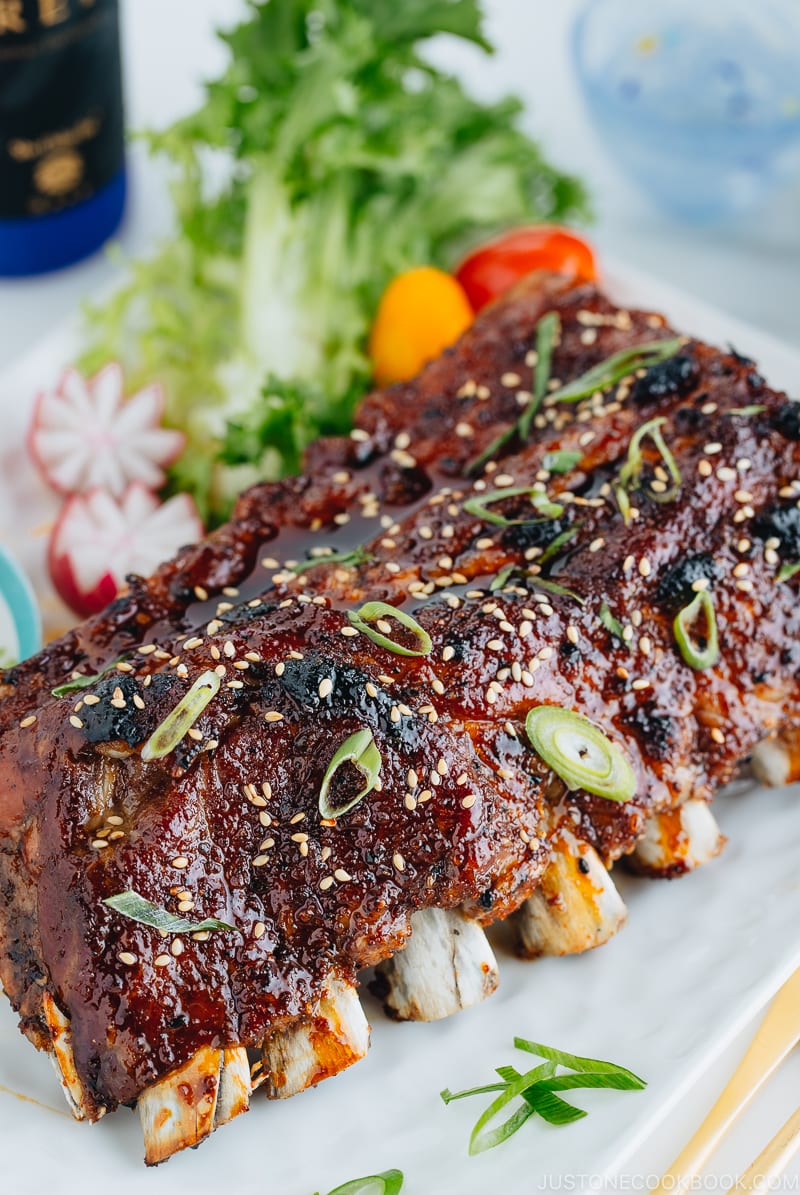
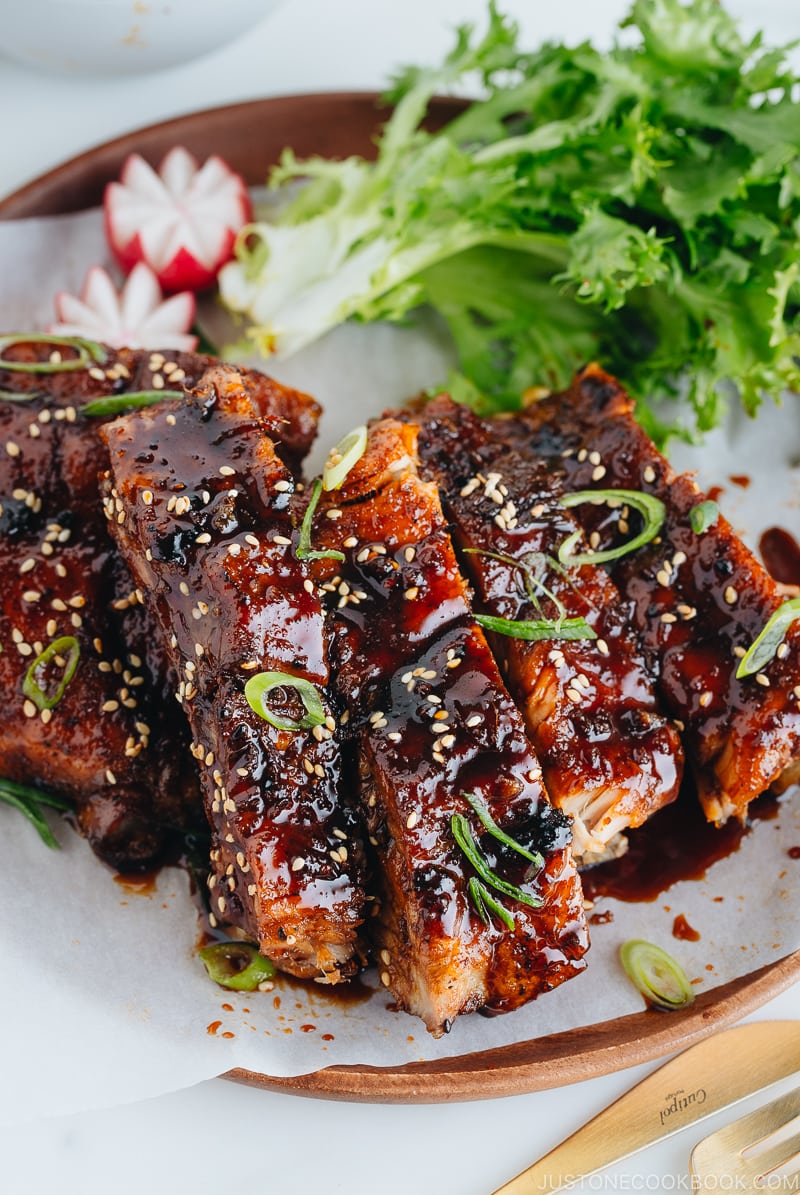
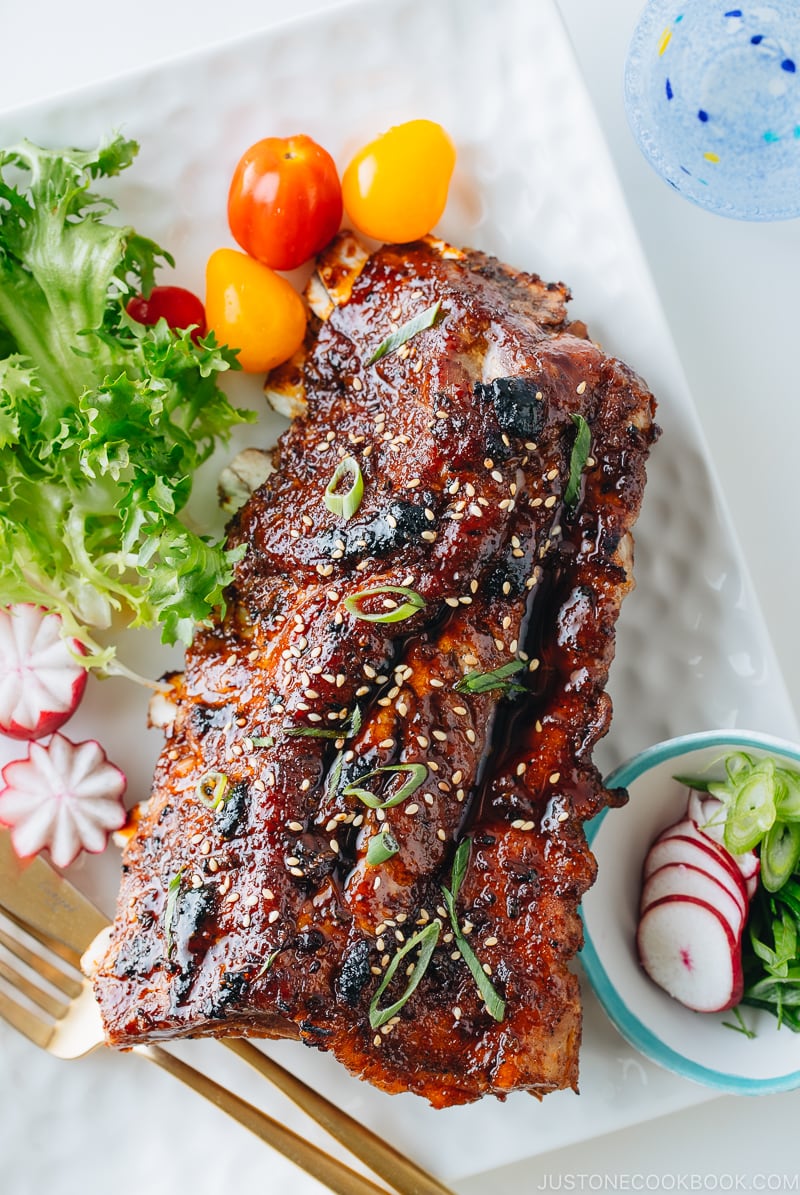
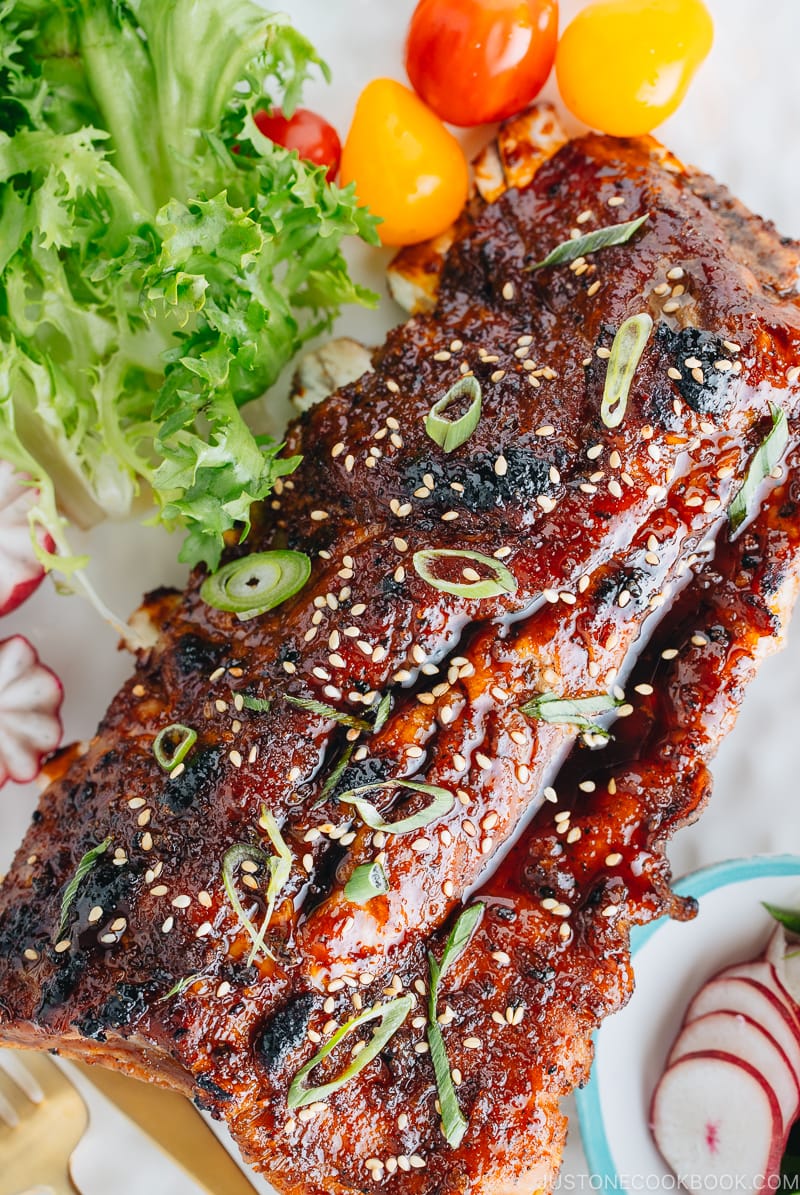
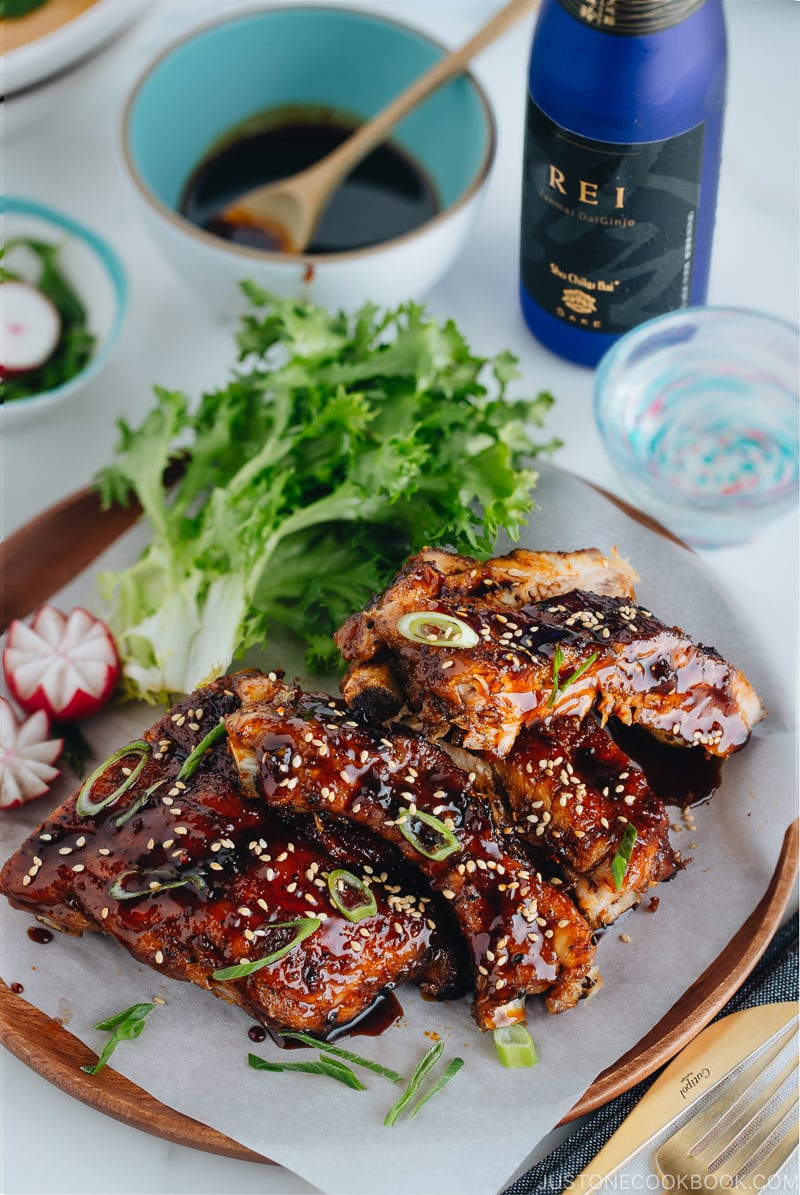
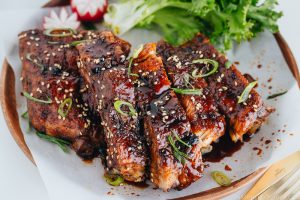
You don’t have to wait until the weekend to enjoy baby back ribs. With the Instant Pot, you can prepare Sticky Asian Ribs in less than 90 minutes! Slathered with caramelized glaze, these ribs are absolutely finger-licking good!
One of my cooking dreams was to make baby back ribs at home. I’m not a big meat eater, and on a daily basis, I eat more vegetables than meat. However, I have a soft spot for Yakiniku (Japanese BBQ) and fall-off-the-bone baby back ribs smothered with sweet-savory delicious sauce, which I discovered when I came to America.
Since our good friend John makes killer smoked baby back ribs, Mr. JOC and I didn’t have to get our own smoker and make our own. The only problem was that I couldn’t eat good ribs when I want to eat them. That’s when I started to make my ribs in the Instant Pot. Today I’ll show you our family’s favorite, Instant Pot Sicky Asian Ribs (甘辛スペアリブ).
Making Ribs in the Instant Pot
Until you give this recipe a try, you probably won’t believe how amazing this recipe and Instant Pot is! Compared to the common 2-to-3-hour slow-cooking oven method, cooking baby back ribs in the pressure cooker drastically cuts down the cooking time and come together super fast for a weeknight meal.
Without the pressure cooker, there is NO way you can eat fall-off-the-bone ribs in less than 90 minutes from start to finish, that includes the 30-minute resting time for the ribs with dry rub.
Pressure cooking ribs for 25-30 minutes is plenty for the meat to come off the bone. You will need to use the oven (broiler) to finish it off, but that’s just several munites. Too easy? You must give it a try!
Delicious Sticky Asian Sauce
You can definitely use this recipe as a base for the American style ribs. Rub in the baby back ribs with your go-to dry rub, cook in the Instant Pot, and apply homemade/store-bought BBQ sauce before placing the ribs into the oven to broil.
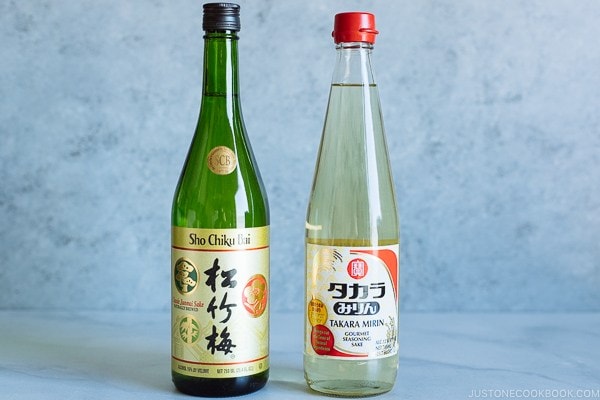
H0wever, I want to introduce you this delicious Sticky Asian Sauce today! All you need is the typical Japanese condiments: sake, mirin, soy sauce, and rice vinegar. I sweetened the sauce with brown sugar and honey and give the sauce a kick with garlic and ginger.
With this sauce, this dish goes well with even rice or noodles! Isn’t it nice to add variations to your baby back rib recipes?
If you are new to Japanese cooking and want to know more about both sake and mirin, the essential condiments for Japanese cooking, you can find more information on each condiment on these pages.
Even though this recipe is pretty straightforward and easy, I thought I’d give some tips that I found important.
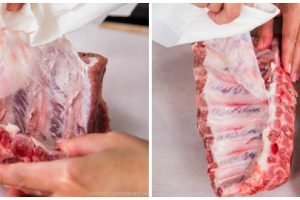
1. Remove membrane
For the very first ribs I made, I completely forgot to remove the membrane, so I thought I would add a reminder here. The membrane is white, very thin connective tissue and located on the back (the bone side) of the ribs. Your butcher may already have the membrane removed. If not, you can ask them to remove it for you.
If you buy already packaged ribs, then you can remove it yourself very easily. Just flip the ribs so the top (meaty part) is face down. Pull the corner of the membrane using a paper towel because it’s slippery. No special skills needed here, just use your fingers and a paper towel to pull it off.
2. Use dry rub
The flavor in the baby back ribs starts with the dry rub. This mix of seasonings and salt helps break down the fibers in the meat to create a complex depth in flavor.
The dry rub is a mixture of only dry seasonings and you need to rub them into the meat and set aside for 30 minutes. The dry rub that I use for this recipe is a simple concoction of salt, black pepper, white pepper and shichimi togarashi (Japanese Seven Spice). Shichimi togarashi is a beloved Japanese spice blend made of Japanese chili powder, orange peel, sesame seeds, Japanese pepper, ginger, and seaweed. It gives a spicy, citrusy and nutty flavor to everything you sprinkle on.
3. Use Apple Cider Vinegar
Acidity in the vinegar breaks down the ligaments and tenderizes the meat as well as adding some sweetness. I use a mix of water and apple cider vinegar to flavor my ribs as they cook.
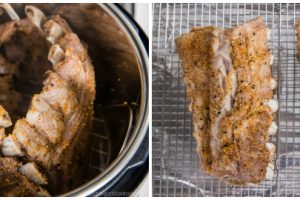
4. Place ribs vertically
To support the weight, make sure to place the rack with the ends of the ribs facing up and on top of the wire rack without touching the liquid.
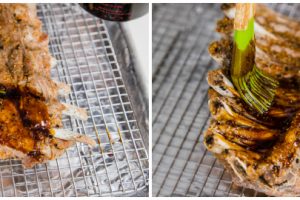
5. Finish off in the broiler/grill
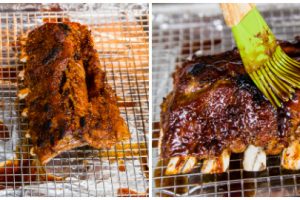
After pressure cooking, the meat is super tender but looks rather steamed. Therefore, it’s important to finish off the ribs in the broiler or over the grill to give some nice char. The sauce you apply on the ribs will be caramelized in the high heat and it gives luscious look on the baby back ribs.
Extra Tip: Gently remove the ribs from the Instant Pot
No, I’m not joking, the meat is so tender that it might literally fall off the bone (and yes, that happened to me). The pressure cooking time is 25-30 minutes. If the presentation is important to you, cook for 25 minutes as I do in this recipe. It is still tender, but the meat won’t’ fall off the bone too easily.
Sake Pairing with Sho Chiku Bai REI Junmai Daiginjo
We paired this tender juicy fall off the bone ribs with the exquisite Sho Chiku Bai REI Junmai Daiginjo. REI is one of our favorite sakes as it’s versatile and can be enjoyed with a wide range of dishes.
As you bite into the juicy ribs slathered in the sweet and tangy sauce, sip REI and the cold and smooth sake cuts right through the fatty meat with its fruity flavors. It instantly refreshes your taste buds and leaves you wanting another sip and another big bite of the ribs.
The floral characteristics of Sho Chiku Bai REI Junmai Dainginjo compliment the flavors of the ribs really well and we highly recommend pairing it with flavorful dishes like these ribs.
Japanese Ingredient Substitution: If you want to look for substitutes for Japanese condiments and ingredients, click here.
Make these Sticky Asian Ribs in less than 90 minutes using the Instant Pot! Slathered with caramelized glaze, these ribs are absolutely finger-licking good!
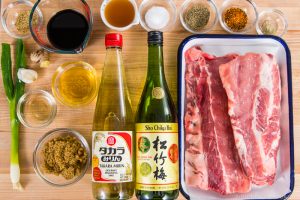
3-3½ lb baby back ribs ((max amount for 6-qt Instant Pot))
1 cup water ((for pressure cooking))
¼ cup apple cider vinegar ((for pressure cooking))
¼ tsp liquid smoke ((optional for smoky flavor; I skip for this recipe))
For the Dry Rub
2 tsp salt (kosher or sea salt; use half if using table salt)
1 tsp freshly ground black pepper
2 tsp Shichimi Togarashi (Japanese seven spice)
¼ tsp white pepper
For the Sauce
¼ cup sake
¼ cup mirin
½ cup soy sauce
1 Tbsp rice vinegar
4 Tbsp brown sugar
3 Tbsp honey
1 clove garlic
1 knob ginger
For Garnish
2 tsp white sesame seeds (roasted/toasted)
1 green onion/scallion ((chopped diagonally))
Gather all the ingredients.
To Prepare Ribs
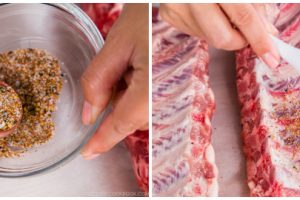
In a small bowl, mix together all the dry rub ingredients: 2 tsp salt, 1 tsp freshly ground black pepper, 2 tsp shichimi togarashi, and ¼ tsp white pepper.
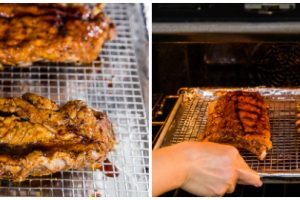
Remove the membrane from the underside of the ribs, pulling it down the entire length with a paper towel (because it’s very slippery!). You can ask the butcher to remove it for you. The ribs on the right are without membrane.
Season the ribs with the dry rub mixture on both sides of the ribs. Here I use UchiCook’s Maraca Sifter. This is so convenient to sprinkle seasonings evenly!
Use dry rub to cover all sides, and then rub in thoroughly on both sides. Set aside for 30 minutes.
To Prepare the Sauce
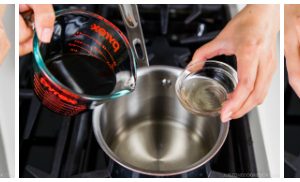
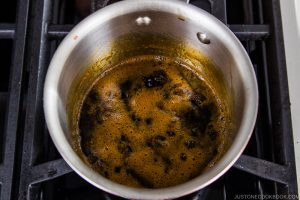
In a small saucepan, combine ¼ cup sake, ¼ cup mirin, ½ cup soy sauce, 1 Tbsp rice vinegar, 4 Tbsp brown sugar, and 3 Tbsp honey.
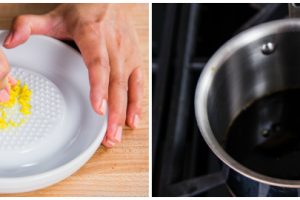
Grate ginger (I use this ceramic grater) and mince garlic (I use this garlic press), and add to the sauce.
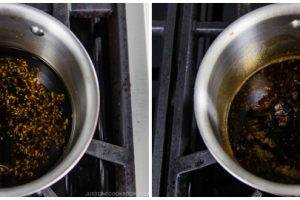
Cook/simmer on low heat for next 30-40 minutes.
Turn off the heat. The sauce may be still liquid-like, but once it cools down, the sauce will get thicken further. The sauce will be roughly 2/3 cup after cool down.
To Pressure Cook Ribs
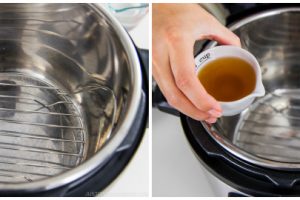
Place the metal steam rack into a 6-qt Instant Pot®. Add 1 cup water and ¼ cup apple cider vinegar.
Put the ribs upright on top of the rack, wrapping in a circle.
Select Manual setting; adjust the pressure to high, and set time for 25-30 minutes (if you want the meat to fall off the bone, do 30 minutes). If you use spare ribs, set time for 30-35 minutes.
When finished cooking, natural release for 5 minutes, then quick release the air (be careful and cover your fingers with a kitchen towel).
To Broil the Ribs
Preheat the broiler to Medium (roughly 500 ºF). Line a baking sheet with aluminum foil and place the wire rack (optional). Transfer the ribs to the wire rack from the Instant Pot.
Brush with the sauce on both sides of the ribs.
Place into oven and broil until the sauce is caramelized, bubbly, and brown, about 3-4 minutes.
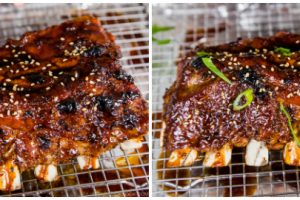
Remove from the oven and brush more sauce on the ribs.
To Serve
Sprinkle sesame seeds and chopped green onion. Serve immediately with the remaining sauce.
Recipe by Namiko Chen of Just One Cookbook. All images and content on this site are copyright protected. Please do not use my images without my permission. If you’d like to share this recipe on your site, please re-write the recipe and link to this post as the original source. Thank you.