Sunday 31 March 2019

5-Minute Vegan Cashew Queso

5-Minute Vegan Cashew Queso

Need vegan queso and need it fast? Look no further! This recipe requires just 7 ingredients, 5 minutes, and 1 blender. Let’s do this!

This recipe was born out of pure necessity. Some friends were over one night and we ordered Mexican food and I needed some queso STAT. So, I figured blending up some cashews with hot water would work.

5-Minute Vegan Cashew Queso from Minimalist Baker →


* This article was originally published here

Saturday 30 March 2019

Perfect Roasted Broccoli

basic roasted broccoli recipe

Any roasted broccoli fans out there? If you’ve tried it before, I’m sure you count yourself as a fan. Roasted broccoli is tender in the middle, with delicious golden edges and irresistibly crispy tips. In short, it’s more tasty than you thought broccoli could be!

I’ve shared roasted broccoli as a component in other recipes before, but I wanted to share my basic roasted broccoli recipe with you today. It’s a great side dish recipe to keep in your back pocket, and goes with just about anything.

raw broccoli, sliced into florets

Roasted broccoli is a healthy side dish with major crowd appeal. Broccoli contains a lot of good-for-you fiber, vitamin C, and a surprising amount of protein, too. Who knew? If you’ve been in a rut with side dishes lately, or you’re tired of steamed broccoli, you’re going to love this simple side.

Below, you’ll find my best tips and variations on roasted broccoli. I’ll be sharing a few more recipes for simple roasted vegetables soon, so I’m excited to kick off with one of my favorites. Here we go!

Continue to the recipe...

The post Perfect Roasted Broccoli appeared first on Cookie and Kate.


* This article was originally published here

How I Use Instant Pot for Japanese Cooking

Instant Pot is my partner in the kitchen for cooking authentic Japanese dishes like chawanmushi, Japanese curry, Japanese-style potato salad, and many others.s It speeds up the cooking time without sacrificing the quality and authenticity of the dishes. That’s why I love my Instant Pot and want to show you today how I use it in my daily Japanese cooking.

Silky and savory Japanese steamed egg custard Chawanmushi in a cup.

Chawanmushi (Savory Egg Custard)

If you looked up Instant Pot recipes on the web, you’re most likely get an infinite result. Undoubtedly the multicooker has been a life-changing kitchen appliance to legions of people out there. From the universally loved spaghetti bolognese to the classic Indian butter chicken, there seem to be the Instant Pot versions for us who want to save time.

The truth is there are yet too many Japanese Instant Pot recipes out there, and I know you’re probably curious how I use the gadget for my daily cooking. For the latest & final installment on my 3-part Instant Pot series, I will talk about how I use my Instant Pot in my daily Japanese cooking and what I cook with it.

In case you missed, here are the first two parts:

A gray bowl containing Japanese Cream Stew (White Stew) with chicken and vegetables in a savory thick white sauce.

Cream Stew (White Stew)

Instant Pot for Japanese Cooking

As I get older, I crave more and more for washoku dishes that I grew up eating – rice and a wholesome range of seasonal ingredients. These classic Japanese dishes are my kind of comfort food. Many of them are simmered dishes or nimono (煮物), which include beans, dried foods, and root vegetables.

To prepare these dishes on the stovetop, it can be rather time-consuming and labor intensive. I sometimes wish they are much easier to cook! However, with the help from the Instant Pot, cooking homestyle Japanese food have gotten a whole lot easier and so much FASTER. And my stress level for feeding a family of four has gone down significantly.

If you’re not familiar, a typical Japanese style meal includes rice as a main dish, one soup, and 3 side dishes (it’s called Ichiju Sansai 一汁三菜), usually with 1-2 simmered dishes. Yeah, talk about elaborate. It’s no simple feat to rustle up Japnese dinner every day, especially if you’re a working parent.

With the Instant Pot, I plan out my preparation in a way that I can work on the main dish or other dishes while the Instant Pot handles the cooking of a laborious dish. I make sure to cook many large portions (see more Japanese-style meal prep dishes) so I can store whatever leftovers in the refrigerator or freezer and serve the different dishes throughout the week. Home cooked Japanese food accomplished with minimal effort and smart planning!

Black ceramic bowls containing Japanese Mixed Rice (Takikomi Gohan).

Takikomi Gohan

Before we move on to what I cook with the Instant Pot, I think it’s also important to know the Pros and Cons of the Instant Pot cooking.

Pros and Cons of Pressure Cooking

Pros

  • Shorten cooking time into 1/3 of time (great for brown rice, a big chunk of meat, tendons, meat with bones).
  • The meat falls off the bone easily and bones in the fish become tender and edible
  • Save on electricity

To cook simmered dishes with the traditional stovetop method, you have to stand in the kitchen for a long time to keep checking on the food. I can never leave the kitchen! Now I can just walk away once I turn on the instant pot, and leave my kitchen to do other stuff. I love that I can start cooking dinner as late as 5 pm instead of 4 pm.

You may need some initial testing but once you get the idea of the timing, you are good to go. Take your kids to karate practice or clean the house with the extra free time; Instant Pot got you covered.

Cons

  • Tender/softer vegetables cook too fast, so some vegetables need to be added in later (or leave out for better consistency).
  • Cannot open the lid in the middle of cooking (to add tender vegetables or skim the scum).
  • Flavors may not be well absorbed just because the meat is tender.
  • Some vegetables may lose nutrients due to too much pressure.
  • Can’t cook leafy greens and food that requires crunchy/crispy texture like Kinpira Gobo (Burdock Root) and Kinpira Renkon (Lotus Root).
  • Hard to control the seasonings while cooking.

Now, this seems like a long list of cons, but they have not stopped me from cooking my dinners in the Instant Pot. I learned to work around the problem by cutting vegetables in bigger chunks and by choosing the right type of ingredients for pressure cooking. In fact, it has empowered me to cook more at home instead of resorting to takeout or eating out.

A blue Japanese bowl containing Nishime, simmered vegetables and chicken.

Chikuzenni (NIshime)

How I Use My Instant Pot

So what type of Japanese dishes do I make with my Instant Pot? Here are some of our favorites on Just One Cookbook:

Pressure cooker kakuni (Instant Pot Japanese Pork Belly) served over rice along with eggs and greens in donburi bowl.

Kakuni (Pork Belly)

1. Big Chunk of Meat

One of the key strengths of the Instant Pot is cooking meats to tender perfection in record time. Before owning the Instant Pot, I rarely cook Japanese dishes that call for big chunks of meats, but now I enjoy making a variety of recipes by leveraging on the pressure cooking feature of the multicooker.

Oxtail Oden (Japanese Fish Cake Stew) being cooked in an Instant Pot

Oden (Fish Cake Stew)

2. Stews + Soups

Seriously, if you love soups and stews like I do, it’s a strong enough reason to get an Instant Pot. When you can cut down cooking time at least in half, it means you get to make and enjoy your favorite dishes regularly.

Sweet black soybeans garnished with a gold leaf in Japanese red and gold dishes.

Black Beans (Kuromame)

3. Dried Beans

Cooking dried beans used to seem like an extravagant use of my time, but now it’s something I can tackle with ease. The Instant Pot has the ability in cooking beans from dry in a short time and the result is always so tender and flavorful. Instead of buying the canned stuff, I have started to cook more homemade red bean paste to make delicious sweets and snacks for the kids.

Pressure Cooker Instant Pot Nikujaga (Japanese Meat and Potato Stew) in a white bowl.

Nikujaga (Meat & Potato Stew)

4. Root Vegetables

From daikon, gobo (burdock root), renkon (lotus root) to carrot, Japanese cuisine features a lot of root vegetables in our daily meals. Instant Pot is particularly suited to cook these root vegetables, making healthy home cooking a possible task to conquer.

A grey dish containing Japanese beef tendon stew.

Beef Tendon Stew (Gyusuji Nikomi)

5. Tendons

It usually takes a painfully long time (3 hours!) to tenderize tendons. With the Instant Pot, it can be cooked perfectly within 30 minutes.

6. Whole Fish

Flounder (Karei カレイ), mackerel (Saba 鯖), horse mackerel (Aji アジ), red snapper (鯛), sardine (Iwashi イワシ ), and Pacific saurey (Sanma 秋刀魚) are great to cook in the instant pot. Just within 15 minutes, the whole fish including bones are nice and tender. Fish bones cooked in a pressure cooker are soft and edible, great for extra calcium! I’ll share the recipe when I get some good fish.

Perfectly cooked rice served in a rice bowl along with miso soup.

Steamed Rice

7. Rice

It usually takes 90 minutes to cook short-grain brown rice in a rice cooker and 30 minutes on the stovetop. Instant Pot makes it the fastest with 20 minutes. Compared to short grain white rice, the cooking time for brown rice is significantly longer, therefore I like cooking brown rice in the Instant Pot. I love the Mocchiri (モッチリ) texture, or mochi-like texture, of brown rice cooked both in the Instant Pot and donabe (Japanese earthenware pot). I’ll share the recipe soon!

Japanese curry served with rice.

Japanese Curry

Top 3 Dishes I Made Most Using Instant Pot for the Past 3 Months

It had been cold and rainy in the past 3 months, so I made these dishes with my Instant Pot most frequently for my family.

  1. Japanese Curry
  2. Oxtail Soup
  3. Chawanmushi (Savory Egg Custard)

Another favorite of ours is Pulled Pork, which I make a big batch and used in tacos, donburi (rice bowl), and sandwich!

Silky soft and creamy Instant Pot Kabocha Flan on a white plate.

Instant Pot Kabocha Flan

Have you tried cooking Japanese recipes with Instant Pot before? Do you have a favorite? Are there any specific recipes you’d like me to share? I’d love to hear from you!

Disclosure: This post is sponsored by Instant Pot. All opinions expressed are my own, and I only work with brands and products that I personally use and thoroughly enjoy. Thank you so much for supporting the companies that keep Just One Cookbook going.

Sign up for the free Just One Cookbook newsletter delivered to your inbox! And stay in touch with me on FacebookPinterestYouTube, and Instagram for all the latest updates.


Hotel Review: The Revolution Hotel, Boston


By LISA W. FODERARO from NYT Travel https://ift.tt/2uAWbHf

Celebrating ‘Platinum Week’ in Japan


By ALLAN RICHARZ from NYT Travel https://ift.tt/2OzNxlA

Friday 29 March 2019

Pistachio Poppyseed Orange Yogurt Bread

sliced glazed orange yogurt bread on a cutting board

Gorgeous pistachio poppyseed orange yogurt bread naturally sweetened with honey, fresh orange juice, and topped with a perfectly sweet orange glaze. A delicious, healthy yogurt bread for spring! Most of you know that my 84 year old Grandma Gloria loves to bake. She’s inspired several recipes on the blog including these buttermilk waffles, sunflower honey [...]

The post Pistachio Poppyseed Orange Yogurt Bread appeared first on Ambitious Kitchen.


* This article was originally published here

Fasten Your Seatbelt and Keep Your Hands to Yourself


By MAYA SALAM from NYT Travel https://ift.tt/2FKX6vk

Copenhagen’s Latest Draw? An Abandoned Shipyard


By INGRID K. WILLIAMS from NYT Travel https://ift.tt/2WuOnTi

Airline Booking Hacks: What Works, and What Might Get You in Trouble


By ELAINE GLUSAC from NYT Travel https://ift.tt/2V4vDd0

Thursday 28 March 2019

Mushroom Spinach Bacon Egg Cups (low carb!)

bacon egg cups and avocado cubes on a plate

Delicious low carb mushroom spinach bacon egg cups with crumbles of feta in every bite. You’ll love this healthy make-ahead breakfast that’s packed with protein and takes just 30 minutes to make. Easily made paleo, too! After a good sweaty session at the gym, there’s nothing I love more than coming home to a delicious, [...]

The post Mushroom Spinach Bacon Egg Cups (low carb!) appeared first on Ambitious Kitchen.


* This article was originally published here

Premium Japanese Green Tea Giveaway (US only)

Two types of Japanese green tea and their containers along with tea pot.

Win a set of premium Japanese green tea from the award-winning Japanese Green Tea Company today! 

Two types of Japanese green tea and their containers along with tea pot.

Springtime is officially here. Are you ready to bring out your picnic basket and fill it with rice balls and sakura mochi?

To usher in the season of cherry blossom, we’ve partnered with Japanese Green Tea Company to give away their best-selling authentic green tea to complement your spring-theme menu.  Three (3) lucky winners will be selected to win their award-winning Issaku Sencha and Gyokuro Japanese premium green tea in this giveaway!

Two types of Japanese green tea and their containers along with tea pot.

Win a Set of Gyokuro and Issaku Japanese Green Tea Today!

Issaku Sencha (Global Tea Champion 2017)

Issaku is the highest-grade tea available from Japanese Green Tea Company, and, due to the complex and long process of creating the tea, only a limited quantity is available to produce every year. This tea is rare, even in Japan to enjoy.

Gyokoro Shaded Imperial Japanese Premium Green Tea

Gyokuro is a special type of green tea shaded from the sun for 20 days with specially made mats which allows the caffeine levels to increase in the leaves, in addition to allowing the amino acids to get stronger, producing a sweeter and stronger flavor. Because of the cultivation process, the leaves have a very particular odor that is impossible to confuse.

Two types of Japanese green tea in a cup and their containers along with tea pot.

About Japanese Green Tea Company

Japanese Green Tea Company sells authentic, healthy Japanese Matcha & Green Tea harvested from sugarcane soil. In addition to the Global Tea Championship, their tea won the Japanese National Tea Award in 1974, 1975, 1979 and 2010.

Japanese Green Tea Company is the only US-based company to source tea directly from Arahataen Green Tea Farms in the Shizuoka prefecture in Japan. Shizuoka has been the center of green tea cultivation in Japan for centuries, and the region’s intense sunlight and intermittent fog gives each batch of tea its distinctive flavor. You can learn more here.

Special Discount for Just One Cookbook Readers

Japanese Green Tea Company is also offering Just One Cookbook readers a 10% discount on your first order.

Discount Code: JOC

You can use the code at the checkout. The code expires on April 17th (one week after the giveaway ends) and is limited to one use per customer.

Two types of Japanese green tea in a cup and their containers along with tea pot.

GIVEAWAY RULES

Please Note: Your email for the comment entry has to match with your email address in my Email Newsletter Subscription mailing list.

This giveaway contest closes on Wednesday, April 10, at 12 p.m. PST and is open to the US only.

Three (3) winners will be selected via Pick Giveaway Winner Plugin and contacted via email, so please include a valid email address in the email address entry box (please double check your spelling!).

The winners are required to respond within 36 hours to claim the prize.

HOW TO ENTER:

The more tickets/comments left on this blog post will increase your odds of winning. Good luck!

Ticket 1 (Required): Subscribe to Japanese Green Tea Company newsletter and leave a separate comment below.

Ticket 2 (Required): Subscribe to my Email Newsletter if you haven’t and leave a comment below on this post.

Ticket 3 (Optional): Follow Japanese Green Tea Company Instagram or Like them on Facebook

Ticket 4 (Optional): Follow my Instagram and then leave a separate comment below on this post.

Ticket 5 (Optional): Subscribe to my YouTube channel and leave a separate comment below on this post.

Ticket 6 (Optional): Like my Facebook and leave a separate comment below on this post.


36 Hours in Rio de Janeiro


By NELL McSHANE WULFHART from NYT Travel https://ift.tt/2JNFzXa

Pack Those Binoculars. It’s Peak Bird-Watching Season.


By CHARU SURI from NYT Travel https://ift.tt/2Uhc0Bt

Wednesday 27 March 2019

Nara Guide: Todaiji

The Best Healthy Blueberry Muffins

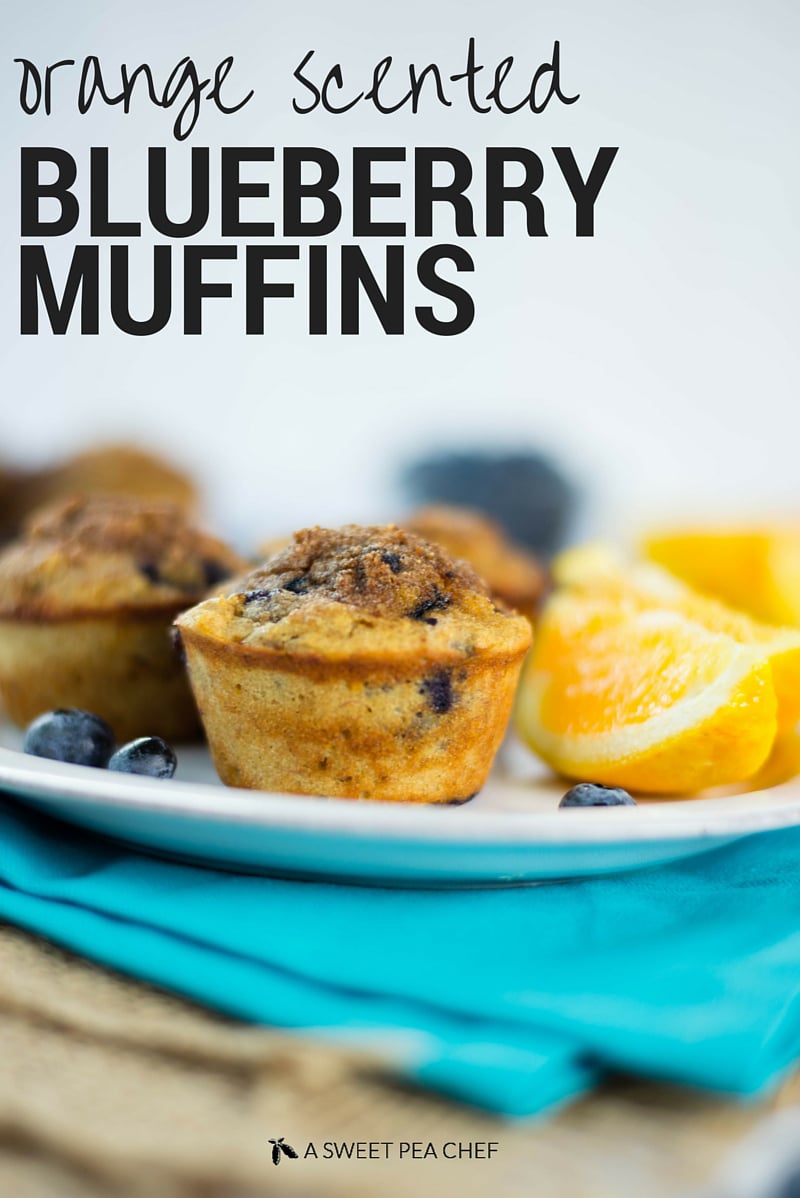
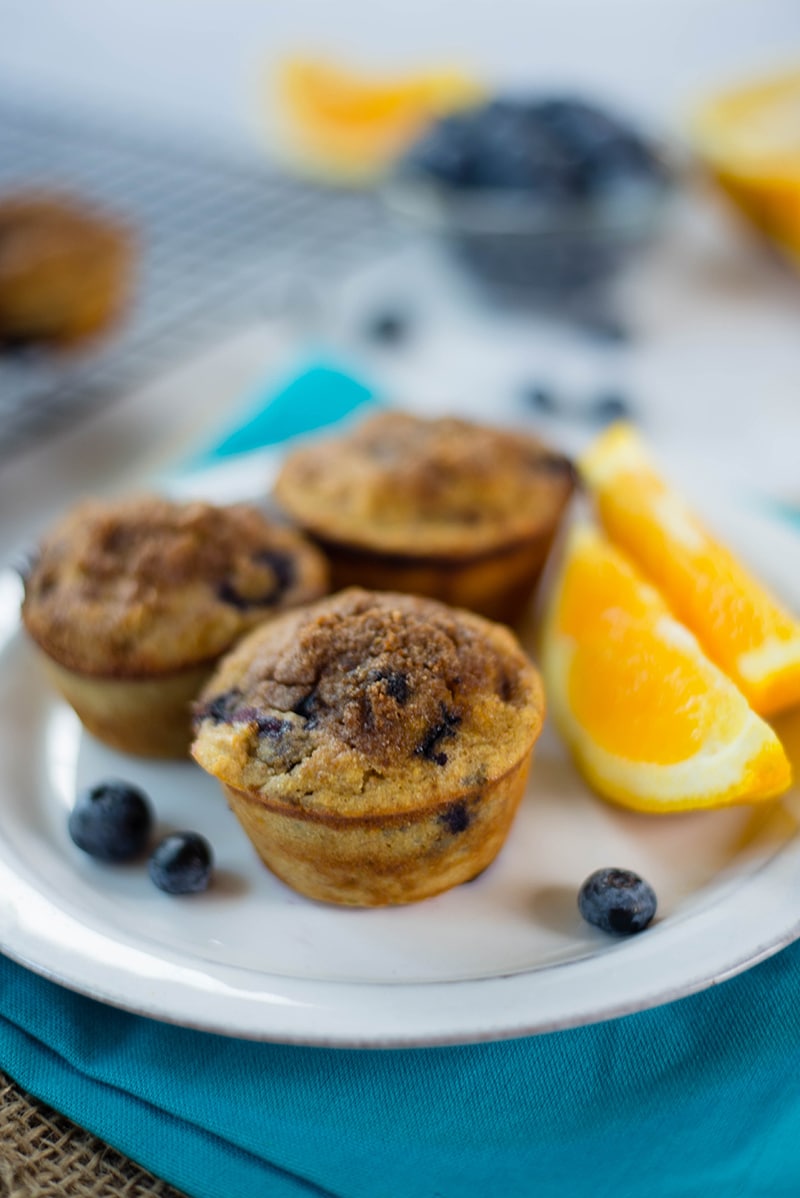
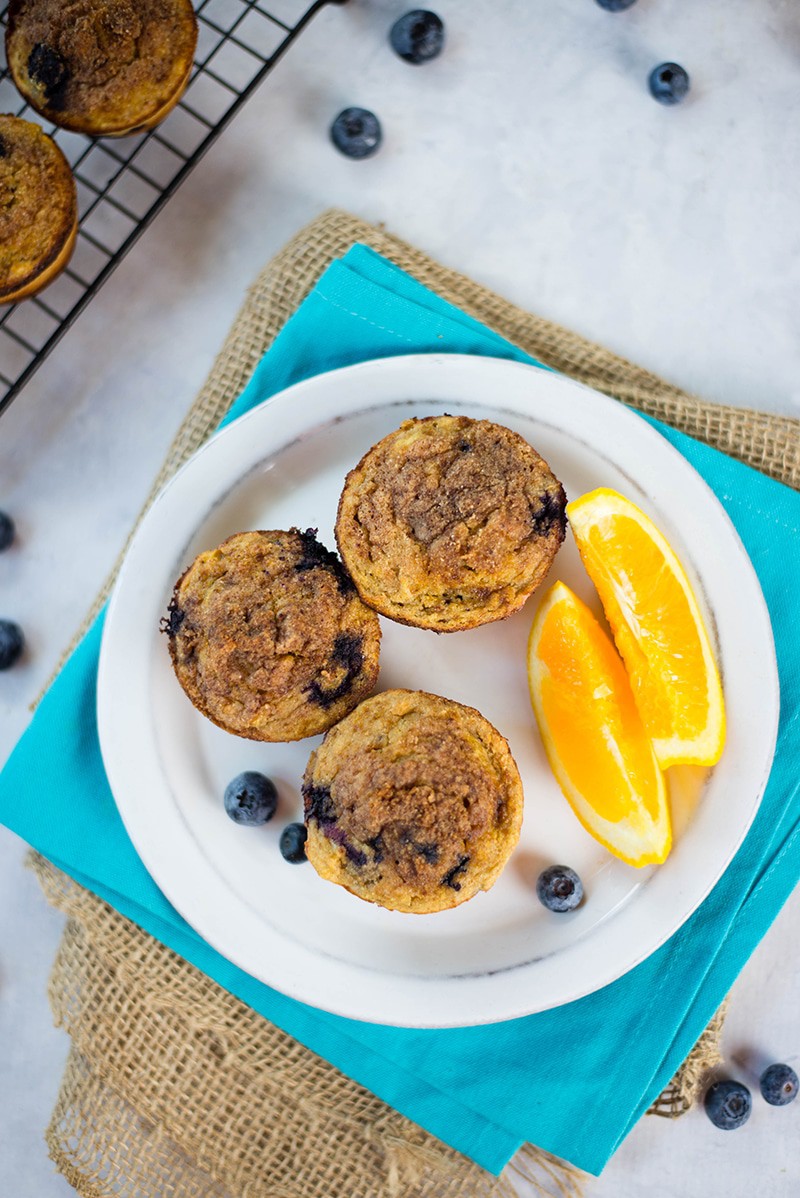
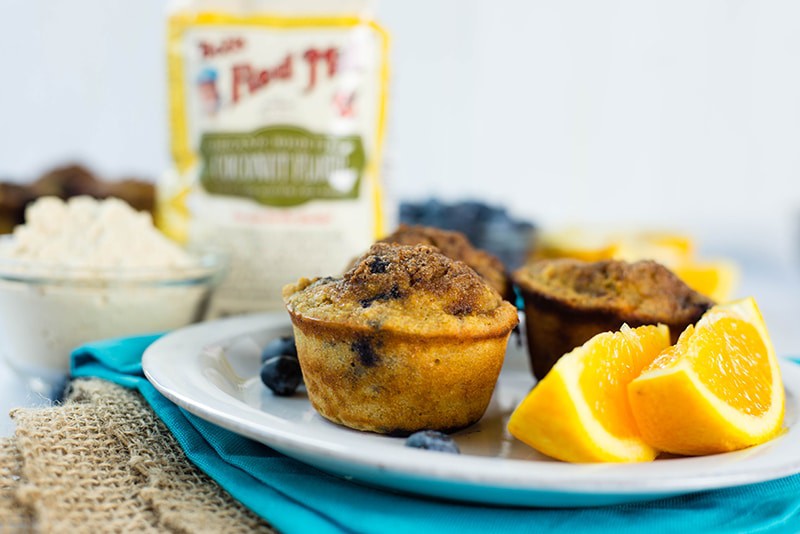
Where are my fellow muffin fans? I have yummy and healthy blueberry muffins for you! Healthy, unrefined, orange-scented blueberry muffins for the win!

Orange Scented Blueberry Muffins | Simple, healthy blueberry goodness! | A Sweet Pea Chef

Blueberry muffins are so my fave kind of muffins.

And, you know me: I like muffins!

No matter where I am or what mood I’m in, sitting down and enjoying a blueberry muffin instantly takes me back to being a kid again.

Problem with your typical blueberry muffin, though, is that it’s just filled with refined sugars and flours and likely lots of unnecessary fats and other unhealthy oils.

I know, right… but… blueberry muffins??

What are we ever to do?

Well, I decided I needed more blueberry muffins in my life.

I needed them on a regular basis.

I needed them as a snack or a breakfast or a sweet treat.

I needed them… to be HEALTHY and good for me.

Which means I made healthy muffins. Healthy blueberry muffins. Actually, I combined the flavors of orange muffins and the flavors of blueberry muffins and I made orange blueberry muffins.

And, I know, it’s different.

But, stay with me, peeps… because it’s also glorious…

I’m tellin’ ya – it’s super tasty and a great way to enjoy your blueberry muffins again.

Orange Scented Blueberry Muffins | Simple, healthy blueberry goodness! | A Sweet Pea ChefOrange Scented Blueberry Muffins | Simple, healthy blueberry goodness! | A Sweet Pea Chef

HOMEMADE ORANGE-SCENTED BLUEBERRY MUFFINS

Making healthy blueberry muffins was not enough, I wanted to add in a lil’ something special to brighten up the blueberry muffins and I found the best way to do this was with some fresh orange zest.

I know – you’re totally thinking, “Lacey, why on earth would you add orange zest to a perfectly good blueberry muffin? They’re great the way they are!” “You can make healthy orange muffins instead of messing with the old fashioned blueberry muffins.”

Truth to be told, I could’ve followed a classic recipe for orange muffins and make orange muffins. But I really wanted orange blueberry muffins. And I wasn’t disappointed.

I mean, even Dustin, who practically cried when I told him I added orange zest into the blueberry muffins he was craving for so long, took one bite and then happily declared them to be the best blueberry muffins he’d ever had.

So more blueberry orange muffin for us! All day, any day!

Orange Scented Blueberry Muffins | Simple, healthy blueberry goodness! | A Sweet Pea Chef

HOW TO MAKE YOUR BLUEBERRY MUFFINS HEALTHY

To make the yummy blueberry orange muffin healthy, you have to do just a few easy steps:

  • remove all processed sugars (and replace with natural sweetness, like ripe bananas);
  • remove all processed flours (and replace with unrefined flours like spelt flour and coconut flour);
  • remove all processed oils (and replace with the awesome healthy substitute of mashed bananas).

See?  Super easy to replace those unhealthy ingredients with natural, unrefined ingredients!

WHAT IS SPELT FLOUR?

I make these tasty orange scented blueberry muffins with coconut flour and spelt flour for a delicious combination of flavors and health benefits – so good for your taste buds and your body!

In case you don’t know what is spelt flour, well, spelt flour is a healthy and more nutritious alternative to all-purpose flour. Spelt is a whole grain that contains calcium, selenium, vitamin B1, vitamin B6, and vitamin E.

Orange Scented Blueberry Muffins | Simple, healthy blueberry goodness! | A Sweet Pea Chef

BANANAS AS AN ALTERNATIVE TO PROCESSED SUGAR

Bananas are one of the best sugar alternatives. I use them ALL the time to naturally sweetness my shakes and baked goods.

They’ll add a sweet taste to your blueberry muffins, but the muffins will stay healthy and you don’t even taste the bananas. Also, using bananas as sugar alternatives in homemade baked treats is a great way to use up overripe bananas. Plus, bananas are loaded with fiber, contain magnesium, vitamin C and vitamin A. Healthy sugar alternatives are definitely better than processed sugar, peeps!

If you don’t have bananas, you could also use unsweetened applesauce.

Orange Scented Blueberry Muffins | Simple, healthy blueberry goodness! | A Sweet Pea Chef

BAKING TIPS FOR ORANGE BLUEBERRY MUFFINS

After you prepped the batter for the blueberry orange muffin…

  1. fill the muffin cups evenly – about 3/4 of the way full because the muffins will rise while in the oven;
  2. transfer the muffin tray to the oven and bake for approximately 12-15 minutes;
  3. to check if the muffins are done, use the toothpick trick – insert a toothpick into the center of the orange blueberry muffins and see if it comes out clean. If it does, the muffins are ready. If not, bake for a couple more minutes and repeat the test.

Orange Scented Blueberry Muffins | Simple, healthy blueberry goodness! | A Sweet Pea Chef

HOW TO MAKE A CRUMB TOPPING FOR BLUEBERRY MUFFINS

Nothing beats the taste, flavor, and deliciousness of blueberry muffins. Except maybe… blueberry muffins with crumb topping. The additional awesomeness of blueberry crumb muffins is brought to you today by a few simple and healthy ingredients. To make the crumb topping for muffins:

  1. place softened coconut oil on a parchment paper and place in the freezer for up to 15 minutes to harden;
  2. in the meantime, in a mixing bowl, mix coconut flour, coconut sugar, and cinnamon;
  3. remove the coconut oil from the freezer and break it into small pieces;
  4. add the coconut oil pieces and stir to combine;
  5. top each muffin with the flour-cinnamon mixture – the coconut oil will melt in the oven and, when combined with the flour-cinnamon mixture, will create a crunchy topping.

It’s so easy to make the crumb topping for muffins, don’t you think?

Orange Scented Blueberry Muffins | Simple, healthy blueberry goodness! | A Sweet Pea Chef

STORING OR FREEZING HEALTHY BLUEBERRY MUFFINS

After learning how to make blueberry muffins, we have to move to the next steps – how to store muffins and how to freeze muffins. However, if you want to reach this point, I highly recommend making a double batch because the first one will disappear immediately.

How to store muffins:

  1. place the healthy muffins in Ziploc bags;
  2. seal the bags and store the muffins at room temperature for up to 3 days.

How to freeze muffins:

  1. to freeze the orange blueberry muffins, place them in Ziploc bags or wrap them in foil;
  2. store them in the freezer for up to 3 months;
  3. thaw the muffins at room temperature or heat them in the microwave on high for approximately 30 seconds.

Orange Scented Blueberry Muffins | Simple, healthy blueberry goodness! | A Sweet Pea Chef

3 MORE HEALTHY MUFFIN RECIPES

One muffin recipe is never enough. Especially when we’re talking about healthy muffins. So I have more. Not another muffin recipe but 3 more muffin recipes that will make delicious and healthy muffins.

PALEO APPLE MUFFINS WITH CRUNCHY CRUMB TOPPING

Healthy, full of flavor, and totes delicious, these Paleo Apple Muffins with Crunchy Crumb Topping will fill your home with a wonderful smell while baking them. Oh, the smell of freshly baked muffins. It’s so good.

Paleo Apple Crunch Muffins | These paleo apple crunch muffins are easy, healthy, full of flavor, and will make your home smell amazing! | A Sweet Pea Chef #ad

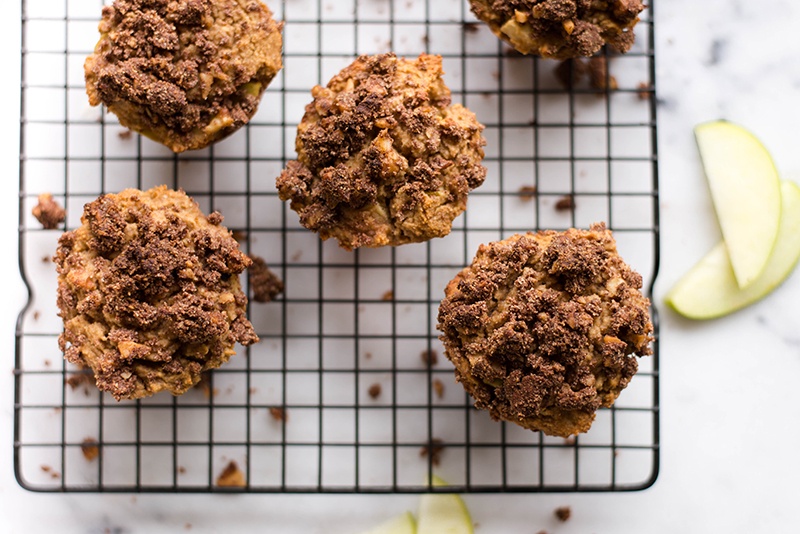
For extra taste and flavor, these Paleo Apple Muffins are topped with a delicious and crunchy crumb topping that is so, so good. Get the recipe.

HEALTHY BANANA CHOCOLATE CHIP MUFFINS

These healthy Banana Chocolate Chip Muffins are the PERFECT way to use ripe bananas and don’t use any refined flour, refined sugar or oil!

Banana Nut Muffins

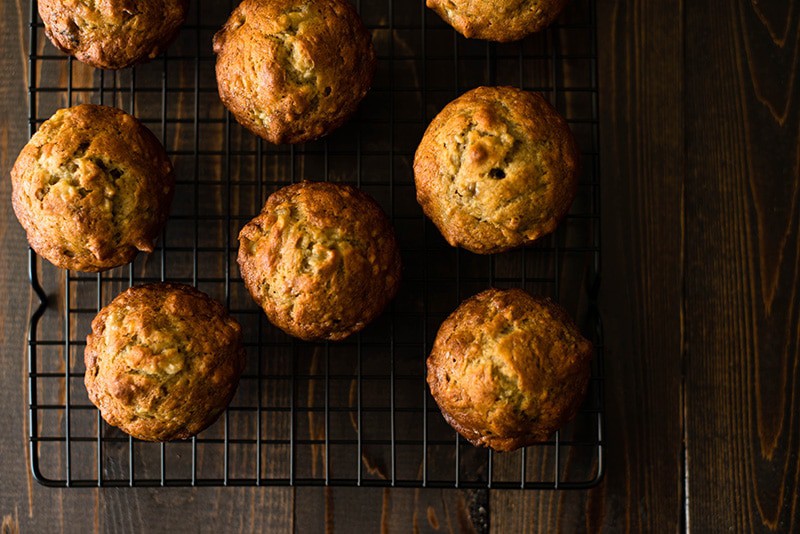
These healthy muffins are soft, dense, filled with amazing banana flavor and chocolate goodness. Get the recipe.

30-MINUTE HEALTHY PUMPKIN CHOCOLATE CHIP MUFFINS

Light and sweet, these 30-Minute Healthy Pumpkin Chocolate Chip Muffins are packed with pumpkin flavor.

Close up of a side shot of the pumpkin chocolate chip muffins on a cooling rack, ext to several other muffins and dark chocolate chips.

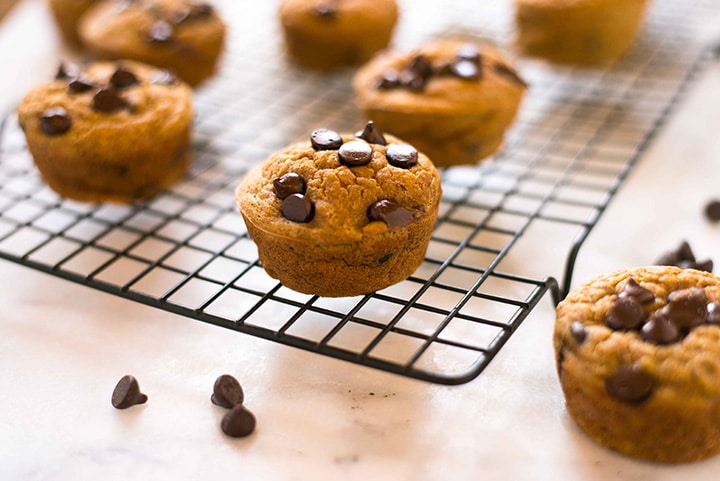
This is my go-to muffin recipe during Fall. But I wouldn’t say no to this muffins the rest of the year. Get the recipe.

Healthy Blueberry Muffin Recipe


The Best Healthy Blueberry Muffins

Healthy, unrefined orange-scented blueberry muffins for the win!

FOR THE DRY INGREDIENTS:

  • 1/2 cup coconut flour
  • 1/2 cup spelt flour
  • 1 1/2 tsp baking powder
  • 1/4 tsp sea salt
  • 1 tsp cinnamon

FOR THE WET INGREDIENTS:

  • 3 bananas (mashed)
  • 5 eggs
  • 3 tbsp raw honey (melted)
  • 1 1/2 tsp vanilla extract
  • 1 tbsp fresh orange zest (1 orange)
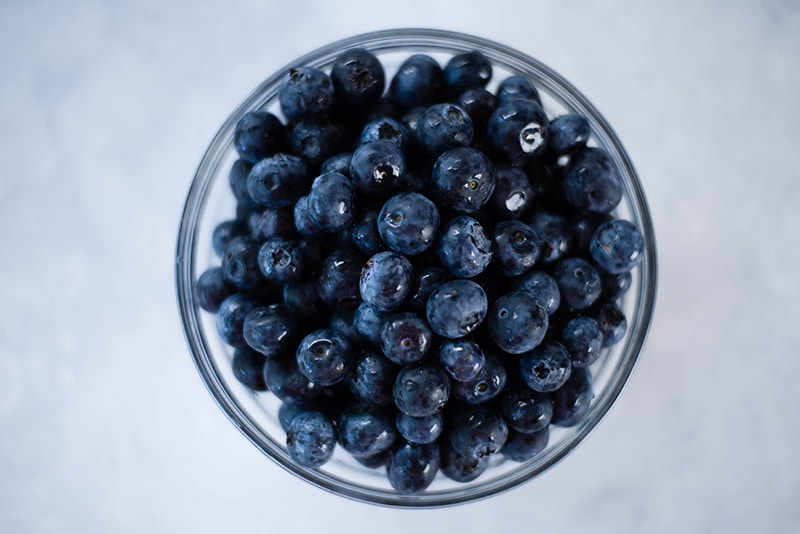
  • 1 cup fresh blueberries

FOR THE CRUMB TOPPING:

  • 2 tbsp coconut sugar
  • 2 tbsp coconut flour
  • 1/2 tsp ground cinnamon
  • 2 tbsp coconut oil (softened)
  1. Start by preheating your oven to 400 degrees Fahrenheit and greasing a regular muffin tin with coconut oil.
  2. Next, in a large mixing bowl, combine the coconut flour, spelt flour, baking powder, sea salt, and ground cinnamon.
  3. In a separate mixing bowl, add ripe bananas and mash until smooth using a fork or potato masher. Once the bananas are fully mashed, add the eggs, raw honey, vanilla extract, and fresh orange zest, and stir to combine.
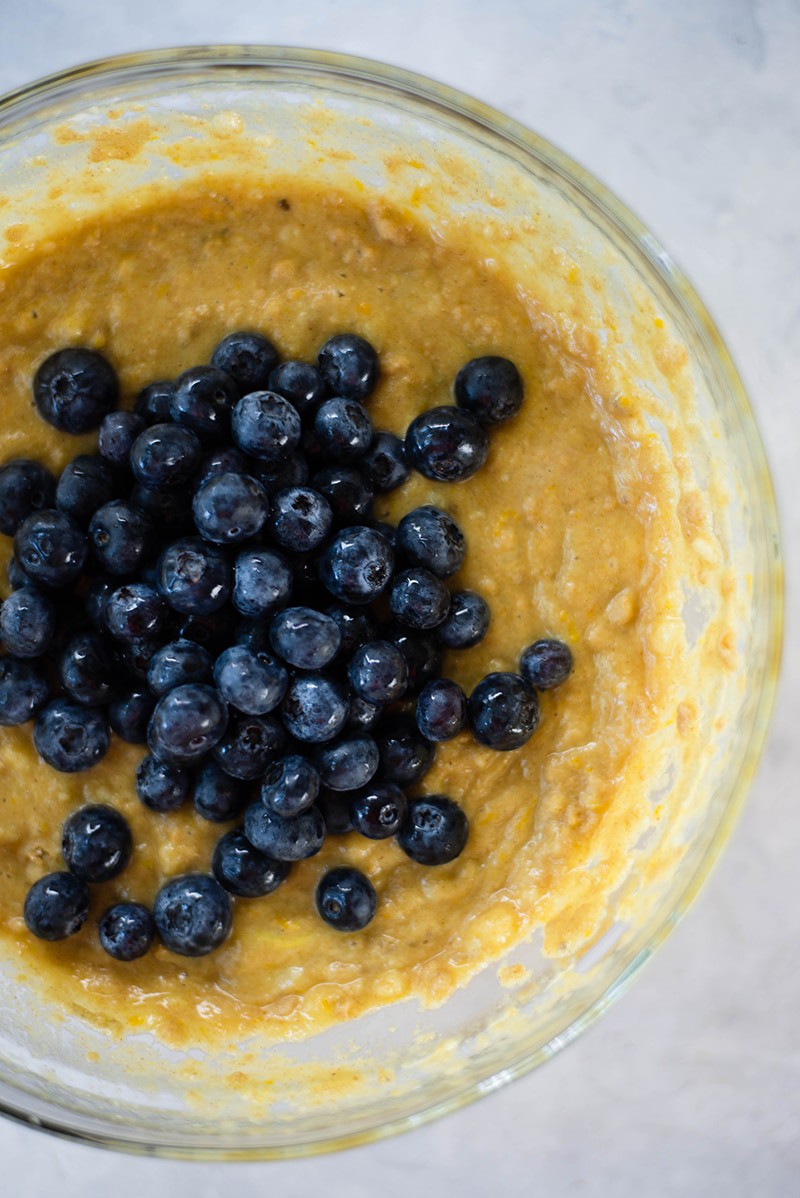
  4. Pour the wet ingredients into the dry ingredients and mix together until just incorporated. Then, add in the fresh blueberries and fold into the batter.
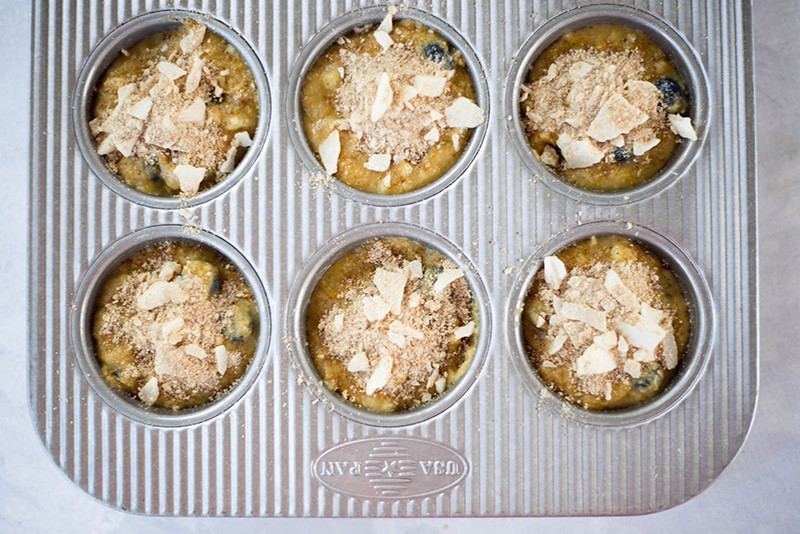
  5. Fill each muffin cup evenly – the muffins will rise some so try to fill them about 3/4 of the way full.
  6. Spread 2 tbsp. of the softened coconut on a sheet of parchment paper and place in the freezer for 10-15 minutes to harden.
  7. While the coconut oil is hardening, mix the remaining coconut flour, coconut sugar, and cinnamon in a small mixing bowl. Once the coconut oil is hardened, remove it from the freezer and break into small pieces. Then, add into the mixing bowl and stir to combine. (As the coconut oil melts in the oven, just like with butter, it will produce a crispy, crunchy topping for the muffins.)
  8. Top each of the muffins with the coconut flour and cinnamon mixture.
  9. Place into the oven and bake for 12-15 minutes, or until a toothpick or knife inserted into the center comes out clean.

This post contains affiliate links for products I use often and highly recommend.

The post The Best Healthy Blueberry Muffins appeared first on A Sweet Pea Chef.


* This article was originally published here

See the World and Make a Difference on a ‘Citizen Science’ Expedition


By NORA WALSH from NYT Travel https://ift.tt/2WxJF7B

On a Colorado Ski Trip, Planes, Trains, No Automobiles


By AMY VIRSHUP from NYT Travel https://ift.tt/2YpcOUd

Tuesday 26 March 2019

Traveling the World, While Looking Over Her Shoulder


By MAYA SALAM from NYT Travel https://ift.tt/2WvKX2V

Safety Tips for the Solo Female Traveler


By TARIRO MZEZEWA from NYT Travel https://ift.tt/2JGOoC0

30 minute Spinach Garlic Parmesan Orzo with Crispy Bacon

bowl of garlic parmesan orzo pasta with veggies and a spoon

Easy, flavorful spinach garlic parmesan orzo pasta with crispy bacon and gorgeous veggies like red bell pepper, corn, carrots, and spinach. This healthy 30-minute dinner is perfect for meal prep and delicious hot or cold! I’ve had a real thing with bacon lately, which somewhat amuses me because most of my life I didn’t really [...]

The post 30 minute Spinach Garlic Parmesan Orzo with Crispy Bacon appeared first on Ambitious Kitchen.


* This article was originally published here

An Awakening in Columbus, a Reckoning in Williamsburg


By SEBASTIAN MODAK from NYT Travel https://ift.tt/2TZjeL6

Travel Longer, Cheaper and Better: Hostels for Beginners


By GEOFFREY MORRISON from NYT Travel https://ift.tt/2OqE9R8

Monday 25 March 2019

Lemon Cookies with Lovely Lemon Glaze

These lemon cookies are soft in the middle with crispy edges, and are delicious topped with a lovely lemon glaze. Add poppy seeds to these cookies to easily make them lemon poppyseed cookies! Lemon lovers will LOVE these cookies. After a few weeks away from blogging and working on our new site, I’m back and [...]

The post Lemon Cookies with Lovely Lemon Glaze appeared first on Ambitious Kitchen.


* This article was originally published here

12 Popular Foods to Enjoy at Cherry Blossom Viewing (Hanami)

Adventurous. Alone. Attacked.


By MEGAN SPECIA and TARIRO MZEZEWA from NYT Travel https://ift.tt/2HPtluF

Sunday 24 March 2019

Easy Dukkah

easy dukkah recipe

Have you tried dukkah yet? It’s easy to fall in love with freshly-made dukkah, an Egyptian nut, seed and spice blend. Dukkah livens up the most basic appetizer around—bread and olive oil—and so much more!

I bet you have all the ingredients to make dukkah (also spelled duqqa) in your pantry already. Dukkah is made with basic ingredients, including nuts, sesame seeds, coriander and cumin. Most recipes call for whole coriander and cumin, but I used ground spices to make an easier version.

dukkah ingredients

Dukkah became quite popular in American food magazines and grocery stores a few years ago, when it seemed to make an appearance on every page of Bon Appétit. Back then, the ingredients seemed a little too fussy, so I bought the Trader Joe’s blend to sample instead.

The store-bought version tasted stale, so it slowly scooted to the back of my pantry and I dismissed the dukkah craze altogether. Fortunately, my Valentine gave me a Lebanese cookbook this February, and I decided to give their dukkah recipe a shot.

I’m so glad I did, because freshly-made dukkah is a delight. It’s my new favorite seasoning, and lends irresistibly nutty, subtly spiced flavor to everything it touches. Want to learn how to make it?

Continue to the recipe...

The post Easy Dukkah appeared first on Cookie and Kate.


* This article was originally published here

Saturday 23 March 2019

Bamboo Rice (Takonoko Gohan) たけのこご飯

Bamboo rice in a bizen Japanese rice bowl and in a donabe (Japanese clay pot).

Cooked in classic Japanese dashi broth, this simple and elegant Bamboo Rice or Takenoko Gohan is a perfect way to welcome spring! The savory rice mixed with sweet, tender and crunchy bamboo shoots – it’s a taste of spring in every bite.

Bamboo rice in a bizen Japanese rice bowl and in a donabe (Japanese clay pot).

Japan has distinct four seasons, and each season is characterized by an abundance of seasonal ingredients. In Spring, we anticipate the emergence of fresh bamboo shoots and make Bamboo Rice, or Takenoko Gohan (たけのこご飯). It’s a simple rice dish cooked in dashi broth with the addition of tender bamboo shoots.

As bamboo represents the coming of spring, the mixed rice holds a special place in Japanese cuisine. It also brings me such joy to cook for my family as we gather at the dinner table to give thanks for the new season.

Watch How to Make Bamboo Rice

Cooked in classic Japanese dashi broth, this simple and elegant Bamboo Rice or Takenoko Gohan is a perfect way to welcome spring! The savory rice mixed with sweet, tender and crunchy bamboo shoots – it’s a taste of spring in every bite.

Edible Bamboo – Bamboo Shoots

Delicate young bamboo shoots are a common ingredient in Japanese cooking just as they are in most Asian culinary world. They are tender and edible when cooked, and they taste like spring to me. You’ve probably tasted bamboo shoots in ramen, but the uses extend wide and far in the kitchen. You can find bamboo shoots in many Japanese recipes such as:

The mild flavor and tender-crisp texture of bamboo shoots make it an excellent addition to bulk up your stir-fries, soups, salads or as a delicious topping to your noodle dishes.

Bamboo shoots are in season in spring between late March through May. Keep an eye out when you visit Japanese or Asian grocery stores. You might be lucky to score some fresh bamboo shoots to make delicious food with them.

Most of the Japanese and Asian grocery stores sell pre-boiled and vacuumed packed bamboo shoot like the picture shown below. The bamboo shoots are already boiled, so you can quickly heat up and enjoy right away. Do not use the canned variety to make Bamboo Rice.

Boiled Bamboo Shoots

If you don’t use the entire bamboo shoot, you can save the leftover in an airtight container.  Make sure to soak the bamboo shoots in cold water all the time and change the water every day to keep it fresh until you are ready to use. They can last up to two weeks when they are properly refrigerated.

Save Bamboo Shoot

You can rinse off the gritty white substance in the bamboo shoot, but they are edible. If they don’t bother you, there’s no need to rinse it off.

Bamboo rice in a donabe (Japanese clay pot).

Cooking Takenoko Gohan in Kamado-san

If you ask me what is the very best way to cook Japanese rice, I would say, without a pause, to cook in Kamado-san (かまどさん).

Kamado-san is a Japanese earthenware (donabe) rice cooker made with special clay. It produces the most delicious rice than any other cooking methods. My family can vouch for that as they can taste the difference immediately.

So, what is the difference between Kamado-san and the regular donabe? While the regular donabe is a fantastic all-around cooking pot, Kamodo-san is specially designed for cooking rice. It has a double lid, a porous clay body and a thicker bottom that cook the rice evenly with steady heat distribution. As a result, the rice is fluffier and shinier.

I still cook my rice in my rice cooker once in a while, but my family enjoy rice cooked in my Kamado-san, especially special rice dishes like this bamboo rice.

Where to Get a Kamado-san: If you are in Los Angeles, check out Toiro Kitchen & Supply. You can also purchase one online and they will ship internationally as well. If you are in Japan, you can purchase one on Amazon or major department stores in the city you are in. Usually, there is a big kitchen floor where you can purchase unique Japanese kitchen items, including Kamado-san. My brother hand-carried two of his new Kamado-sans to Bangkok where he lives.

Bamboo rice in a bizen Japanese rice bowl and in a donabe (Japanese clay pot).

Other Methods to Cook Bamboo Rice

You can, of course, prepare Bamboo Rice using other methods. All the preparation steps are exactly the same up till you add rice, broth, ingredients (in that order) into your cooking pot. Remember, DO NOT MIX the rice and ingredients. Each rice kernel will cook through evenly when rice is compact and next to each other.

Rice Cooker

Once everything is in the inner pot of the rice cooker, close the rice cooker lid. Press “mixed rice” cooking program/mode, and press start. If your rice cooker doesn’t come with a “mixed rice” setting, go ahead and start cooking rice as you normally do, but do not open the lid for extra 5 minutes after the cooking program is done (after beeping). The “mixed rice” setting help the bottom of rice gets nice brown char, which we call “Okoge” (お焦げ). Adding those extra 5 minutes for the regular cooking program will give some time for the rice to brown.

Other types of Donabe and Heavy Bottom Pot (Dutch oven) on Stovetop

Place the lid on the pot and start cooking over medium heat. Keep an eye on the liquid/broth until it starts to boil (It’ll take about 10 minutes). Once boiling, turn the heat to low and cook for 15 minutes without opening the lid. When it’s done cooking, quickly open the lid and see if there is any water left. If so, cook additional 1-2 minutes. Then remove from the heat (don’t keep it on the hot burner), and let it steam for 10-15 minutes.

Instant Pot (Pressure Cooker)

The only difference for Instant Pot method is that the broth that goes into the Instant Pot needs to be 360 ml, instead of 400 ml. For pressure cooking Japanese rice, rice to water ratio is 1 to 1. Therefore, the katsuo dashi should be 300 ml (instead of 340 ml), and after adding condiments (total 60 ml), the total broth will be 360 ml.

Close the lid and click MANUAL. Set HIGH pressure for 2 minutes. When it’s finished cooking, the Instant Pot will beep and switch automatically to the “Keep Warm” mode. Let the pressure release naturally for 10 minutes (10-minute “natural release”) and then proceed with a “quick release” by turning the steam release handle to the “venting” position to let steam out until the float valve drops down. Do not exceed more than 10 minutes, and fluff the rice and serve immediately (otherwise, rice may stick at the bottom).

Whichever method you decide on making this Bamboo Rice (Takenoko Gohan), it is a special time to savor this springtime produce. You could keep it simple by serving bamboo rice with just a side of miso soup, or with the addition of grilled mackerel (saba shioyaki) and a fresh green side like Spinach Gomaae. I hope you enjoy!

Bamboo rice in a bizen Japanese rice bowl and in a donabe (Japanese clay pot).

Other Mixed Rice Recipes on Just One Cookbook

Bamboo rice in a bizen Japanese rice bowl and in a donabe (Japanese clay pot).

Japanese Ingredient Substitution: If you want to look for substitutes for Japanese condiments and ingredients, click here.

Sign up for the free Just One Cookbook newsletter delivered to your inbox! And stay in touch with me on FacebookPinterestYouTube, and Instagram for all the latest updates.

Bamboo Rice (Takenoko Gohan)

Cooked in classic Japanese dashi broth, this simple and elegant Bamboo Rice or Takenoko Gohan is a perfect way to welcome spring! The savory rice mixed with tender and crunchy bamboo shoots – it’s a taste of spring in every bite. 

  • 2 rice measuring cups uncooked Japanese short grain rice ((360 ml))
  • 5.3 oz boiled bamboo shoot ((150 g))
  • ½ aburaage (deep fried tofu pouch) ((optional; See Notes))

Katsuo Dashi

  • 1 ½ cup water ((360 ml))
  • 1 cup katsuobushi (dried bonito flakes) ((packed, 10 g))

Seasonings

  • 2 Tbsp sake
  • 2 Tbsp usukuchi (light-color) soy sauce ((or use regular soy sauce; See Notes))
  • ½ tsp salt (kosher or sea salt; use half if using table salt)

To Prepare Rice

  1. Rinse the rice under cold water, by gently rubbing the rice with your fingertips in a circling motion. Submerge the rice in water and pour out the starchy water. Rinse and repeat until the water becomes clear. Soak rice in water for 20-30 minutes. Meanwhile, start preparing the next ingredients. After soaking for 20-30 minutes, drain water completely and set aside for 10 minutes. If you don’t have time to wait, then shake off the excess water the best you can.

To Prepare Katsuo Dashi

  1. Add 1 ½ cup water in a saucepan and bring it to almost boil. Add 1 cup packed katsuobushi to the water, reduce the heat, simmer for 30 seconds, and turn off the heat. Set aside and let the katsuobushi sink to the bottom, about 10 minutes.
  2. Strain the dashi through a fine-mesh sieve over a liquid measuring cup. You need exactly 340 ml. If you don’t have enough, add water. If you have too much, then take it out. Tip: You can use katsuobushi for Second Dashi (Niban Dashi) or make homemade furikake.
  3. Add 2 Tbsp sake, 2 Tbsp usukuchi soy sauce (or regular soy sauce), and ½ tsp kosher salt. Usukuchi soy sauce (lighter color soy sauce) will not darken the rice as much as regular soy sauce.

  4. Mix well to combine and let the salt dissolve completely. At the end, you should have 400 ml of broth.

To Prepare Ingredients

  1. Prepare boiling water and pour over the aburaage to remove excess oil. Cut in half first and then cut into thin strips. Squeeze excess water out.
  2. Open the packaged bamboo shoot and cut in half. Some pieces may be bigger or smaller, but you will need 5.3 oz (150 g).
  3. Then cut the halves into quarters. The key here is to cut into smaller pieces so it’s easy to eat with rice. I usually keep the tip of bamboo, roughly ¾ inch length as intact (a triangle shape looks cute for presentation).
  4. Then for the rest of bottom bamboo parts, cut into thin slices.

To Cook Rice

  1. The rice should be drained well by now. Add the rice into the donabe (or rice cooker/heavy bottom pot). Pour 400 ml broth you prepared, and make sure the rice is evenly distributed in the pot.
  2. Evenly distribute the aburaage over the rice (DO NOT MIX with rice) and then bamboo shoot on top of aburaage (again do not mix with the rest). Rice needs to be steamed nicely and evenly and when it’s mixed with other ingredients, it will not be cooked.
  3. If you’re using the Kamado-san, place the inner lid and then the donabe lid. Cook on medium high heat for 14 minutes (The ideal heating level may vary depending on the type of burner. My burner is very strong, so I use the medium heat. For the rice cooker: Choose “regular” or “mixed rice” mode and start cooking. If you use “regular” setting, let it steam for 5 minutes more to create “okoge” (burnt rice). For the heavy bottom pot: Bring it to boil on medium heat (you can peek to see if it’s boiling). Once boiling, reduce the heat to low and cook for 15 minutes, or until liquid is completely gone.
  4. Once it’s cooked, transfer to a table (or away from hot stove) and set aside for 20 minutes (10-15 minutes for the rice cooker and heavy bottom pot).

Japanese Ingredient Substitution: If you want to look for substitutes for Japanese condiments and ingredients, click here.


Aburaage (Deep Fried Tofu Pouch): You can omit if you can find it, but the oil from aburaage actually gives nice flavors (it might not sound right, but trust me). Aburaage gives textures, additional savory flavors and it’s one of the “must” ingredients in my mixed rice recipes. You can use those deep-fried tofu cubes from Asian grocery stores but cut them into small thin slices after pouring hot water to get rid of excess oil (we don’t want too much oil).


Usukuchi (light-color) soy sauce: You can use regular soy sauce, but in Japan, we often use Usukuchi soy sauce so the rice doesn’t become too dark from soy sauce. You don’t have to buy this soy sauce unless you use it to make other dishes (udon noodle soup and chawanmushi etc) where you want the soy sauce flavor but don’t want your dish to have a darker color.


Recipe by Namiko Chen of Just One Cookbook. All images and content on this site are copyright protected. Please do not use my images without my permission. If you’d like to share this recipe on your site, please re-write the recipe in your own words and link to this post as the original source. Thank you.d link to this post as the original source. Thank you.

How to Make Cauliflower Rice

If you want to discover all the secrets behind cauliflower rice, you are in the right place! Find out everything there is to know about riced cauliflower: what is cauliflower rice, how to rice cauliflower, how to prepare cauliflower rice, and more cauliflower rice tips and ideas!

How to Make Cauliflower Rice | Learn what is cauliflower rice, how to make it, how to cook it, and other useful tips | A Sweet Pea Chef

Cauliflower is this amazing vegetable high in fiber, filled with B-vitamins, vitamin K, vitamin C, antioxidants, and nutrients that promote health. Not to mention that cauliflower is versatile and can be easily transformed into many delicious dishes and side dishes like this Cauliflower Gratin. Or this Parmesan Roasted Cauliflower. Or maybe this Cauliflower Gratin. Or, you know what, take a look at these 10 Healthy Cauliflower Recipes if you still don’t believe me when I say cauliflower can be used in so many delicious ways.

If you guessed I love cauliflower recipes, your guess is correct.  So, naturally, I love cauliflower rice recipes too!

But what’s not to love? Cauliflower rice is a great substitute for rice. It’s low in carbs and in calories. It’s a great way to make your little ones eat more veggies. It’s also a great way for you to add more veggies to your diet. And, if you don’t like complicated recipes with numerous steps, you’ll be more than happy to learn that making cauliflower rice is very quick and easy.

Maintaining a healthy lifestyle is not hard when you find the right substitutes. Healthy doesn’t mean tasteless. Healthy can mean delicious, flavorful, and full of amazing nutrients.

Substituting rice for cauliflower rice is a great way to transform your favorite meals. And, you have to believe me, making cauliflower rice is just as easy as making regular rice.  In fact – it’s actually a little easier!

Are you excited to learn how to cook cauliflower rice now?

A cauliflower head that will be turned into riced cauliflower.Cutting cauliflower into florets to make riced cauliflower.

HOW TO MAKE CAULIFLOWER RICE

Everybody is talking about it but… what is cauliflower rice? And most importantly, how to make cauliflower rice?

Cauliflower rice is basically grated cauliflower that tastes amazing when you cook it. It is fluffy and tender and it can be made in 2 different ways.

You can make cauliflower rice with a food processor but you can also learn how to make cauliflower rice without a food processor (if you do not own one). A box grater will do the job of the food processor for you so you don’t have to worry.

How much rice does one head of cauliflower make?

If you’re wondering how many cups of cauliflower rice per head that depends on the cauliflower head but, in general, a medium cauliflower head weighs approximately 2 pounds.

From one pound of cauliflower, you can make about 4 cups of cauliflower rice.

That means a cauliflower head makes about 8 cups of cauliflower rice.

That’s a lot of cauliflower rice you can use in numerous recipes like the ones listed below.

How long does cauliflower rice last?

Are you the type of person who likes to prep meals ahead of time? You’re one of my people, then!

The good news is you can make riced cauliflower ahead of time. How long does cauliflower rice last? Well, that depends…

  • if you cook it, you can store it in the fridge for 1 or 2 days in a sealed bag or container;
  • if you want to store it for more days, store it raw and it will last for up to 4 days in your fridge or up to 6 months in the freezer.

How to freeze cauliflower rice?

Want to learn how to freeze cauliflower rice and store it in the freezer?  The process is very easy!

After making the riced cauliflower…

  1. transfer it to reusable freezer bags;
  2. seal them;
  3. and store them flat in the freezer.

When you want to use cauliflower rice in a dish, unzip the bag, transfer the rice to a pan and cook it as you would normally do. If you usually steam the rice, make sure you stir from time to time to break the frozen blocks.

If you’d prefer to keep them as separate as possible, you can freeze first on a rimmed baking sheet lined with parchment paper with the rice separated from each other as much as possible.  Once frozen, transfer to a bag or freezer safe container.

Cauliflower florets in a bowl ready to be turned into riced cauliflower.

WHY USE RICED CAULIFLOWER INSTEAD OF REGULAR RICE

White rice has 45 g of carbs per cup. That’s a lot of carbs for you. And, while you can enjoy rice as a side dish from time to time, eating it on a regular basis is not a good idea for your health.

How many carbs in cauliflower rice though? After all, this is what we should be talking about! I think you’ll be shocked to find out that cauliflower has only 5 g carbs per cup.

Huge difference, right?

And let’s talk about the calories, too. Rice has approximately 218 calories per cup while cauliflower has only 25.

Yes, seriously!

And did I mention cauliflower rice is crazy delicious?

Freshly made riced cauliflower in the food processor.

HOW TO RICE CAULIFLOWER WITH A FOOD PROCESSOR

We reached the most important part of making cauliflower rice the how do you rice cauliflower part?

For the first option, we’re going to discuss – how to make cauliflower rice with a food processor.

This is my favorite riced cauliflower recipe because it’s so easy. To make cauliflower rice with a food processor:

  1. cut the cauliflower into small florets;
  2. add the cauliflower florets to the food processor (the food processor should be ¾ full);
  3. pulse the cauliflower florets until small pieces are formed.

Extra tip: stop pulsing and scrape the scrape the sides of the bowl. Pulse again. Repeat if necessary.

You could also rice the cauliflower, floret by floret, with the motor running and pressing one floret at a time through the dispenser.

Making riced cauliflower with a kitchen grater.

HOW TO GRATE CAULIFLOWER BY HAND

You can learn how to make cauliflower rice without food processor if you don’t own one. Learning how to rice cauliflower by hand basically means how to grate cauliflower so here’s how it’s done:

  1. cut cauliflower into larger florets;
  2. use a box grater and push across cauliflower florets until you make small pieces.

That’s pretty much it. Now off to learning how to cook cauliflower rice.

Cooking cauliflower rice.

HOW TO COOK CAULIFLOWER RICE

Cooking cauliflower rice can be done in different ways. You can try cauliflower rice recipes where the riced cauliflower is already incorporated into the recipe steps or you can cook cauliflower rice from scratch and serve it as a side. I have 3 recommendations for you:

Microwave Riced Cauliflower

Microwaving riced cauliflower is the easiest and fastest way of cooking cauliflower rice. To do it:

  1. add cauliflower rice to a bowl;
  2. cover the bowl with paper towels;
  3. microwave for approximately 3 minutes on high;
  4. season and serve.

Stir-frying Riced Cauliflower

Another easy way for cooking cauliflower rice is stir frying. All you need is a little bit of olive oil, your riced cauliflower, and salt and pepper to season. In approximately 5 minutes, your healthy, low carb rice will be ready. To make stir-fried cauliflower rice:

  1. heat a pan on medium heat;
  2. add a little bit of olive oil and cauliflower rice;
  3. cook for approximately 5 minutes stirring frequently.

Roasting Cauliflower Rice

Lastly, roasting cauliflower is a great cauliflower rice recipe for sides. To make roasted cauliflower rice:

  1. drizzle a little bit of olive oil over riced cauliflower and toss;
  2. spread the riced cauliflower evenly on a baking sheet;
  3. roast the low carb rice in the oven for about 10 minutes at 400 degrees F;
  4. mix the tray halfway through roasting for evenly roasted cauliflower rice.

How to season riced cauliflower

You want to learn how to cook riced cauliflower because you’re afraid you won’t like its taste? Don’t worry, there are so many ways to make cauliflower rice that one is sure to be right for you.

Besides salt and pepper, sweet onions or yellow onions are usually used to season cauliflower rice when frying it. Garlic is also an option. Add onion powder too if you prefer a stronger onion taste. Same thing goes for garlic.

If you love parsley, you can add fresh chopped parsley. Or other herbs and spices you like. Don’t be afraid to experiment. After all, the secret to clean eating is finding ways to make it work for you.

Slow Cooker Chicken Burrito Bowls | Delicious, healthy, and clean burrito bowls that use slow cooker shredded chicken and cauliflower rice | www.asweetpeachef.com

WHAT TO MAKE PAIR WITH CAULIFLOWER RICE

Now that I convinced you that cauliflower rice is not only healthy but also incredibly tasty, I have to discuss with you some cauliflower rice recipes and pairings you should try. To be fair, the possibilities are endless but in case you need ideas, here are 3 healthy pairings that I recommend:

  • Make Slow Cooker Chicken Burrito Bowls – making burrito bowls is a great way to incorporate cauliflower rice into our family’s diet without making it too obvious. Burrito bowls are a healthier
  • Steak Fajita Bowl with Cilantro Lime Ricereplace the rice with low carb rice AKA cauliflower rice in this recipe for a healthier and just as tasty option. Cilantro Lime is not only for regular rice, peeps. It’s delicious in cauliflower rice recipes as well!

3 MORE EASY CAULIFLOWER RECIPES

I hope learning how to make cauliflower rice made you realize how amazeballs cauliflower is. Because it really is amazing. And I have 3 more recipes to prove it. One is another riced cauliflower recipe, the other 2 are slightly different but just as amazing.

25 MINUTE CHICKEN CAULIFLOWER FRIED RICE

This Chicken Cauliflower Rice recipe is a great dinner recipe you can make during busy weeknights. It’s also a great way to introduce your family to cauliflower rice.

Chicken Cauliflower Fried Rice | Cut the carbs and greasy take-out and still get your chicken fried rice fix with this 25 minute chicken cauliflower fried rice recipe.  Cauliflower fried rice is a delicious, easy, and healthy fried rice substitute!  | A Sweet Pea Chef

377 calories per serving. Healthy, easy to make, ready in 25 minutes. Sounds like the perfect dinner recipe, right? Get the recipe.

LOADED CAULIFLOWER TOTS RECIPE

This Loaded Cauliflower Tots Recipe makes healthy totes, friends. I think this says it all.

Tin filled with loaded cauliflower tots and then topped with sliced green onion, setting next to greek yogurt ranch dipping sauce for serving.

But in case you want more details – the cauliflower totes are filled with bacon, cheddar, and green onion. So YUMMY. Get the recipe.

FALL HARVEST BUDDHA BOWL ON CAULIFLOWER GRITS

You can use cauliflower to make grits, then pair it with roasted veggies and other yummy ingredients to put together this delicious Fall Harvest Buddha Bowl on Cauliflower Grits.

View from the top of the Healthy Harvest Buddha Bowl that contains cauliflower grits, rasted veggies, sauteed kale, slices of apple, and pomegranate seeds.
The Fall Harvest Buddha Bowl on Cauliflower Grits is healthy, packed with nutrients, and so darn delicious. Get the recipe.

How To Make Cauliflower Rice

If you want to discover all the secrets behind cauliflower rice, you are in the right place! Find out everything there is to know about riced cauliflower: what is cauliflower rice, how to rice cauliflower, how to prepare cauliflower rice, and more cauliflower rice tips and ideas!

  • 1 large head cauliflower
  • 1 tbsp olive oil
  • 1 1/2 tsp sea salt
  • 1/2 tsp ground black pepper
  • 1/2 tsp garlic powder
  1. There are two ways to turn the cauliflower into rice-size pieces: (1) using a kitchen grater on the larger holes or (2) in a food processor. (The food processor makes this way quick and easy so I recommend it if you have one). If using a grater, keep the cauliflower whole and grate as you would cheese. If using a processor, break the cauliflower into florets – it may be necessary to do this in 2-3 batches.

How To Make Cauliflower Rice on the Stove

  1. Heat the olive oil in a large pan over medium-high heat.

  2. Add the cauliflower “rice” and cook, stirring occasionally, until the cauliflower rice is tender and just slightly golden brown, about 7-10 minutes.
  3. Mix in the remaining salt, pepper, and garlic powder into the cauliflower rice and stir to combine.

How To Make Cauliflower Rice in the Oven

  1. First, start by preheating your oven to 400 degrees F and lining a rimmed baking sheet with parchment paper.

  2. Lay out the “rice” evenly on the rimmed baking sheet, and place into the oven.

  3. Roast the cauliflower for 20-25 minutes, tossing halfway through, until the cauliflower is tender and starting to brown around the edges of the pan.

  4. Remove from oven and allow to cool.

  5. If using the cauliflower rice to make cauliflower tortillas or cauliflower pizza crust, it is necessary to squeeze the liquid out of the rice.  Once the cauliflower rice is cool enough to handle, place it into a thin clean dish towel or cheesecloth and squeeze out as much excess liquid as you can. This will be very helpful when it’s time to cook because they won’t be super liquidy. You can just discard the liquid once you’ve gotten as much out as you can.

Nutritional info provided is for cauliflower rice cooked on the stove.  Cauliflower rice cooked in the oven will contain less calories and fat since that method does not use any oils.

This post contains affiliate links for products I use often and highly recommend.

The post How to Make Cauliflower Rice appeared first on A Sweet Pea Chef.


* This article was originally published here