This low carb burrito bowl with cauliflower rice is a delicious way to eat more vegetables! It’s Whole 30 vegetarian and customizable for all diets.

This post was created in partnership with ALDI. All opinions are our own.
“This may be the best bowl of vegetables I’ve ever eaten.” That was Alex after eating this healthy burrito bowl, an ultra-delicious recipe that will have you immediately coming back for seconds! This bowl is almost all vegetables and it’s truly one of Alex and my new family favorites we’ll be making again and again. The recipe is Whole 30 vegetarian friendly, and at the same time customizable for just about any diet. It’s perfect for company, or an easy weeknight dinner. And it uses no special equipment. Oh, and you can get all the ingredients at ALDI. Have we convinced you yet? Keep reading for this low carb burrito bowl with cauliflower rice recipe!
Before we start, a quick announcement: Alex and I are so excited to announce that we’ll be working with ALDI all year long as brand ambassadors! We’ll be sharing with you recipes that use organic, gluten-free, low carb, high protein and clean label products from ALDI. They want to make sure that all people have access to healthy, organic real food and that’s exactly in line with our mission at A Couple Cooks. We also have a super special cooking show series with the first episode to air in January. Stay tuned!

You might think burrito bowls don’t require a recipe: just throw a bunch of vaguely Mexican-themed ingredients in a bowl. Wrong! The magic of a burrito bowl is all about selecting and cooking each component to perfection. And that’s even more important in a healthy burrito bowl, because you’ve got to get a lot of flavor out of humble ingredients. All of the cooking techniques are simple, and no special equipment is needed. And with every single one of these ingredients coming from one store, it becomes an accessible way to eat more vegetables! ALDI has a wide selection of organic, gluten-free, low carb, high protein and clean label products and produce.
This veggie burrito bowl has a few keys to keeping it very tasty while at the same time, healthy enough to call it healthy. First, the cauliflower rice, a fun veggie substitute for rice that’s Whole 30 perfect for a low carb burrito bowl. And the pièce de résistance is our chorizo eggs. These chorizo eggs somehow mimic meat in flavor, texture, and appearance, and are oh so tasty! They come together in just 5 minutes in a skillet with a few simple spices: chili powder, garlic powder, and cumin. Then we’ve got fajita-style bell peppers and onions and crispy roasted shredded sweet potato to super amp the flavors and textures. Finally, top it off with a dollop of salsa, a handful of greens and avocado chunks, and a squeeze of lime. The overall effect is a bowl of colors, flavors and textures that’s incredibly satisfying.
Try it! + Instacart COUPON! Are you an ALDI fan? Let us know if you head to ALDI and make this recipe! Also, ALDI now delivers groceries to your door using Instacart! Place your ALDI order on Instacart, then use the code ALDIFAN for $10 off your first three ALDI orders on Instacart of $35 or more.


So, let’s talk about the cauliflower rice in this burrito bowl. It’s rice made from finely chopped cauliflower! You can make it yourself with cauliflower and a food processor, but it’s also available already prepared in the frozen section at ALDI. Did you know that frozen vegetables are just as nutritious as raw? Because they’re frozen at peak freshness, all the nutrients are retained. So it’s convenient to have the cauliflower rice already prepared! How to cook cauliflower rice? Whether it’s raw or frozen, just sauté it in olive oil for about 5 minutes until tender and season with kosher salt. Though it doesn’t taste like actual rice, it’s pretty delicious and acts just like rice. (You could use it in this cauliflower fried rice too.)

What we love burrito bowls is that they are so versatile, especially for feeding a crowd! When we have over a bunch of people, we love serving burrito bowls where you can have lots of different options for different diets and preferences. This recipe is Whole 30 vegetarian; it was challenging for us to create because most of the filling vegetarian fiber and protein sources like beans and grains are not allowed on Whole 30. Eggs are allowed, which is how we came up with these delicious chorizo eggs! Much of the protein on a Whole 30 diet typically comes from meat, so if you’re eating Whole 30 vegetarian, it’s important to make sure the recipes have lots of protein and fiber so that they’re filling.
If you’re not looking for vegetarian Whole 30 recipes, you can easily customize this recipe! Use rice in place of the cauliflower rice, or shredded chicken in place of the eggs. Or for a vegan option, use our simple black beans instead of eggs! But if you’re going to eat it as a Whole 30 vegetarian bowl, using our exact healthy burrito bowl recipe below keeps it filling so you’re not hungry a few hours later.

This burrito bowl with cauliflower rice is one of our favorite new healthy dinner ideas! Our some of our other top healthy dinner ideas on A Couple Cooks:
Veggie Packed Quinoa Fried Rice Feta and Quinoa Stuffed Peppers Hearty Sweet Potato and Kale Soup Chickpea Couscous Bowls with Tahini Sauce This recipe is…This low carb burrito bowl with cauliflower rice recipe is vegetarian, gluten-free, Whole 30 friendly, and low carb. For vegan, use black beans instead of eggs.
Print
 (1 votes, average: 5.00 out of 1)
This low carb burrito bowl with cauliflower rice is a delicious way to eat more vegetables! It’s Whole 30 vegetarian and customizable for all diets.
Keywords: Burrito bowl, healthy burrito bowl, low carb burrito bowl, Whole 30 vegetarian, Vegetarian whole 30 recipes, how to cook cauliflower rice
Tag @acouplecooks on Instagram and hashtag it #acouplecooks
A Couple Cooks - Healthy, Whole Food, Vegetarian Recipes

51 of the best healthy meal prep recipes to make this year! From easy breakfasts and filling lunches to delicious, one pan dinners and plenty of healthy treats, these recipes are perfect to prep for the week or to feed your family. Starting the new year with some of the best healthy meal prep recipes [...]
The post 51 Healthy Meal Prep Recipes to Make This Year appeared first on Ambitious Kitchen.

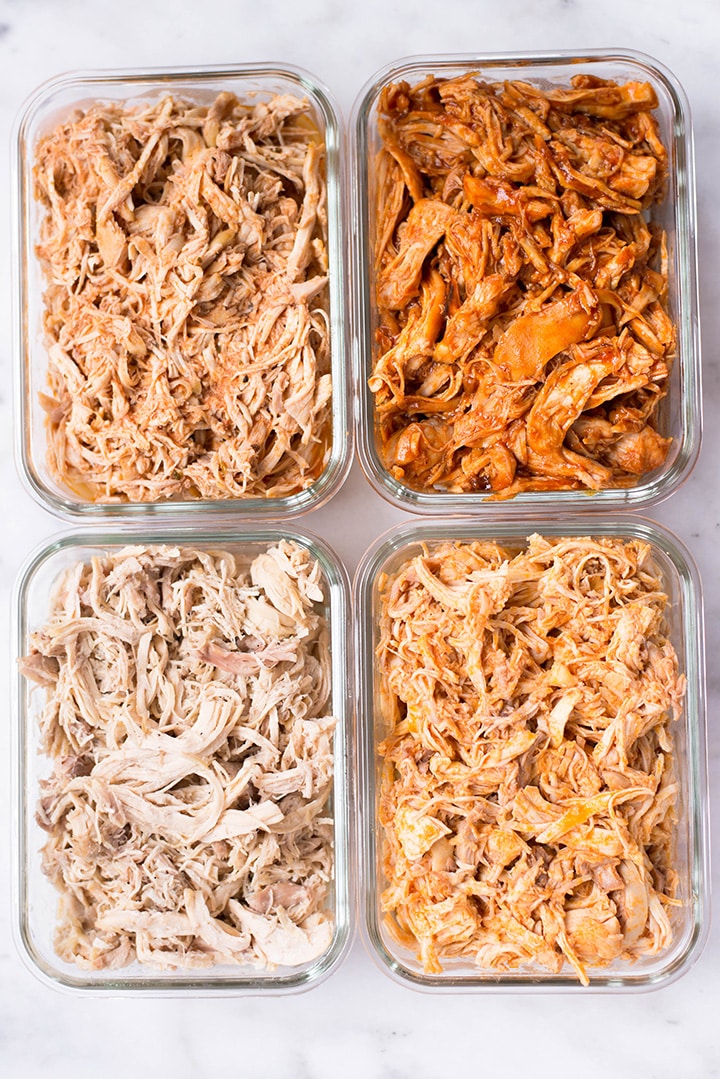
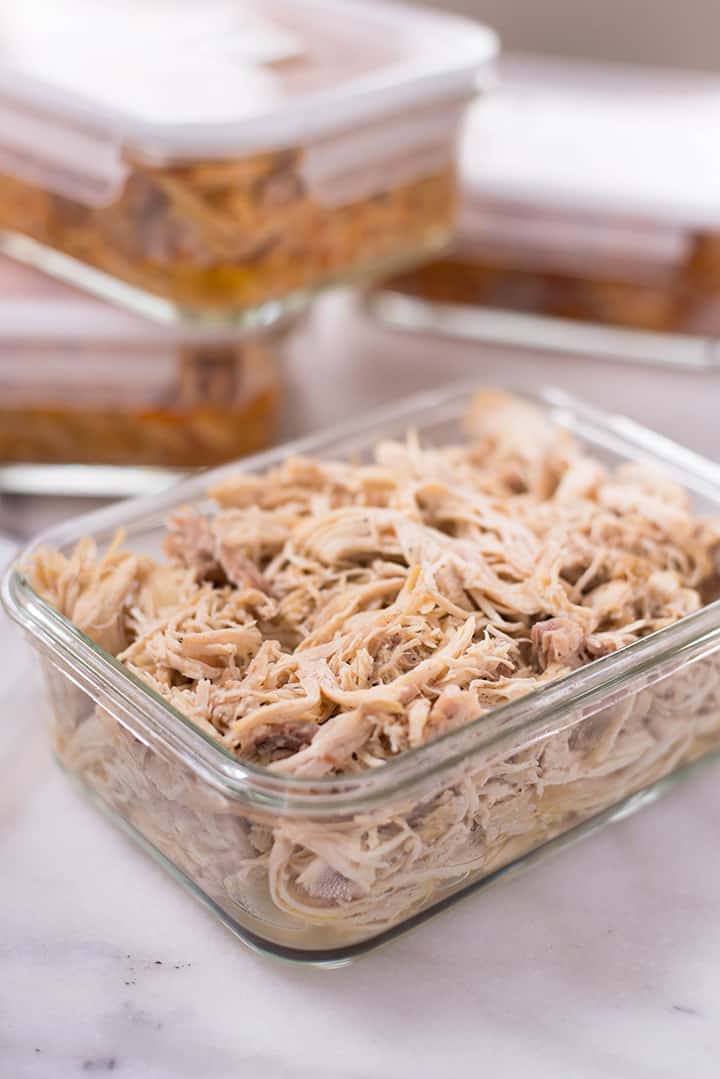
Learn how to make slow cooker shredded chicken, portion it, store it in the fridge or freezer and use it any time a recipe calls for shredded chicken. Bonus – 4 shredded chicken recipes with amazing different flavors.
Chicken meals happen all the time in my house. And for a good reason. Kids love them, Dustin and I love them, they are easy to prep and incredibly versatile.
Also, you know I like to prep food ahead of time and chicken meal prep is always so quick and easy. However, chicken can be boring if you’re not creative enough with it. You know what type of chicken is never boring? Slow cooker chicken meal prep! I’ve said this before and I’ll say it again, the slow cooker is this magical kitchen gadget that can make anything taste delicious. And the best thing about it is you don’t even have to try too hard. You just throw everything in and forget about it for a few hours.
Can it get better than that? I really don’t think so.
See where I’m going with this?
Chicken meal prep in the slow cooker!
Yes, but not any type of chicken meal prep but crockpot shredded chicken! YUM, right?
From how long to cook chicken in the crock pot to what to do with shredded chicken, you’ll learn everything there is to know about how to make shredded chicken today.
And don’t forget about the bonus!
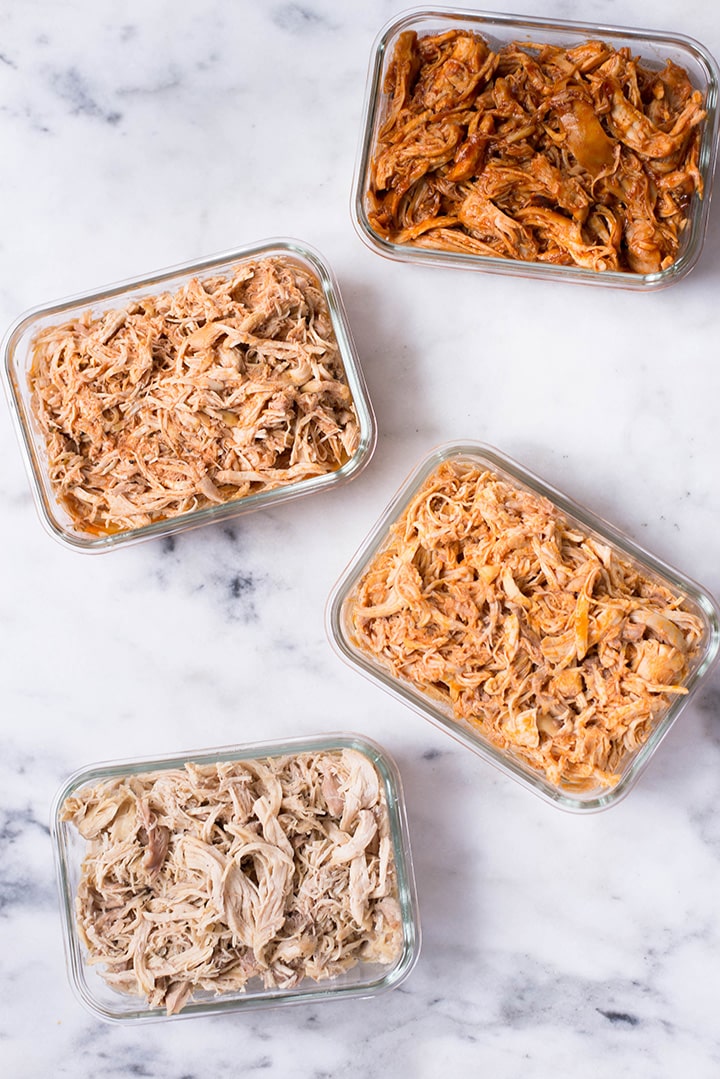
FOUR shredded chicken recipes that are totes delicious and perfect for meal prep.
Shall we begin?
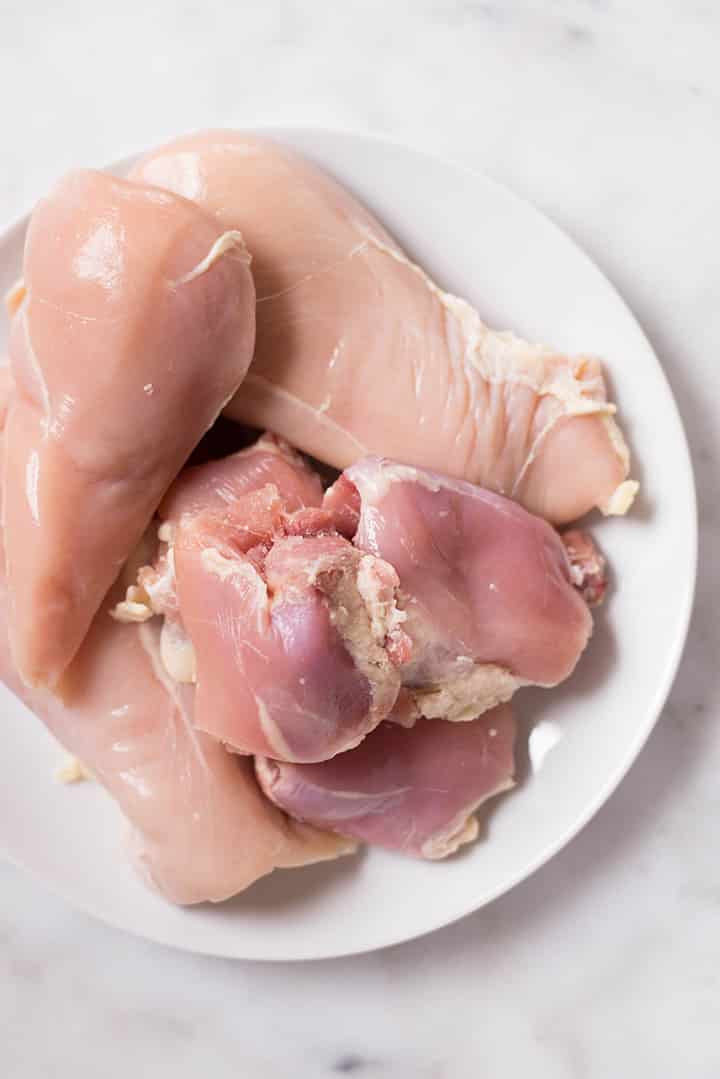
Shredded chicken meal prep is really the easiest thing ever, especially if you’re using your slow cooker. To make slow cooker shredded chicken:
put the chicken in the slow cooker; add seasoning and chicken broth; set the slow cooker and forget about it for a few hours; once the chicken is done, remove it from the slow cooker and shred it (more about how to shred chicken later); now, you can transfer the pulled chicken to meal prep containers and store in the fridge or in the freezer and grab any time you want a quick and delicious meal.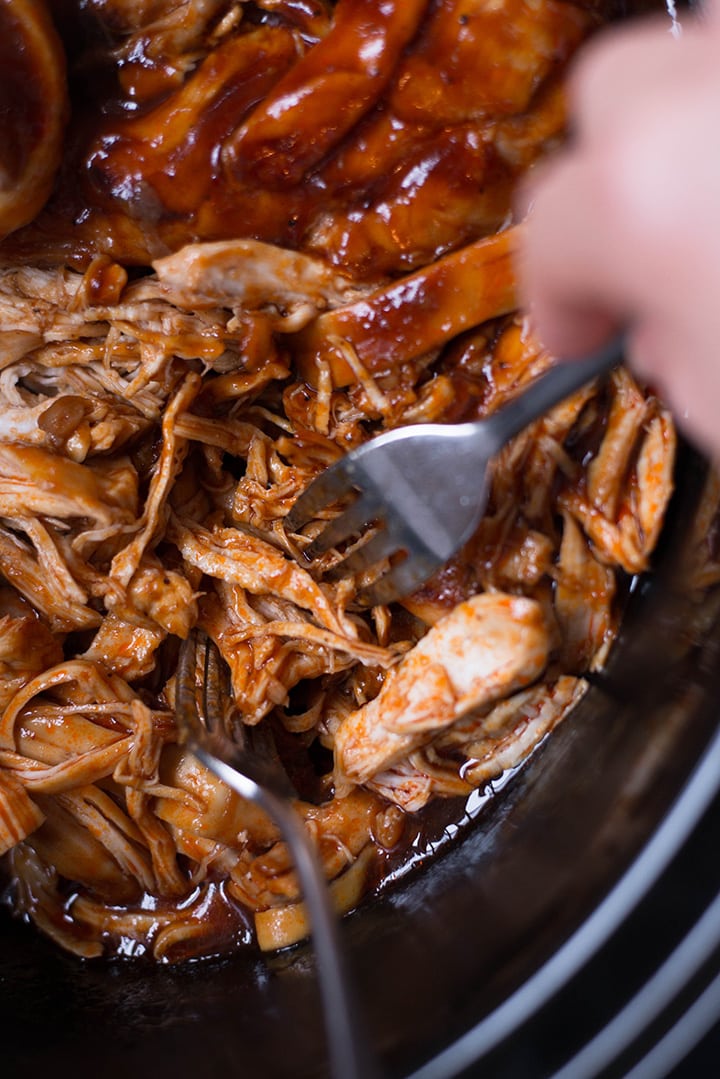 HEALTH BENEFITS OF CHICKEN
Everybody knows chicken is healthy. That’s why most people cook chicken all the time if they eat healthy. But what are the actual health benefits of chicken?
Well, chicken is…
a low-fat protein that helps your body to maintain or build muscle mass; a great source of minerals including selenium. Selenium is a powerful antioxidant that helps defend the body against chronic diseases such as cancer and heart disease. a good source of phosphorus. Phosphorus plays an important role in how our bodies use carbs. And it also helps repair cells and tissue. a good source of vitamin B6. Vitamin B6 helps your white blood cells to function properly. a good source of vitamin B3. Vitamin B3 lowers the cholesterol levels.As you can see, chicken is more than good for you. It is actually AMAZING for you.
You probably know that the healthiest part of the chicken is the boneless, skinless chicken breast. It’s also the part with 0 carbs. Yes, ZERO. But more often than not, chicken breast is bland and dry. And you might be tempted to avoid it because of that. However, you shouldn’t. What you should do is to learn how to make slow cooker chicken breast and how long to cook chicken breast in crock pot. Once you do that you can say goodbye to the bland and dry chicken breast forever. Pinky promise!
And making slow cooker chicken breast is almost a hands-off deal. All you have to do is:
dump the chicken in the slow cooker; add spices and seasonings; add chicken broth; set the slow cooker on low for approximately for 4-6 hours.I find that it is better to cook chicken breast on low to prevent it from drying out. Also, you can always add some chicken thighs for extra flavor and to prevent the shredded chicken from becoming dry when you reheat it. That makes the perfect combination of health and flavor.
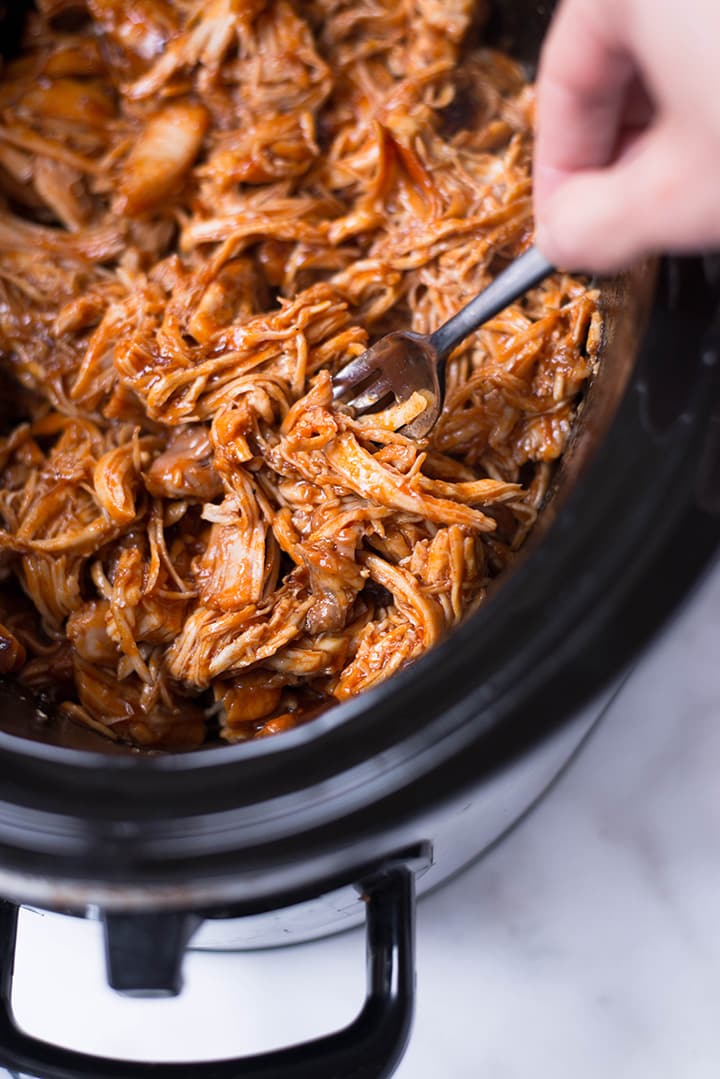
When it comes to how to shred chicken, you have 2 options. You can do it by hand or with a hand blender.
To shred chicken by hand:
transfer the chicken from the slow cooker to a bowl; allow it to cool; then shred the chicken with 2 forks. Hold the chicken with one fork and pull apart with the other one.To shred chicken with a hand blender:
remove the chicken from extra sauce and liquid. place the chicken into a mixing bowl. I really recommend a deep one to prevent a mess. use a hand blender or a blender attachment to shred chicken.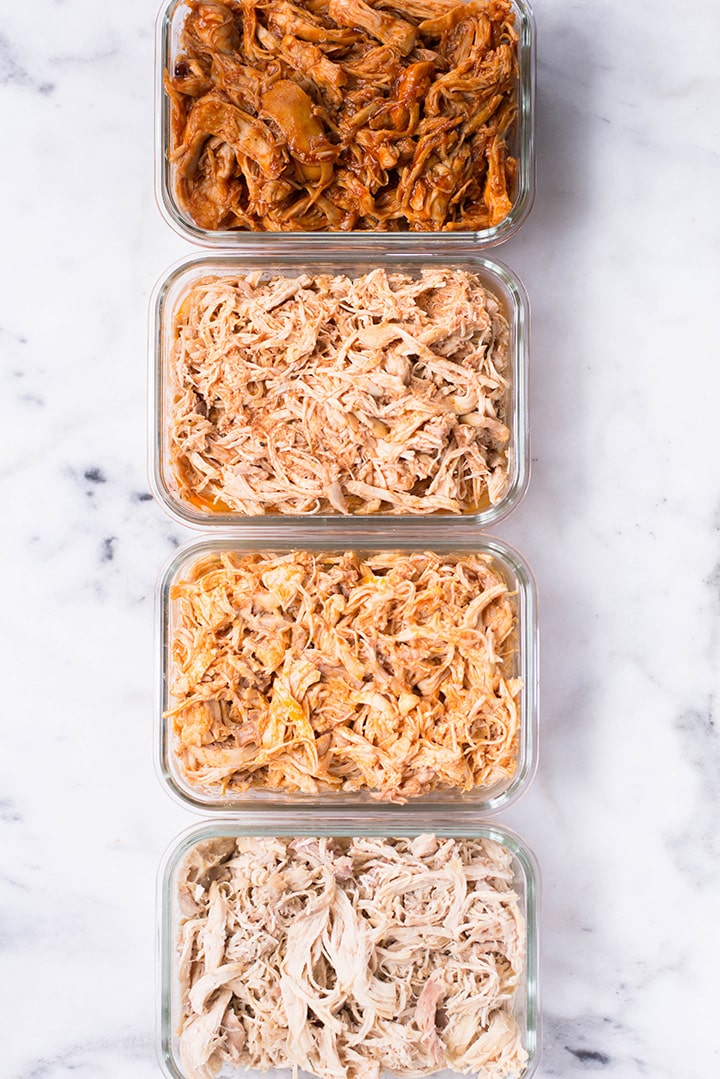 WHAT TO DO WITH SHREDDED CHICKEN
The real question is… what to do with shredded chicken. Well, you can use slow cooker shredded chicken…
in salads; in enchiladas; in sandwiches; with brown rice; with quinoa; in tacos; in nachos; in soups; or in lettuce wraps.Seriously, the possibilities are endless. Especially when you experiment with different shredded chicken recipes to get different flavors.
MEAL PREPPING SHREDDED CHICKENOnto the shredded chicken recipes now. I have 4 delicious and flavorful shredded chicken recipes that are perfect for meal prep. If you follow these recipes, you’ll get juicy, flavorful, and tender chicken that’s perfect for any day of the week when you don’t have enough time to prep lunch or dinner from scratch.
1. SLOW COOKER BUFFALO SHREDDED CHICKEN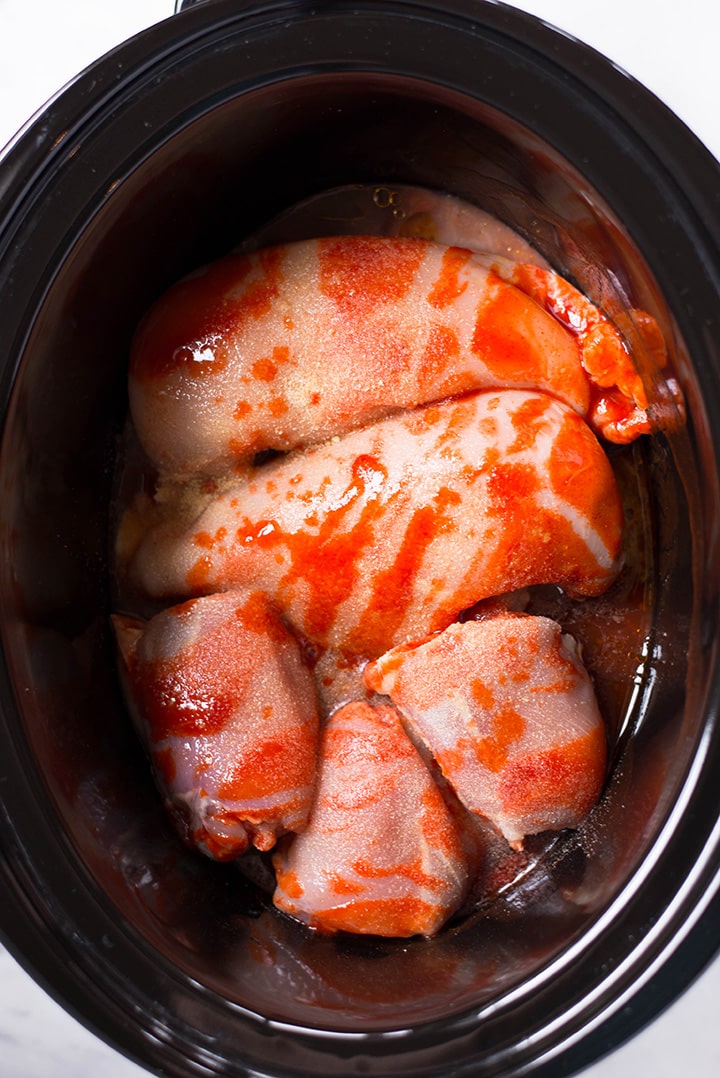

This Slow Cooker Buffalo Shredded Chicken is a spicy and tasty and has all the amazing flavors of buffalo chicken but it’s made with clean ingredients.
2. SLOW COOKER BBQ SHREDDED CHICKEN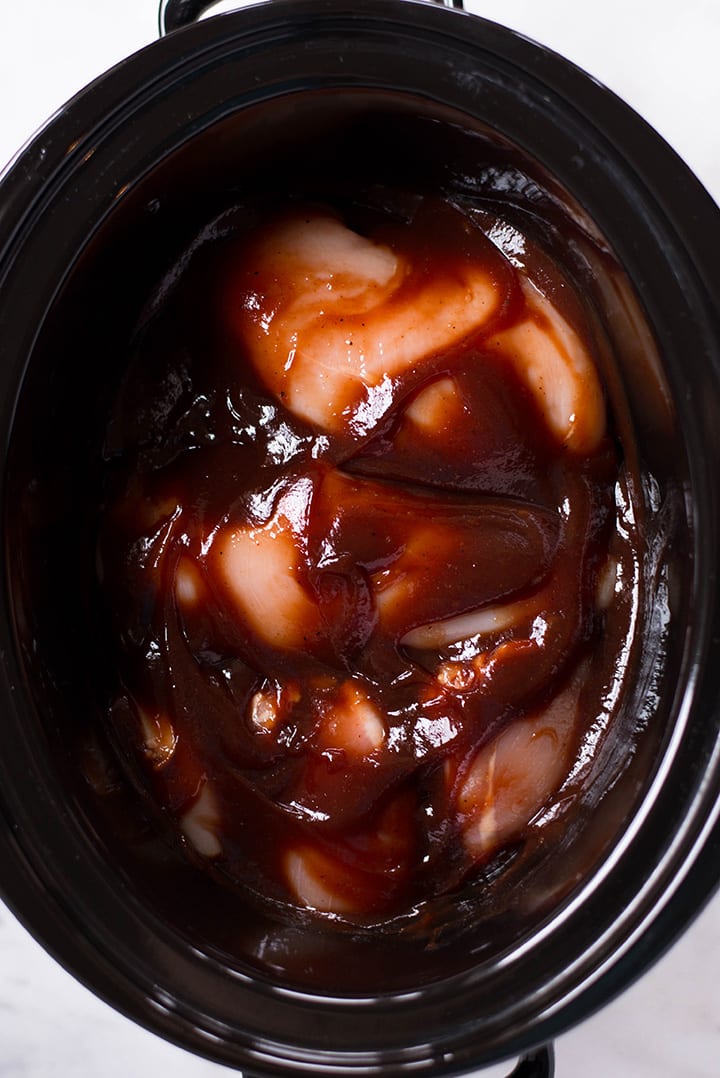
This Slow Cooker BBQ Shredded Chicken is made with a healthy a delicious BBQ sauce that’s finger-licking good.
3. SLOW COOKER MEXICAN SHREDDED CHICKEN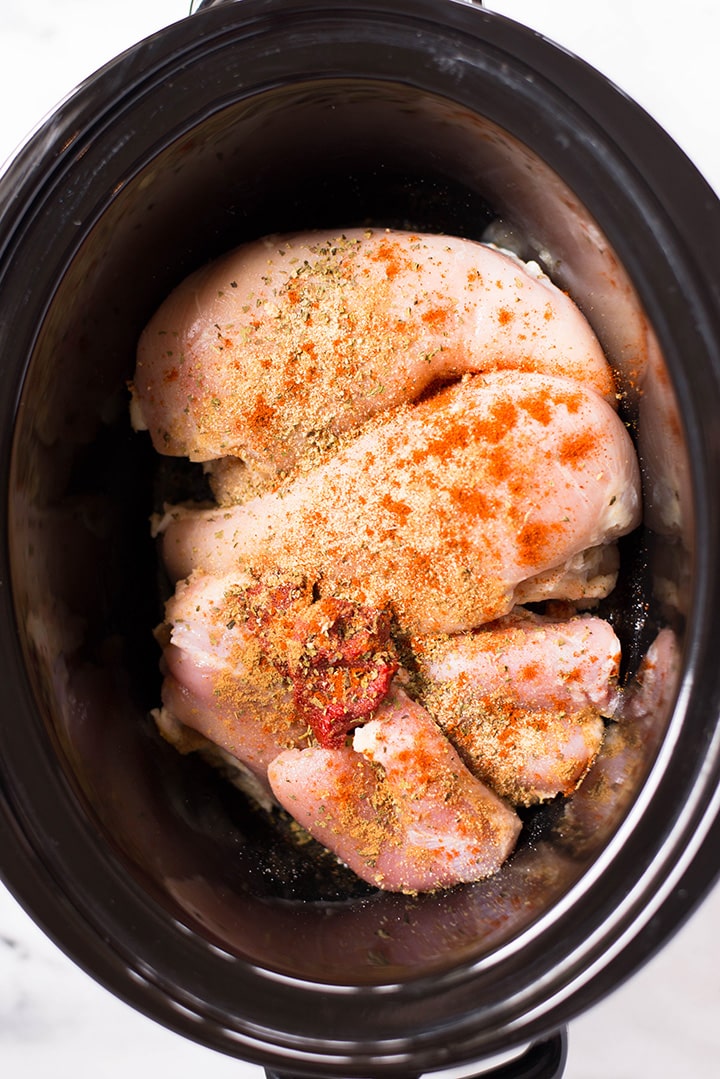

If you love Mexican food, this Slow Cooker Mexican Shredded Chicken is for you. The Mexican Shredded Chicken is just perfect in tacos but it’s just as good in salads too.
4. SLOW COOKER SHREDDED CHICKEN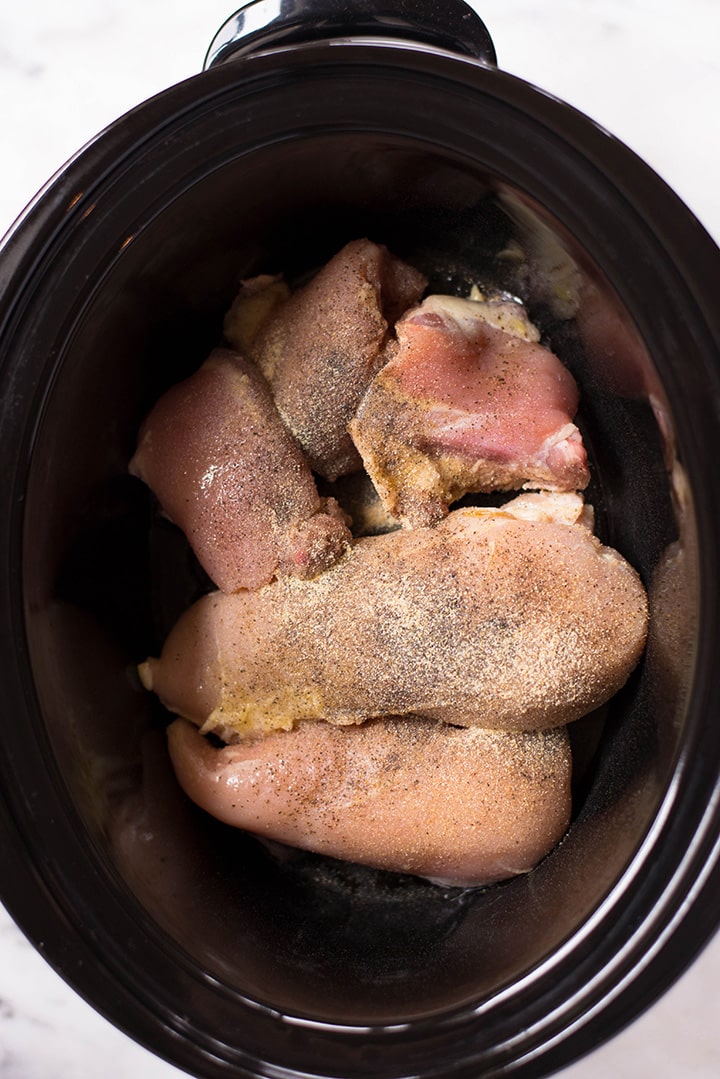

This classic Slow Cooker Shredded Chicken is great for any recipe that requires shredded chicken including chicken noodle soup, tacos or enchiladas.
Stored in airtight containers, shredded chicken last for…
Up to 5 days in the fridge; And up to 6 months in the freezer.When you’re ready to eat the shredded chicken, remove from the fridge and reheat in the microwave for approximately 2 minutes. Or for 3-4 minutes if you reheat it from frozen.

I’m crazy about my slow cooker and I love to use it for meal prep. As I’m sure you can tell. And, of course, I have 3 more healthy slow cooker chicken recipes for you.
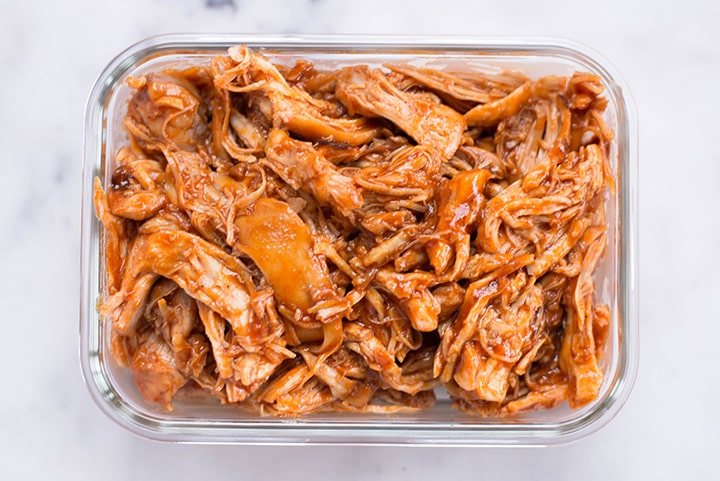
SLOW COOKER CHICKEN BURRITO BOWLSMake slow cooker chicken meal prep easy with these Slow Cooker Chicken Burrito Bowls. They are the perfect low-carb alternative for burrito cravings.
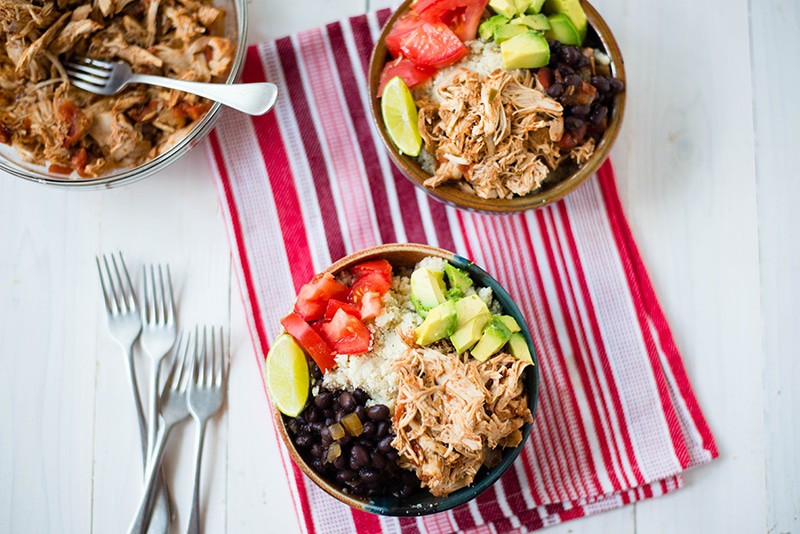
Don’t worry, you still get the amazing textures and flavors of regular burritos. Get the recipe.
CROCK POT CHICKEN ENCHILADA SOUPAnother slow cooker chicken meal prep I love is this Crock Pot Chicken Enchilada Soup. It’s healthy enchilada so what’s not to love, right?
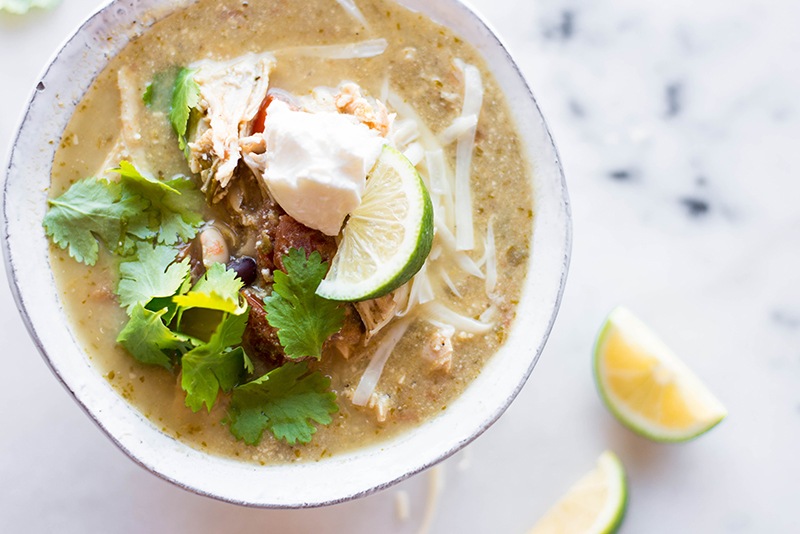
This Crock Pot Chicken Enchilada Soup is rich, savory, and you can enjoy guilt-free. Get the recipe.
SLOW COOKER CHICKEN NOODLE SOUPI told you earlier that you can use the classic shredded chicken recipe to make chicken noodle soup. If you were wondering how, here is my Slow Cooker Chicken Noodle Soup.
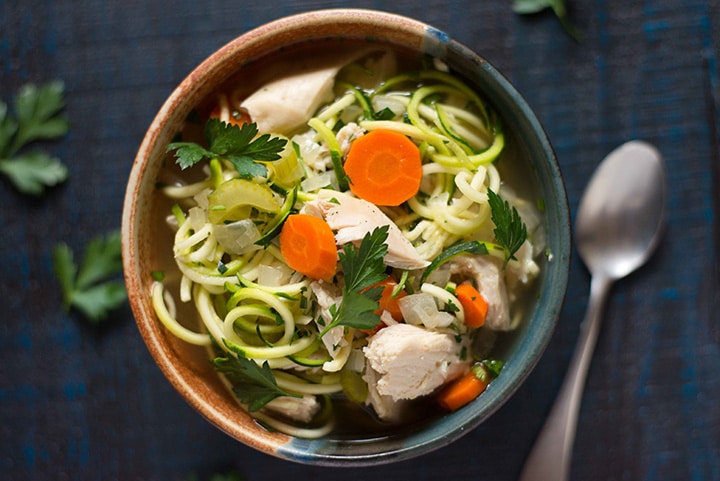
Made with zucchini noodles to cut down on carbs, this Slow Cooker Chicken Noodle Soup is healthy comfort food in a bowl. Get the recipe.

Learn how to make slow cooker shredded chicken, portion it, store it in the fridge or freezer and use it any time a recipe calls for shredded chicken. Bonus – 4 shredded chicken recipes with amazing different flavors.
Cover and cook for 4-6 hours, or until the chicken is cooked through. Using two forks, shred the chicken. Can also use a hand blender to quickly blend the chicken, if desired.
Nutritional data provided for Slow Cooker Shredded Chicken.
Serving ideas: brown rice, quinoa, black beans, tacos, lettuce wraps
This post contains affiliate links for products I use often and highly recommend.
The post Slow Cooker Shredded Chicken Meal Prep appeared first on A Sweet Pea Chef.

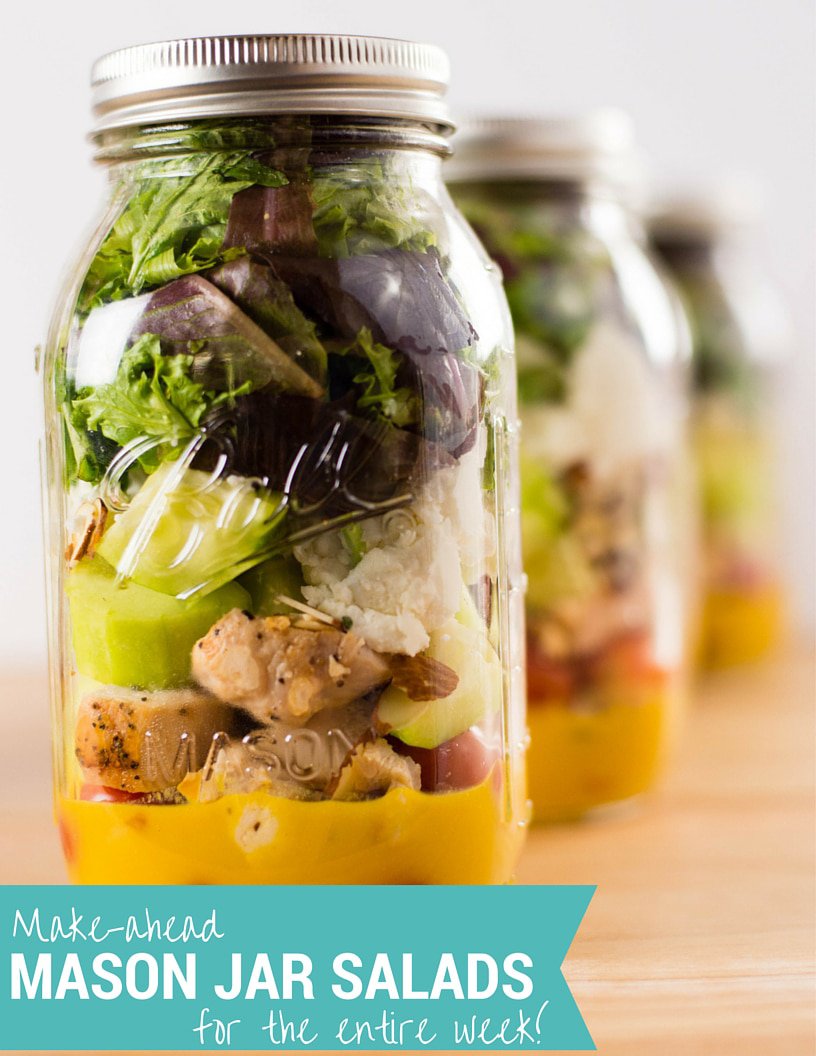
Add more salads into your weekly meals and make these delicious mason jar salads for the entire week in just a matter of minutes. Trust me that you’ll want to slurp up this killer honey mustard dressing!
To be honest, it took me a shockingly long while to get on the whole mason jar salad bandwagon. Not that I have anything against mason jars… I use them for mason jar meals like this chia pudding and these overnight oats like ALL the time. And I love salad recipes. And you know I’m all about meal planning. Mason jar meal prep is so fun and easy. But, for whatever reason, I never tried mason jar salad recipes.
Then, one day, I just decided to make a salad in a jar and see what all the fuss was about. And I’m SO glad I did. GUYS! Mason jar salads are amazing – they’re super easy, delicious, and really do keep everything nice and fresh until you’re ready to eat them. Salad meal prep was something I never used to do because I hate soggy lettuce. I mean – soggy lettuce = eww, right?
Mason jar salad recipes completely solve this problem because you put the lettuce at the very top so you don’t have to worry about it getting touched by all the dressing and entering the dreaded mush zone.
So, when it’s time to enjoy your salad, just grab it out of the fridge and shake it out into a bowl. Your salad will taste like you just made it and you’ll continue on your delicious, clean eating lifestyle — one that gets to enjoy tasty and clean salads for lunch. Woot!!
Check out my tips on this post for how to pack your mason jar salad to keep everything as fresh as possible – I’ve learned there is definitely a strategy to it, but it’s pretty straightforward and you’ll be on your way to enjoying mason jar salads in no time.
This recipe is for an amaze-balls chicken salad recipe with a clean honey mustard salad dressing. Yep: clean. honey. mustard. salad dressing. It’s so easy and so good – you will likely be licking your mason jars once you’re done.
HOW TO MAKE MASON JAR SALADAs I said, making a salad in a jar requires a little bit of strategizing but the process is so darn easy. After all, all you have to do to make mason jar salads is to…
prep the ingredients; make the dressing; layer the salad in a jar recipe ingredients in a mason jar; enjoy the mason jar salad or store it in the fridge.See? All the steps for how to make mason jar salads are easy to follow.
 SALAD MEAL PREP TIPS
Guys, I really do love my mason jar recipes including my salad in a jar recipes. And I’m all about saving time and eating healthy so, obviously, I HEART grab-and-go lunches. I want to make sure you’ll get on board too ,so here are my tips for making healthy mason jar salad recipes.
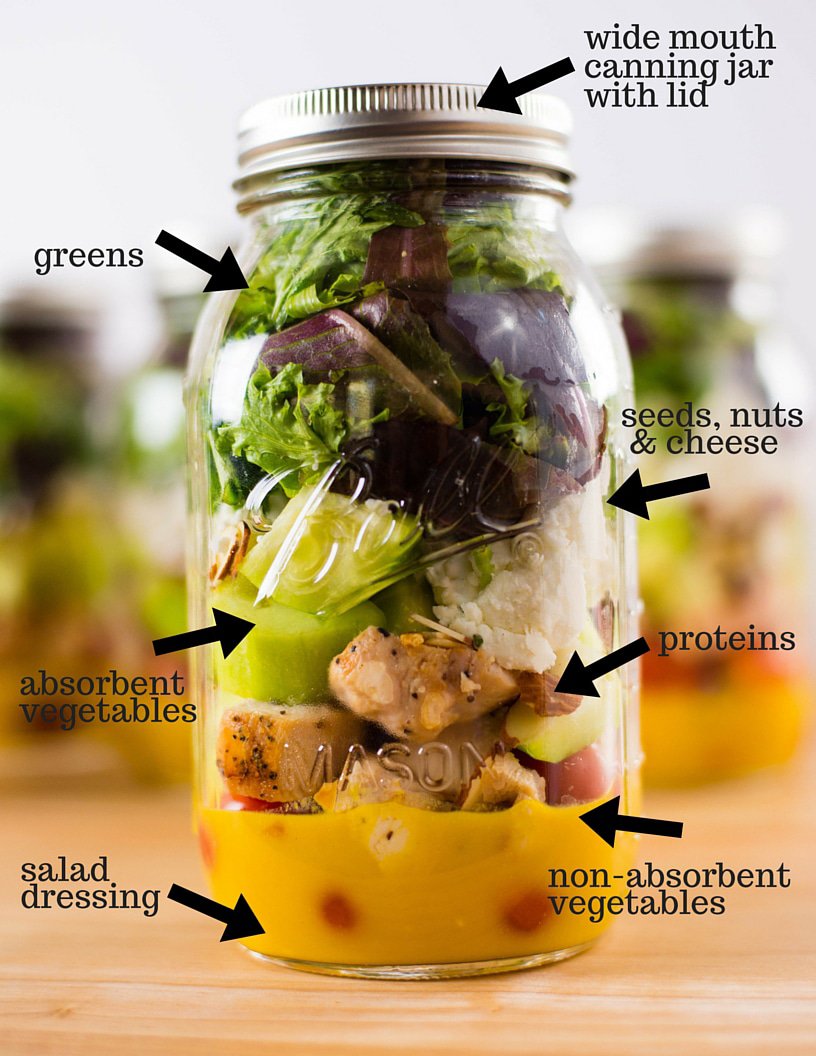
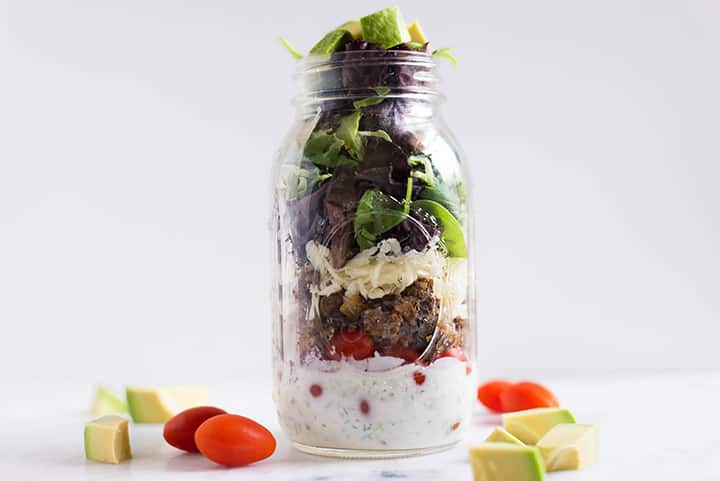
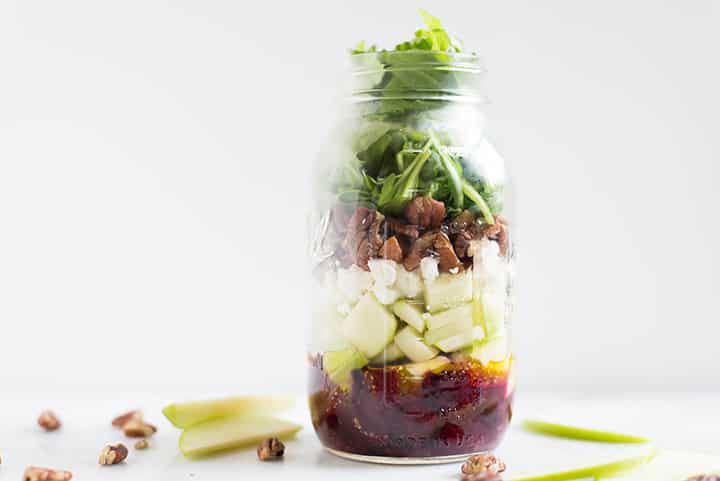
Choose your container for salad in a jar wisely – any glass canning jar with a lid can be used, but wide-mouthed jars are the easiest for both packing the salad into the jars and shaking them out again when you’re ready to eat. I use these quart-sized jars for larger lunch and dinner salad portions because I like to have a lot of extra veggies and goodies in my salads. The next tip is for how to make mason jar salads meal prep easy and I have to say that if you prep the ingredients first, the process is definitely easier. So chop the veggies, cook the protein and the grains if you have to, prep the salad greens, use your kitchen scale for portion control and divide the ingredients into separate piles. The most important step of this salad in jar process is layering. Learn how to build a mason jar salad and embrace those salad layers. Tips for how to layer a mason jar salad in the next section. HOW TO LAYER A MASON JAR SALADWhy did I say that this part is the most important one? Because learning how to layer a mason jar salad properly will keep your salad fresh. This is the key to successful mason jar salad meal prep. No more soggy lettuce. Just fresh, delicious ingredients.
To build a mason jar salad…
Start with the dressing. At the bottom, add 1-4 tablespoons of dressing, depending on how many ingredients you’re going to add and how much dressing you prefer in your salad. In this way, you’ll prevent the lettuce and veggies from getting mushy. WIN! Continue to assemble the mason jar salad by adding the hard veggies and fruits. Follow the hard veggies and fruits by a layer of grains, if you’re using any. Add protein. Then add soft veggies, fruits, roasted nuts or seeds. Top this layer with cheese, if using. Add salad greens. Salad greens such as lettuce have to always be on top. Add as much as you can squeeze into the jar.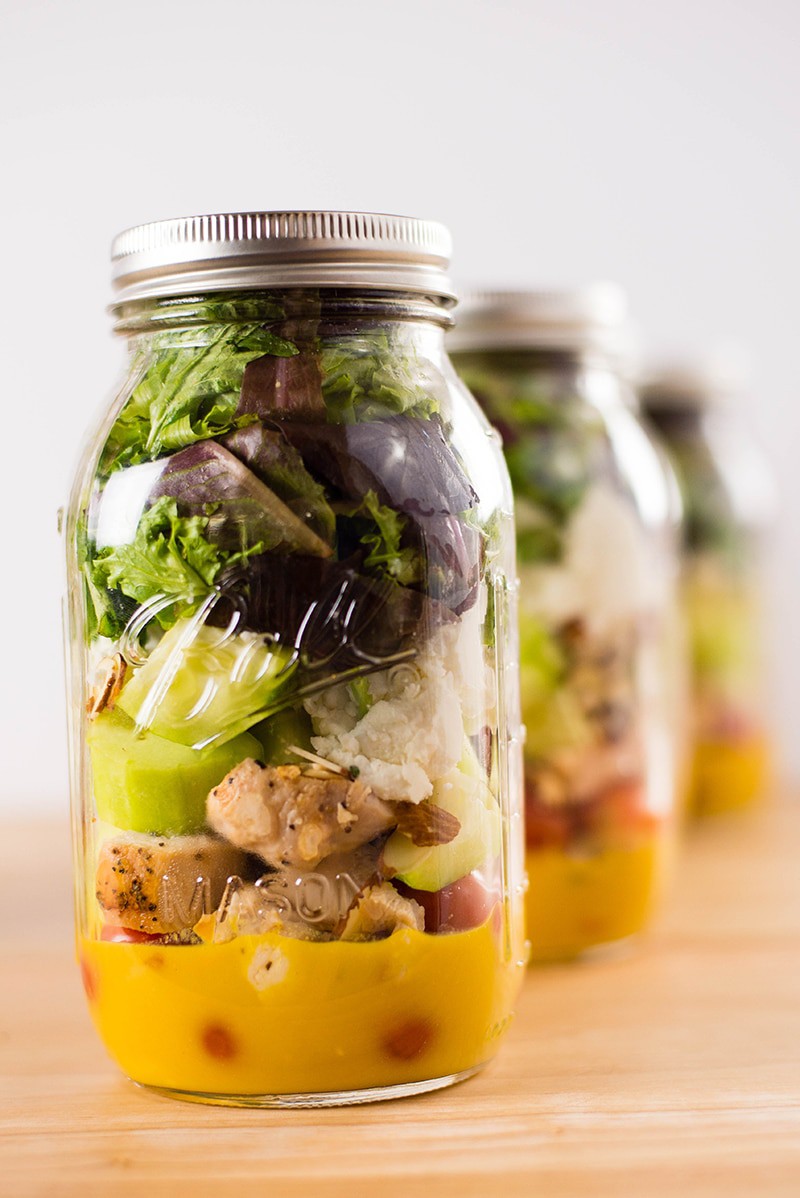 HOW DO YOU EAT A MASON JAR SALAD?
Ok, obviously, you cannot eat salad out of a jar. I mean, you could try but it won’t be easy. For sure. So, how do you eat a mason jar salad?
Well, when you are ready to eat the mason jar salad, just…
unscrew the cap; give the mason jar salad a vigorous shake to mix the dressing with the rest of the ingredients; shake the salad into a bowl or a large plate; toss to combine, as needed.Bon appetite!
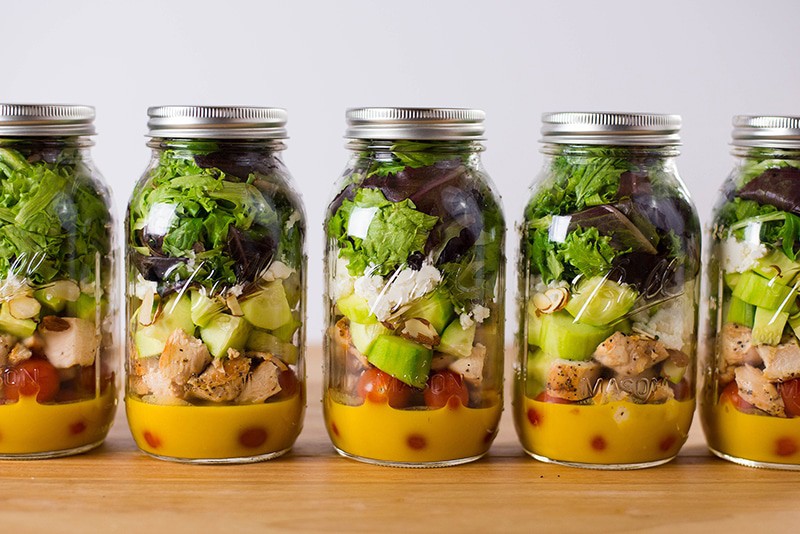
This recipe, as written, will get you through an entire work week of enjoying a tasty mason jar salad each day for 5 days!
In general, mason jar salads last for 4-5 days in the fridge if you store them properly. By that, I mean placing them in the fridge and making sure the lid is tightly sealed.
Perfect grab-and-go lunches for a week ready in less than 30 minutes!
Can I get a HECK YEA?
3 MORE HEALTHY MASON JAR SALAD RECIPESThe thing with mason jar meals is that they are so quick and easy to make they become addictive. This is what happens with all mason jar recipes. Mason jar salads included. I can guarantee! But the thing is, I don’t want you to be bored, which will happen if you make the same salad in a jar every week. So more mason jar recipes are in order then.
CHICKEN COBB MASON JAR SALADAnother great salad in a jar is this Chicken Cobb Mason Jar Salad. This salad is healthy, clean, and packed with nutrients.
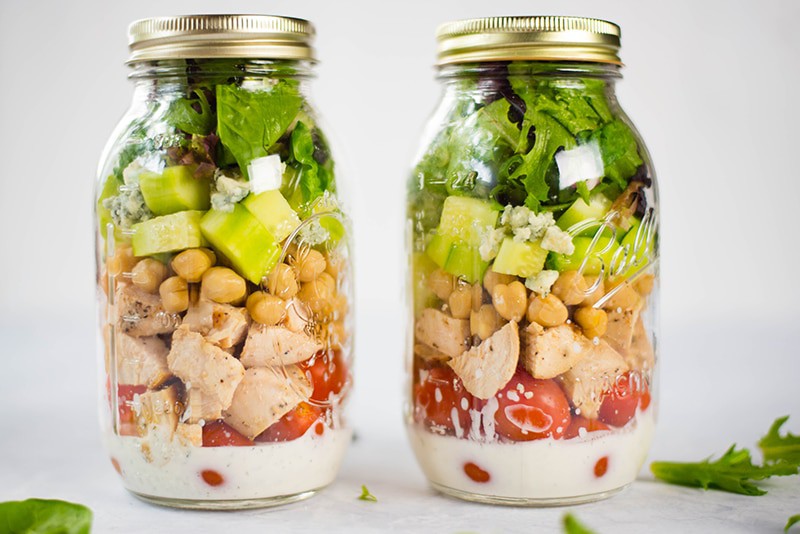
This Chicken Cobb Mason Jar Salad is a great way to transform chicken cobb salad into a grab-and-go lunch. Plus you get tips for how to make chicken cobb salads healthy. And don’t even get me started on the healthy homemade ranch dressing. It’s so good! Get the recipe.
HEALTHY TACO SALAD RECIPEIf you are a fan of Mexican food, the next salad in a jar is definitely a lunch option you’ll love. Introducing the Healthy Taco Salad Recipe.
This Healthy Taco Salad is a great way to cut down on carbs but still enjoy the amazing flavors and textures of tacos. Get the recipe.
BEET & GOAT CHEESE SALAD WITH WHITE WINE VINEGAR DRESSINGThis Beet & Goat Cheese Salad with White Wine Vinegar Dressing is the last salad in a jar of the day.
The sweet and savory Beet & Goat Cheese Salad with White Wine Vinegar Dressing is packed with protein, fiber, and vitamins and it makes a great lunch or light dinner. Get the recipe.

Add more salads into your weekly meals and make these delicious mason jar salads for the entire week in just a matter of minutes.
This post contains affiliate links for products I use frequently and highly recommend.
The post Mason Jar Salad for Meal Prep + A Killer Clean Honey Mustard Dressing! appeared first on A Sweet Pea Chef.